Ditch Those CD's! A Guide To Using USB Flash Drives
This
guide is intended to show the average PC user how to create bootable
USB Flash Drives as a replacement for rescue disks and "Live" CD's.
Article Index - Ditch Those CD's! A Guide To Using USB Flash Drives
Page 1 - Article Intro, Flash Drive Booting, Advanced USB Drive Formatting
Page 2 - Install Windows 7 or Windows Vista From A USB Flash Drive
Page 3 - Install Windows XP From A USB Flash Drive
Page 4 - Install a Linux Operating From A USB Flash Drive
or
Boot from one or more Linux Live CD's on a USB Flash Drive
Page 5 - Utility And Rescue Bootable USB Flash Drive
Page 6 - Portable Apps And USB Flash Drive PC Toolbox
Page 7 - What I Use & Other USB Info
Many utilities exist that can help you manage PC's. This can be
operating system installation, virus removal, data recovery, disk
management, etc.
In addition, there are Windows and Linux "live" CD's that allow you to
boot into Windows or Linux to perform the aforementioned, try Linux
distros, or to simply have a portable Operating System.
Why use USB flash drives (aka: thumb drives) instead of CD's? Speed,
size, and portability.
1 - USB flash drives are far faster than CD's and DVD's.
2 - USB flash drives range in sizes and currently max out at 256
gigabytes.
3 - USB flash drives are small and thus highly portable. Many Geeks
carry them on their key chains.
There are literally dozens of ways to create a bootable USB flash
drive. I'm only going to cover the ones I use.
This guide is aimed at the home user, Geeks or Geek Wanna-Be, and folks like me who are your family and friends "computer guy".
All the tools listed are free, at least for home users.
*Note - The research and testing that went into this guide has taken
several weeks. I have used every program listed (and then some) and tested them as best
I could.
I've formatted and flashed and booted up, formatted and flash..................
Tips On Buying USB Flash Drives
1 - Quality and reliability. Stick with name brands or at least well
reviewed drives. Check the reviews for the drives. Using a site like
Newegg has reviews built-in.
2 - USB flash drives range in speed and faster ones come on the market
all the time. Do a search on the product and check the manufacturers
site.
Tools Used:
Please note that all tools listed are all FREE.
RMPrepUSB
Windows 7 USBDVD Download Tool
WinToFlash
YUMI
Winbuilder Win7PE
Unetbootin
nLite
RT7Lite
UBCD4Win
ImgBurn
LiveUSB Install
SARDU
XBOOT
EasyBCD
Katana
plus a few others listed elsewhere.
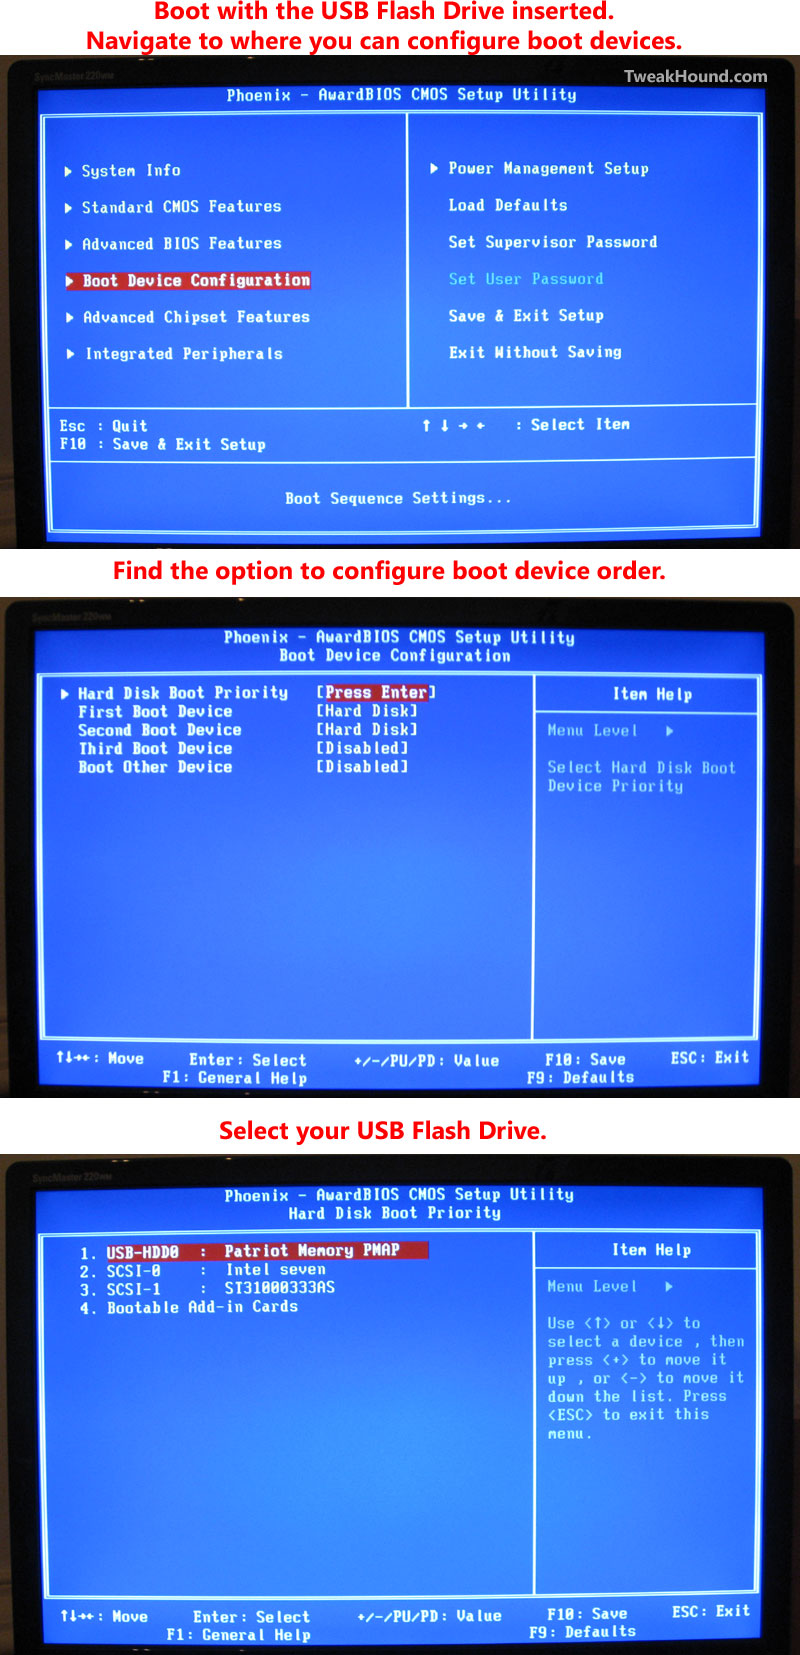
Your BIOS
You must be able to boot from a USB Flash Drive. The options for that
are in your BIOS or in some cases by hitting a key at boot.
You'll have to consult your computer manual or do a search for your particular computer on exactly how.
Below is an example from one of my computers. Click on the pic for a larger image.
Advanced USB Drive Formatting
This method allows you to delete the partition on the flash drive, make it an active partition (bootable), and format it.
I always use this method when creating bootable flash drives.
We will use the built-n Windows tool called diskpart. It's free and fast.
-Insert your flash drive.
-Open a command prompt. ( press the Windows + R keys and type cmd).
- Here are the commands in order.
1 - diskpart
2 - list disk (find the number of your flash drive)
3 - select disk X (where X is the number of your flash drive. Make absolutely sure you have the right number!)
4 - clean
5 - create partition primary
6 - select partition 1
7 - active
8 - format fs=fat32 quick
9 - assign
Next >
Page 2 - Install Windows 7 or Windows Vista From A USB Flash Drive
Tweaking Windows 7
Installing Windows 7
TweakHound's Super XP Tweaking Guide - SP3 Final
Tweaking Windows Vista
The Right Way To Install Windows XP
Installing Windows Vista
The
Freeware XP Machine
The Vista
Freeware Machine
Windows XP
Backup Strategies For Home Users
Windows Vista Backup Strategies For Home Users
Installing
Suse Linux 10.3
How To Samba With Suse 11.2 And Windows
iTunes,
iPod File Types & Quality
I use True Image 2011 for all my OS backups and Disk Director 11.0 for all my partitioning requirements.
TweakHound readers often get a discount off Acronis Products. Click the links for more info.