The Page File, SuperFetch, and ReadyBoost
***Important
About 2 years after the first release of this guide I did some major testing with the pagefile on Windows 7. Please see my article: The Windows 7 Pagefile And Running Without One. Because they know better than everyone else some folks insist on telling you that you must test your page file usage and tweak it. Of course they’ve got nothing but their say-so to back it up. You can do this if you desire but IMHO it is a complete waste of time. Based on all the actual, real-world testing I’ve done my advice is either to leave page file as is or get a lot of RAM and disable it. It is important you read the aforementioned article if you are even considering disabling the page file.
| The Crucial Memory Advisor™Select your system and press go! |
The Page File
1. The average user is best served by LEAVING THE PAGE FILE ALONE. Windows 7 does an excellent job of managing the page file settings for most people.
2. The recommendations below are not designed to give you the highest scores on a synthetic benchmark but to give you the best overall performance for your system (including stability). The size of hard drives today are huge and making the page file a little larger than it “needs” to be hurts nothing and you’re covered if you’re ever doing something that requires more.
From Microsoft:
“Page file size equal to RAM: Prior to Windows 7 the default paging file size was determined differently on different versions of Windows. But in general terms, when the paging file size was configured as “system-managed” its size would typically be calculated as RAM x (some number greater than 1) or RAM + (some number).
In Windows 7 and Server 2008 R2 the default size is equal to the amount of memory installed in the machine. Your gut reaction to this is probably the same as mine was – to get a successful complete memory dump the paging file needs to be a little larger than RAM. How much larger probably goes back to what version of Windows you are running and other factors, but 300 MB is generally considered plenty of padding for the purposes of getting a complete dump.
Not to worry. A default installation of Windows 7 or Server 2008 R2 is configured to generate a kernel memory dump and also with a system-managed paging file size. So a paging file equal to RAM is plenty. If you decide that you want to capture a complete memory dump, simply change the dump option to “Complete memory dump” and restart (be sure to leave the paging file size as system-managed). After the restart the paging file should be RAM + 300 MB. This applies to both client and server SKUs.”
ASKPERF – Windows 7 / Windows Server 2008 R2: Upgrade Paths, Registry Enhancements, Crash Dumps and Page File Sizing
One hard drive:
If you only have one hard drive or your other drives are significantly slower than your OS drive. Leave it alone.
Two hard drives:
The second drive should be near as fast or faster than the OS drive or there is no reason to do this.
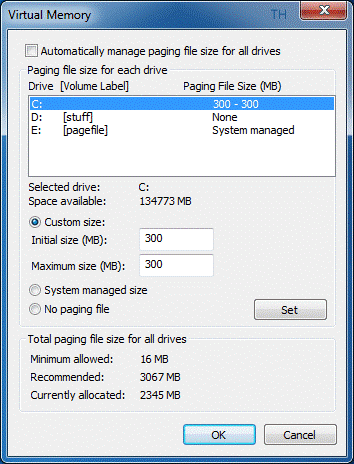
Make 2 page files, one on the OS drive, one on the first partition of the second drive. The page file on the OS drive should be at least 300MB. The second page file should be equal to the amount of RAM (physical memory) or System managed size (preferred).
***Author’s note – Based on emails I’ve received I do not seem to be making myself clear. If you have one hard drive DO NOT MOVE OR MAKE A SECOND PAGE FILE. If you have 2 drives and you make a second page file you should leave at least a small page file on the OS partition. The second page file should be on the FIRST PARTITION of the second drive.
To adjust page file settings:
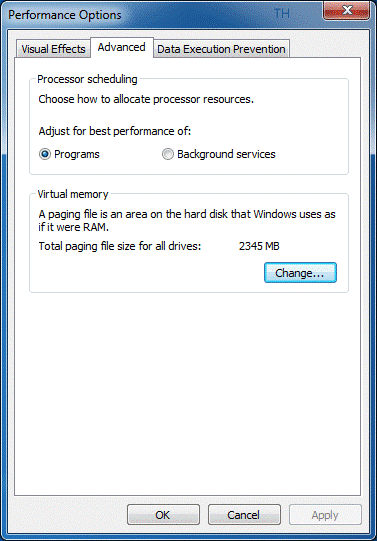
Press the Windows + Pause Break keys > in the left pane click on Advanced system settings > click on the Advanced tab > in the Performance section click the Settings… button > click on the Advanced tab . click on the Change… button. Highlight the drive you wish to work with.
Below are some examples from a system with 2GB of RAM.

2GB of RAM, 300MB pagefile on OS drive, System managed pagefile on 2nd drive.

SuperFetch (description)
My recommendation: Unless you have a fast RAID setup or SSD then don’t mess with it.
“In Windows 7, SuperFetch is automatically
enabled for disks that have a low Windows Experience Disk Score and disabled for disks that have a high score. During performance testing, you should use the default SuperFetch setting because it represents actual end-user experience. SuperFetch adds the prefetched pages to the system’s standby page list, which has been reorganized and redesigned to retain useful data in memory over longer periods of time. Both Windows 7 and Windows Vista set priorities for pages on the standby list so that historically important pages remain in memory and less frequently used pages do not. For example, the prefetched pages of a frequently used program have a higher priority than those of a recently copied file that might not be used again.”
Performance Testing Guide for Windows
and
“If the system disk is an SSD, and the SSD performs adequately on random reads and doesn’t have glaring performance issues with random writes or flushes, then Superfetch, boot prefetching, application launch prefetching, ReadyBoost and ReadDrive will all be disabled.”
Engineering Windows 7 – Support and Q&A for Solid-State Drives
One problem with the above 2 statements . I have an SSD disk (specifically the Intel X25-M Generation 2). My Windows Experience score for Primary hard disk is 7.7 (out a possible 7.9). Windows 7 did not disable the service nor adjust the registry settings. It is visible via Task Manager (SysMain) and actively using system resources. I’m interested if anyone has had Windows 7 disable this as they claim. I would also like to know what qualifies as a high “Windows Experience Disk Score” according to Microsoft.
Superfetch Improvements For Windows 7
“During Windows7 development, we made a number of improvements to how Superfetch manages memory. Many of these changes were directly in response to customer comments. At a high level, some of these improvements are as follows:
(1) Be quieter: Even though Superfetch always utilizes low-priority I/O for its memory population in order to avoid interfering with foreground activity, we found that many users get annoyed at hearing the disk activity and seeing the disk light blink. In Windows7, Superfetch is a lot more respectful of user presence.
(2) Be more selective: In Windows7, Superfetch still populates the OS cache with frequently-accessed data from the disk and prioritizes RAM contents, but the underlying algorithms have been improved over Vista. As a result, Superfetch now typically prefetches a smaller, but more relevant volume of data from the disk and prioritizes memory more effectively.
Overall, our results (from a number of users over weeks) indicate that disk activity due to Superfetch is significantly lower in Windows7 compared to Vista while system responsiveness is much improved due to fewer hard page faults from the pagefile and other files.”
Mehmet Iyigun – Principal Development Lead at Microsoft
To Disable Superfetch simply disable the service:
Press the Windows + R keys > type services.msc > double-click on the Superfetch service > set Startup type to disabled then Stop the service or reboot.
Use ReadyBoost
Why: You need more physical memory
Why not: Not needed if you have enough memory
ReadyBoost is:
– a quick way to add additional memory to your system by using an external USB flash drive or flash card.
ReadyBoost is not:
– a replacement for an adequate amount of system memory.
– a replacement for the page file (it works in tandem with it).
Windows 7 features – ReadyBoost
How Do You Use It?
Plug in a USB flash drive of flash card > Open up Computer > right-click on the drive that you want to use and choose Properties > click the ReadyBoost tab > click Use this device > optionally choose how much of the device to use.
*tip – Use a USB port in the back of your computer. Yep, I broke a drive sticking out of the front when I bumped into it (dooh!)
Microsoft – Turn ReadyBoost on or off for a storage device (with instructional video)

