 A reader wanted to know if I had changed what was on my System Repair Flash Drive from previous articles here, and here.
Those were from 2011, 2012. So, yes it has changed.
[Read more…] about My System Repair Flash Drive
How-To's
Upgrade To Win10 And Keep Previous Windows Version
 I’m going to show you how I upgraded to Windows 10 and kept my Windows 7 install. I alluded to this method earlier. Although not tested this should work for Windows 8.1 too.
I searched the Windows 10 EULA and I can find nothing that restricts this but I’m not a lawyer either.
[Read more…] about Upgrade To Win10 And Keep Previous Windows Version
Tweaking Windows 10
************ This version is now expired. Updated version here: https://www.tweakhound.com/2021/05/19/tweaking-windows-10-version-21h1/
TweakHound’s

Tweaking Windows 10
Windows 10 April 2018 Update
A guide to tweak and optimize Windows 10.
Updated for Windows 10 April 2018 Update. Lasted edited 05 June, 2018
***Note, 15 November 2018. Guide will not be updated for the October Update.
Release 1809 does not have enough significant changes to warrant a rewrite.

tweak – to change slightly, esp. in order to make something more effective or correct.
optimize – get the most out of, make optimal – modify to achieve maximum efficiency in storage capacity or time or cost
“TweakHound.com – Home Of The Original Tweak Guides”
Table of Contents
Introduction
Mobile-First, Cloud-First, Touch-First
Bad Tweaks
Notes & Ramblings
My Desktop Pet Peeve
First Things First
Get Your Control Panel Icons Back
UAC
God Mode
Tips For This Guide
Settings For User Accounts
Account Types
Local An Microsoft Accounts Defined
Switch To A Local Account
Using The Windows Store With A Local Account
How To Login Automatically
Libraries
Moving Your User Folders
Adding A Folder To A Library
Show Libraries In Windows Explorer
Customize The Desktop
Start Menu Settings
Start Menu Groups
The Win + X Menu
3rd Party Start Menus
Display Settings
Personalize
The Taskbar
The Search Box
The Task View And Touch Keyboard Buttons
Toolbars
The Clock
Disable System Sounds
Customize Folder Options
Folder View Options
Optimize Folders
The Page File, SuperFetch, and ReadyBoost
The Page File
SuperFetch
ReadyBoost
Miscellaneous Tweaks
Turn Off App Recommendations
Turn Off Autoplay
Remove Ads From Windows Explorer
Windows Defender
Shortcut Keys For Windows 10
Windows 10 Power Options
Power Plans For Laptops
Windows 10 Fast Startup
Disable Fast Startup
Windows Mobility Center
Add a Windows Mobility Center shortcut to your desktop
Windows 10 Networking
Sharing
Home Networking Tips
Windows 10 Network Tweaks
Windows Backup And Recovery Options
Reset this PC
System Restore
Accessing Windows Recovery Settings Offilne
Windows 7 Backup
File History
Recovery Media
Uninstalling Unneeded Stuff
Optional Windows Components
Windows Apps
Maintaining Your Computer
Receiving Updates When Available
Checking for problems and fixing them
Windows 10 Troubleshooter
Administrative Tools
Reliability Monitor
Event Viewer
Generate A System Health Report
Task Manager
Clean, Defrag, & Optimize
Disk Cleanup
Advanced Disk Cleanup
Disk Cleanup Freeware
Manage Startup Items with Autoruns
Defrag & Optimize
Windows 10 Privacy Settings (part of the guide but in different location)
Windows 10 Services
 Yeah, I know Win10 fires up a lots of services. Lots of folks are in a hurry to disable services. I get it. Back in the Windows XP days this could make a big difference. With todays wicked fast PCs and Win10s fantastic memory management, this is no longer the case.
[Read more…] about Windows 10 Services
Windows 10 Backup And Recovery Options
Win10: Customize The Desktop
 This is part of the upcoming Windows 10 Tweak Guide. Since this section is finished and you guys have been so patient I thought I would post it.
[Read more…] about Win10: Customize The Desktop
Windows 10 Privacy Settings
************ This version is now expired. Updated version here: https://www.tweakhound.com/2020/12/30/tweaking-windows-10-version-20h2/
Windows 10 Privacy Settings
A companion guide for:
TweakHound’s

Tweaking Windows 10
Version 4.0, last edited 17 May, 2018
Windows 10 Privacy Settings
Page 1 – Intro, Windows Insider Program, Use A Local Account
Page 2 – Windows 10 Built-In Privacy Settings
Page 3 – Telemetry, Cortana
Page 4 – Update & Security, Windows Defender
Page 5 – Services, Microsoft Browsers
Page 6 – Remove Ads And Annoyances
Page 7 – Apps To Tweak Privacy Settings
Windows 10 does a lot of communicating with Microsoft servers. Many people find this to be somewhere between an annoyance to an outright invasion of privacy. Some folks suspect it’s even worse than that. For its part, Microsoft steadfastly insists that they do not invade your privacy, that any information sent back to Microsoft is “anonymous”, and that it is for your own good. I will leave it up to you to decide.
This section will show you your privacy options, the settings I use, and 3rd party apps that can help you configure your settings.
It should be noted that turning off some settings can hamper the ability of some built-in and Microsoft Store apps to function properly. Since I don’t use these things I haven’t run into a single issue.
Windows Insider Program
This is a neat program for those that want updates before everyone else or Geeks that live on the bleeding edge. It also sends the maximum amount of data back to Microsoft. If privacy is a concern, then don’t use this.
More info: https://insider.windows.com/
Use A Local Account
If you are using a Microsoft Account and privacy is a concern you should switch to a Local Account. Be warned you will lose syncing. If this is important to you then skip this.
More info: http://windows.microsoft.com/en-us/windows-10/getstarted-microsoft-account
Let switch to a Local account:
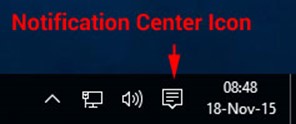
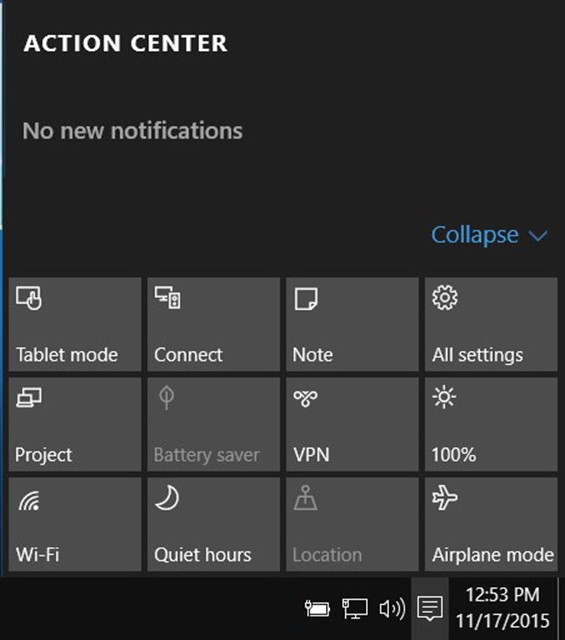
Choose All settings
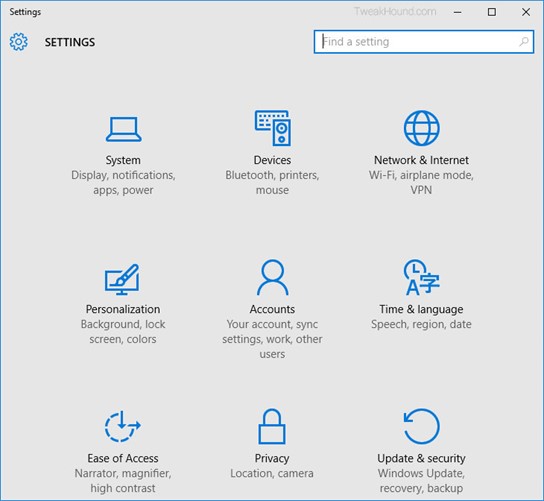
Choose Accounts
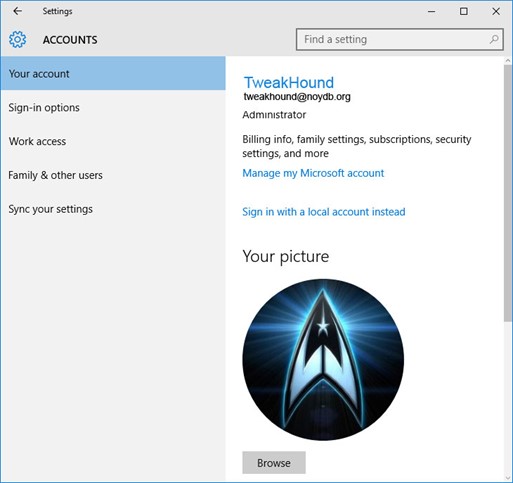
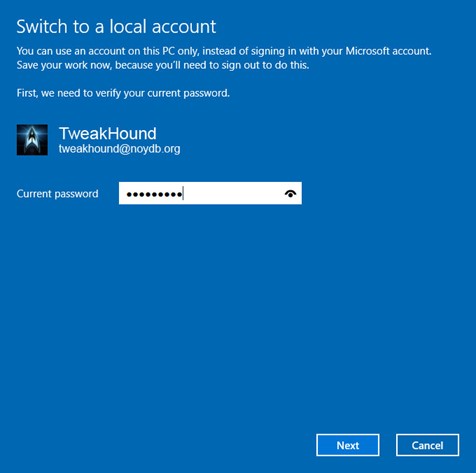
Choose Sign in with a local account instead
Enter current user password
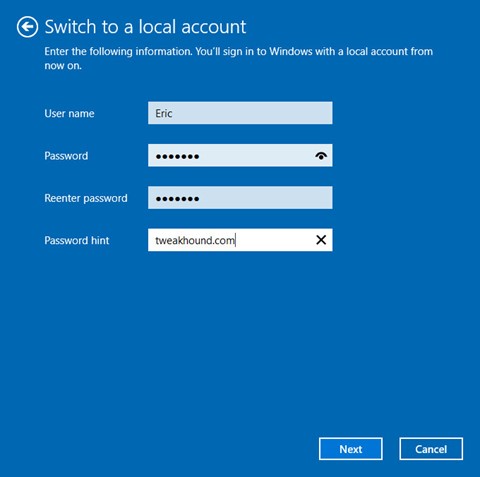
Enter the new User name, Password, and Password hint.
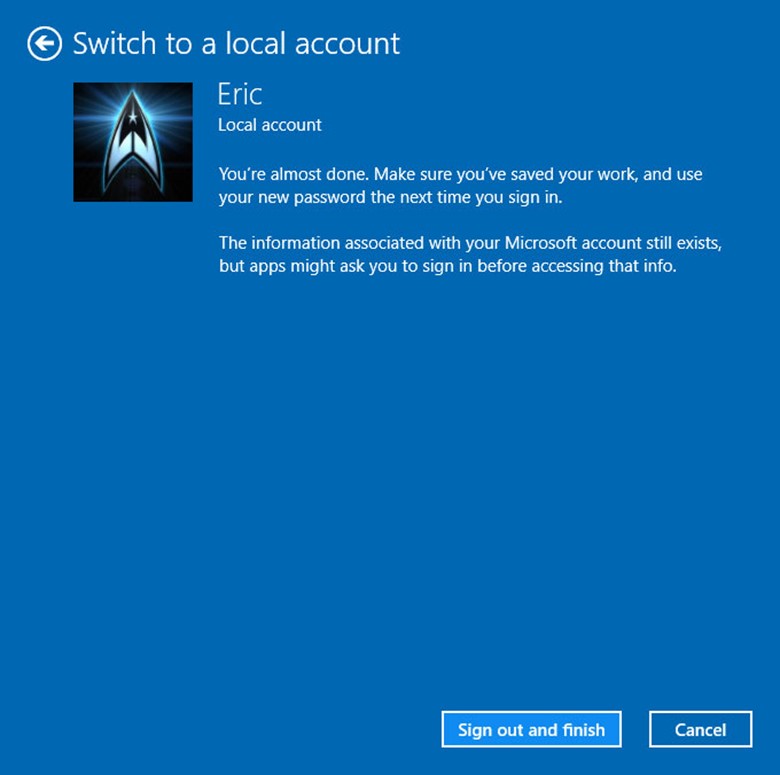
Sign out and finish.
Download Windows 10 TH2 ISO And Create Media
 Go to the Windows 10 download page.
Scroll down to the Download Tool Button and click it.
![]()
Once downloaded, double-click MediaCreationTool.exe.
[Read more…] about Download Windows 10 TH2 ISO And Create Media
openSUSE Leap 42.1 Tips, Tricks, and Tweaks
 This article IS NOT FINISHED. I’m preoccupied with other stuff but folks have been asking for this so I thought I would show what I’ve got.
[Read more…] about openSUSE Leap 42.1 Tips, Tricks, and Tweaks
Dual Boot openSUSE Leap and Windows 10 UEFI
This is how I dual-boot my Windows 10 rig with openSUSE Leap.
This article is virtually unchanged from: Dual Boot openSUSE 13.2 and Windows 8.1 UEFI
Notes:
– BACKUP your computer with a disk image before attempting this!
– Please do not contact me with questions on this topic.
That’s what the openSUSE forums are for.
– For how I dual-boot with a standard BIOS (legacy) see here: Dual-Boot openSUSE 12.3 And Windows (article is NOT compatible with BTRFS)
Interesting Links
openSUSE:UEFI
BCD System Store Settings for UEFI
Dual booting with Windows 8, not as painful as expected.
Preparation
1 – Full disk image backup using Acronis True Image.
2 – Make or leave unpartitioned space on OS drive for openSUSE. (If you can’t do this without a tutorial, well…..)
3 – Make UEFI boot usb flash drive with Rufus.
Installation
Pardon the odd screenshots. I used Vmware player for this article.
I should note that I am not a believer in using multiple partitions for my Linux installs.
Boot up, go through setup until you get to the partitioning section.
I do not use BTRFS and I always use Create Partition Setup…
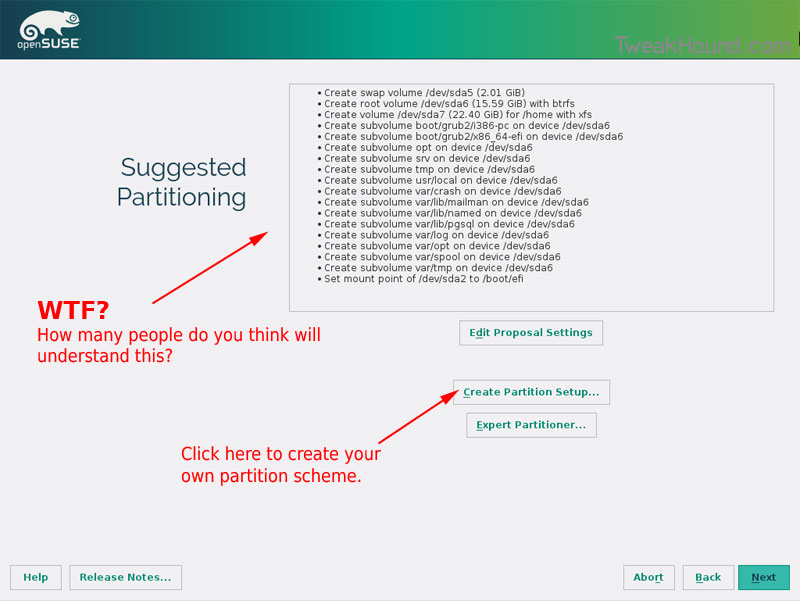
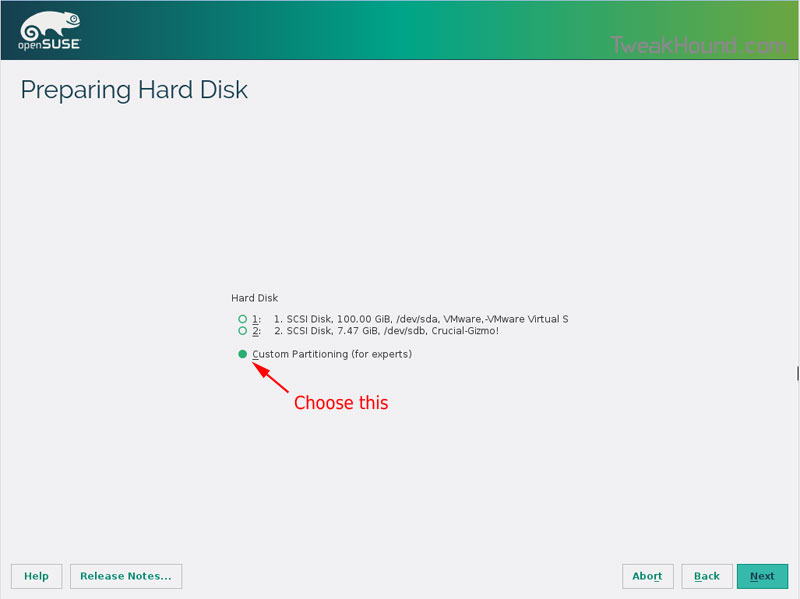
Choose Custom Partitioning (for experts) and click Next
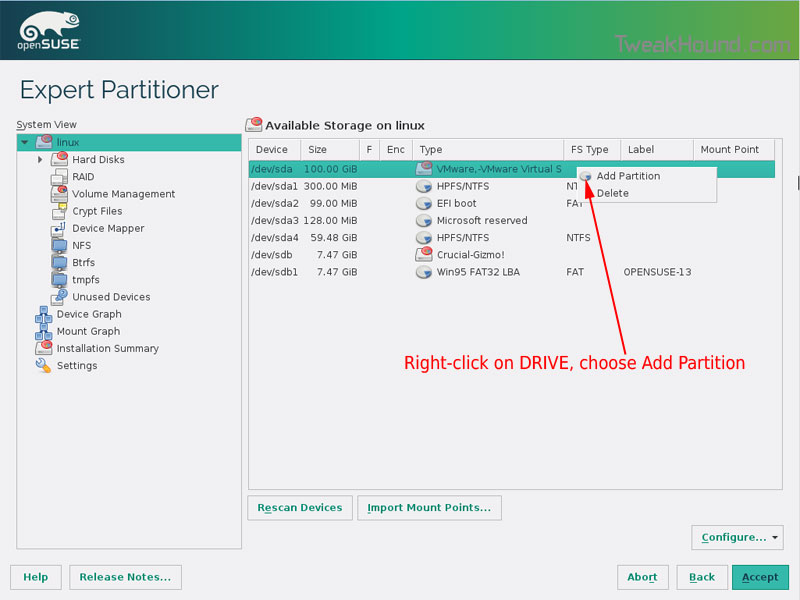
Right-click on the DRIVE where you want to install openSUSE and choose Add Partition
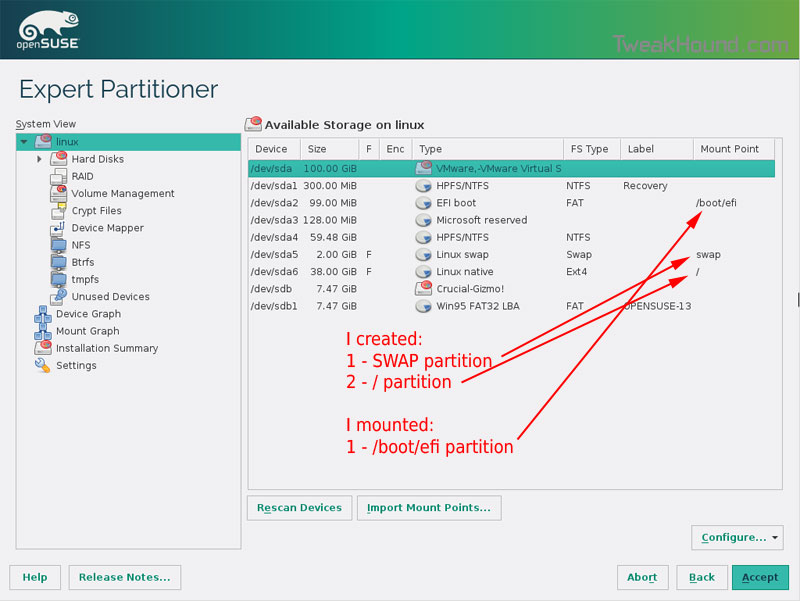
Make a swap partition, 2-4GB is fine.
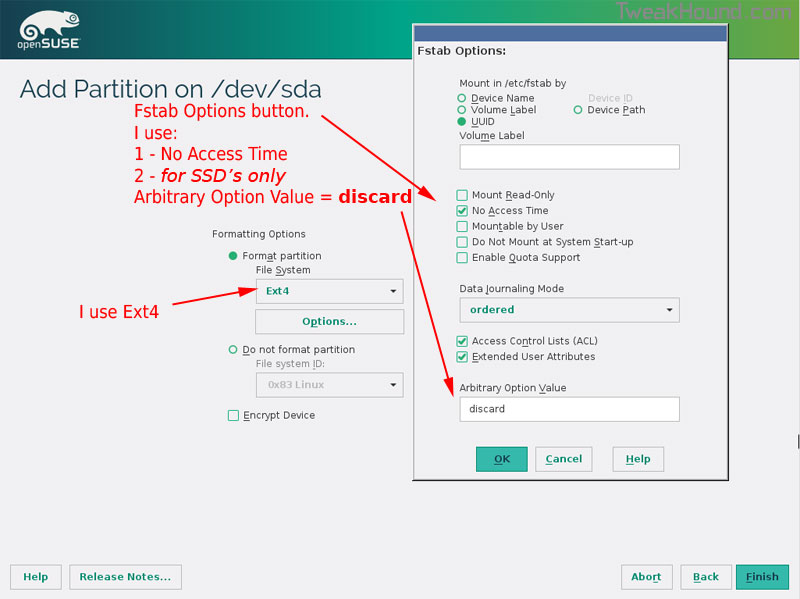
Below are the options I use. Ext4 for file system, noatime, discard* (=trim)
*note – I am not using discard at the moment because it was causing errors on my Samsung 850 Pro SSD.
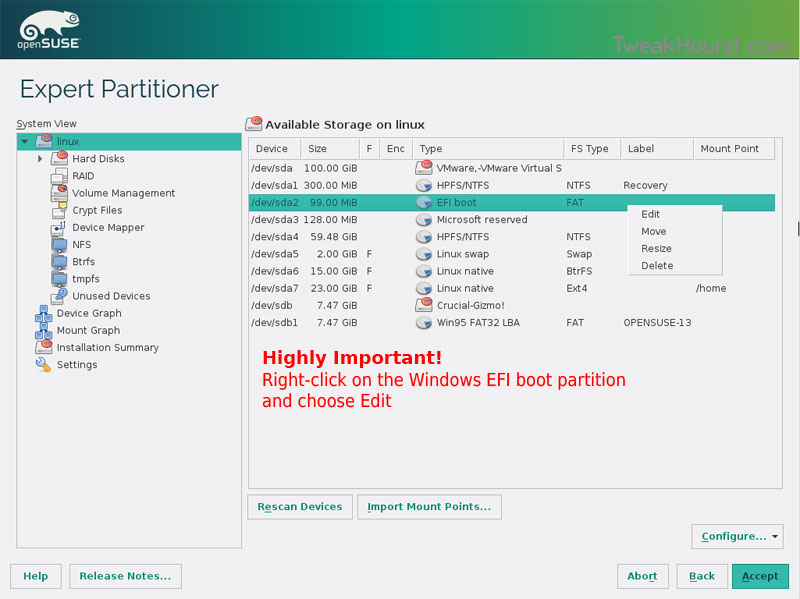
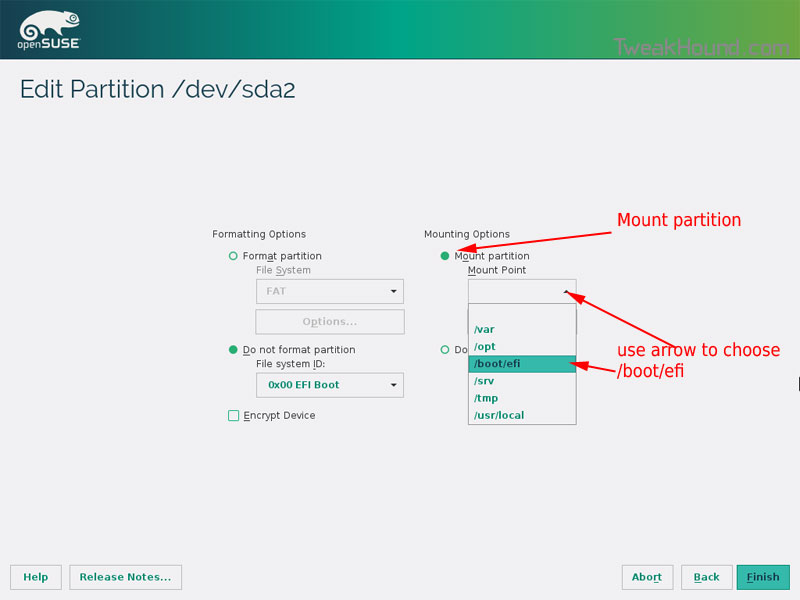
This next step is critical as your system will not boot without it.
Right-click on the Windows EFI boot partition and choose Edit
Choose Mount partition
Choose /boot/efi
Click Finish
Done? click Accept
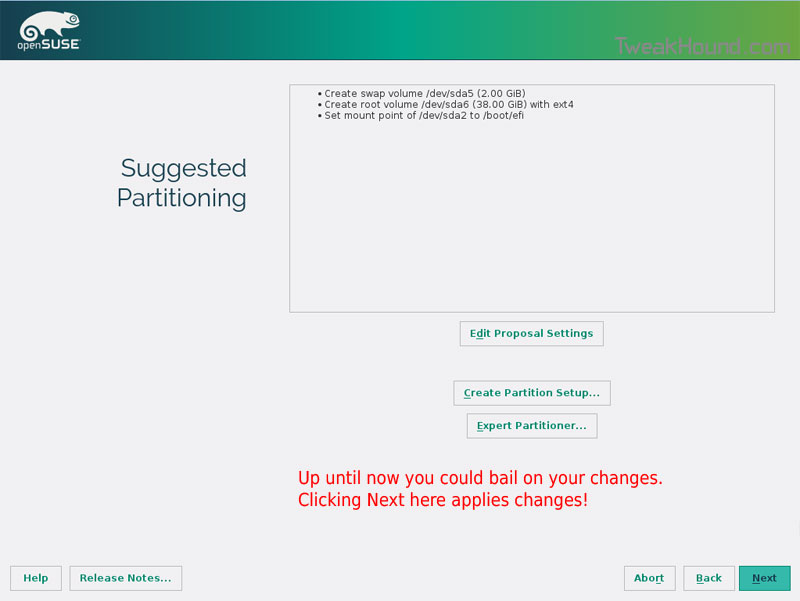
Last chance to bail…
Click Next
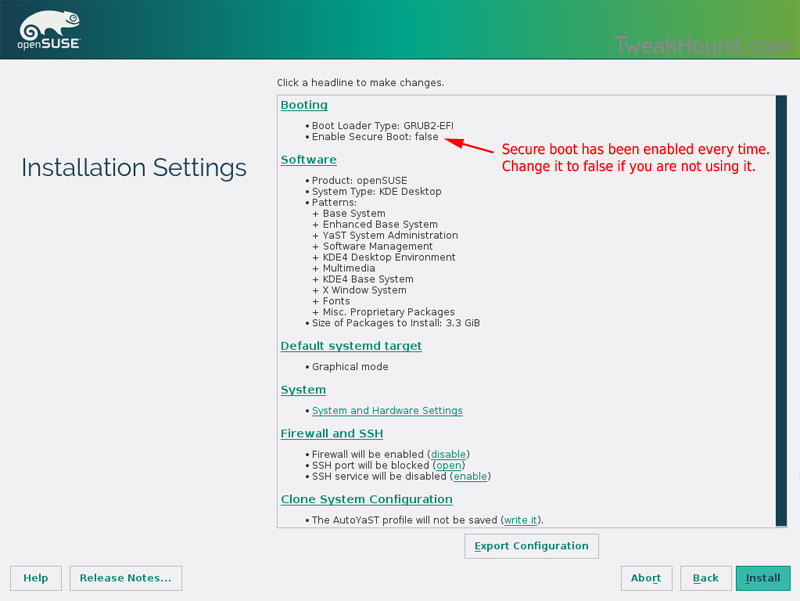
I don’t use Secure Boot. It can be disabled here:
Boot Screen:
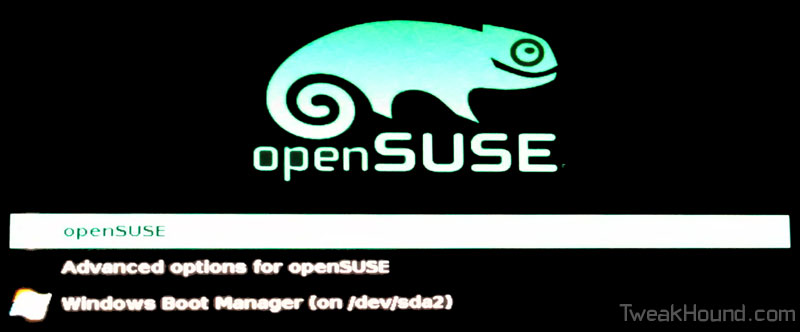
Everything should run just peachy until you boot into Windows again.
Windows will usually try and make its bootloader default again which means openSUSE isn’t an option.
While in Windows, open an Elevated Command Prompt and copy/paste this command (source):
bcdedit /set {bootmgr} path \EFI\opensuse\shim.efi
That’s it!