 You know all the “definitive lists” or “master lists” of Windows 7 shortcuts you see posted around the web?
[Read more…] about <sarcasm> Super Duper Top Secret Windows 7 Shortcuts Collection <⁄sarcasm>
Computer stuff...

 You know all the “definitive lists” or “master lists” of Windows 7 shortcuts you see posted around the web?
[Read more…] about <sarcasm> Super Duper Top Secret Windows 7 Shortcuts Collection <⁄sarcasm>

(last edited 31 December, 2020)
The following is a list of Windows tweaks that either do not work, do not work as advertised, or that are better left alone.
Many of these once worked in some version of Windows and virtually every tweak guide and program use or has used these tweaks. My guide also used to contain some of them. It has taken a considerable amount of research and testing to come to these conclusions. While others have incorporated these into other guides and tried to pass it on as their own work I’ve done the investigation and benchmarking (and AFAIK I was the first to publish these en masse on the web). I’ve Googled up one side of the net and down the other. Sometimes I think I’ve seen every page at Microsoft. I’ve hosed installs, applied and removed settings, and spent more time tracking the registry than I care to admit (far more than I would like my wife to know about!).
The original version of this guide was part of my XP Tweak Guide.
*edit – 31 December, 2020
As of this writing, this article is somewhere around 15 years old. Links to sources have disappeared. I updated the links today, mostly to the Internet Wayback Machine archive. I’ve also backed up these sources to PDF and have linked to those where appropriate.
Programs to look out for.
Memory Optimizers (or any program that has one)
I’ve long railed against these things. The only thing that these programs can do is harm real system performance. My advice, stay away from any “memory optimizer” programs. Don’t believe me? How about taking renowned Windows guru Mark Russinovich’s word for it? In his article entitled “The Memory-Optimization Hoax, RAM optimizers make false promises“(archive | PDF) he lays out the argument better than I ever could. His conclusion is that these programs are “fraudware” and he has “yet to see a RAM optimizer that lives up to any of its claims.” Nuff said!
One-Click Optimizers
Many programs contain a single-click option to “maintain” or “optimize” your system. Like any tweaks there isn’t a one-size-fits all solution in these categories.
Registry Cleaners
These programs may be of use to those who know what they are doing to fix problems. The problem is people use this for some sort of a performance tweak (which it isn’t) and then run into problems like Windows or programs becoming unresponsive or not working as expected.
Tweaking Programs
Tweaking programs are fine for customizing Windows and adding functionality.
When it comes to performance tweaks it has been my experience that almost all of these programs over promise and under deliver.
Many of these programs use the Bad Tweaks listed below.
The Pagefile
Disabling the pagefile is not a performance tweak.
Please see my article The Windows 7 Pagefile And Running Without One for more on this.
The Bad Tweaks will be divided into 7 sections:
1 – Tweaks that can actually harm performance.
2 – Tweaks that are misrepresented as performance tweaks.
3 – Tweaks that aren’t needed.
4 – Tweaks that don’t work.
5 – Bad tweaks specific to Windows 8
6 – Other bad tweaks.
7 – Bad SSD Tweaks.
Section 1 – Tweaks that can actually harm performance.
Tweaks listed in this section should be avoided.
Any tweaking programs that use these tweaks should be avoided.
—
Memory Tweaks
You want a bona fide, 100% guaranteed memory tweak?
Get at least 4GB’s of RAM!
Further reading on this topic:
Pushing the Limits of Windows: Physical Memory (PDF)
Pushing the Limits of Windows: Virtual Memory (PDF)
Inside the Windows Vista Kernel: Part 2 (PDF)
Windows does a fine job of managing memory and has improved with every version.
To my knowledge no reputable source has ever produced a real-world benchmark that shows the tweaks in this section improve performance.
Note to XP and Vista users – Windows Vista has far better memory management than does XP. Windows 7 has better memory management than Vista. From what I have seen from Windows 8 its memory management is going to be awesome.
Tweak – Any tweak that involves any part of:
HKEY_LOCAL_MACHINE\SYSTEM\CurrentControlSet\Control\Session Manager\Memory Management
As you may have guessed this key and its sub-keys involve how Windows handles memory. You do not need to mess with these settings. Windows does an excellent job of handling memory (especially Windows 7).
More info on the keys is here: http://technet.microsoft.com/en-us/library/cc976130.aspx
These tweaks often include but are not limited to:
1 – DisablePagingExecutive
Often referred to as: Disable Paging of Kernel.
Under all but the most very extreme circumstances it does nothing. What this setting does is force Windows to keep the kernel (the core of the operating system) in RAM. This means that the kernel will reside in the fastest storage area in your computer. Sounds great right? Guess what? Windows does this anyway unless the system comes under such an extremely heavy load that it needs the space. The very millisecond that the system has free memory, it will put the kernel right back into RAM. If the system is in such dire straits that it needs to use the space that the kernel is using I would say you are on your way to a crash and you better let whatever wants the space have it. You also better add more memory ASAP.
Oh, and by-the-way – Some of the kernel cannot be forced out of RAM.
2 – LargeSystemCache
Often referred to as: Large System Cache
This setting is also achieved by going to:
XP- Start > Settings > Control Panel > System > Advanced > Performance Settings > Advanced > Memory usage = System Cache.
Vista / 7 – System Properties > Advanced > Performance (settings) > Processor scheduling > Adjust for best performance of > Background services
Under Windows this tweak could be of some value under various odd circumstances. However, it causes problems with many drivers/hardware/applications.*** This tweak is really designed for machines running as a server. If you use this tweak and have problems don’t be whining at the driver/application writers for writing code that takes advantage of the way Windows uses memory. They didn’t ask you to turn your machine into a server.
***This tweak is known to negatively affect ATI video cards, storage devices, and several benchmark applications amongst other things.
—
Prefetch and Superfetch Tweaks
Avoid any tweak that involves Prefetch or Superfetch.
*Important – This applies only to computers with hard drives and does not apply to SSD’s.
Info on Prefetch and Superfetch:
Inside the Windows Vista Kernel: Part 2 (PDF) (applies to Vista and 7)
Windows XP: Kernel Improvements Create a More Robust, Powerful, and Scalable OS (applies to XP) (PDF)
Popular tweaks involve altering the following key(s):
HKEY_LOCAL_MACHINE\SYSTEM\CurrentControlSet\Control\Session Manager\Memory Management\PrefetchParameters
“EnableSuperfetch”
“EnablePrefetcher”
“EnableBootTrace”
Tweaks may also involve disabling the Superfetch service via services.msc.
First, I fail to see where any advantage is gained by messing with the prefetch settings. While disabling the prefetch service (or only using setting 1 or 2) can speed boot times it only hurts overall system performance.
Most tweak guides and popular tweaking programs use a setting of “5″. There is no documentation to suggest that this setting works. MS states that valid values are 0,1,2,3 and that this setting is “anded”. The default value is “3″. I tested using a setting of “5″ on 3 occasions and there was no real improvement in boot times and hard drive activity was longer at boot.*
Prefetching is a good thing, leave it alone. In addition well written disk defrag utilities such as Raxco’s Perfect Disk use the layout.ini information for its optimizations.
Clean The Prefetch Folder
As stated above, Prefetching is a good thing, leave it alone. In addition well written disk defrag utilities such as Raxco’s Perfect Disk use the layout.ini information for its optimizations. There is one possible and optional exception to this, see the ”Clean, Defrag, Optimize ” section of this guide for more info.
It still amazes me that anyone suggests messing with Prefetch / Superfetch settings and files. They often quote their own “benchmarks” as a source of info as to why you should mess with the settings. I’ve spent over 10 years researching, using, testing, and tweaking XP, Vista, and 7. I can guarantee you that the default settings for Prefetch and the way Windows manages it is the way to go. Anyone who suggests otherwise simply does not understand the process.
—
Optimize Boot Files
This tweak is usually only mentioned for XP.
There are 3 keys related to “tweaks” about optimizing boot files:
1:
[HKEY_LOCAL_MACHINE\SOFTWARE\Microsoft\Dfrg\BootOptimizeFunction]
“Enable”=”N”
Quote from MS:
“Accepted values for this entry are Y or N. If the entry is set to Y, Windows automatically optimizes the file location for boot optimization. This optimization occurs automatically if the system is idle for 10 minutes. Boot optimization improves startup time by locating startup files in contiguous clusters on the volume, reducing the movement of the disk head when reading the volume.”
2:
[HKEY_LOCAL_MACHINE\SOFTWARE\Microsoft\Windows\CurrentVersion\OptimalLayout]
“EnableAutoLayout”=dword:00000000
Found in TweakUI under the “General” section, “Optimize hard disk when idle”. XP already does this by default but this key is not in the registry. Either you or some application has to put this key in. The key exists so that a non-Windows disk defragger can manage the process.
3:
[HKEY_LOCAL_MACHINE\SOFTWARE\Microsoft\Windows NT\CurrentVersion\Prefetcher]
“BootFilesOptimized”=dword:00000001
First and most important, as far as I can tell this is an informational key, not a program setting key. Second, lets say it does change the program behavior, the default is to have XP optimize the boot files. So, why wouldn’t you want this? Third, if you use a 3rd party defrag program it may/will modify or delete this value. Changing the existing settings may/will screw things up.
These keys have NOTHING to do with how the full/manual disk defragmenter works, as in when you run the Windows GUI disk defragmenter program******, this despite what many XP “experts” have opined. XP is set up by default to:
1 – Rearrange boot files when idle for a period of time (10 minutes).
and
2 – To do a “partial defrag” of files every 3 days (what bootvis does).
The “rearrange” part is where it finds all the files needed for boot and places them in one spot on the disk. (Prefetch value 1)
The partial defrag is where it does the same thing for all the items in the prefetch folder layout.ini file. (Combines Prefetch value 1 (boot) and 2 (apps) = value 3)
For best performance leave these settings alone, these are features not bugs. Well written disk defrag utilities such as Raxco’s Perfect Disk may/will adjust these settings because it is now managing your drives defragmenting process.
******Actually you could but it would involve using command line switches. ( defrag c: -b )
Section 2- Tweaks that are misrepresented as performance tweaks.
Open 16-bit apps in separate space
OS – All Windows non-server versions (32-bit)
Often listed as a performance tweak.
The “tweak”:
HKEY_LOCAL_MACHINE\SYSTEM\CurrentControlSet\Control\WOW
“DefaultSeparateVDM”
(PDF)This is not a performance tweak. The key is there to keep 16-bit apps from crashing your computer.
—
Disable UAC
This is not a performance tweak. I’ve benchmarked it on and off and seen no difference in scores or memory use.
Section 3 – Tweaks that aren’t needed.
This section involves tweaks that IMHO(in my humble opinion) do not need to be applied.
Tweak – NtfsMftZoneReservation
Often referred to as: Disable MFT Fragmentation
HKEY_LOCAL_MACHINE\SYSTEM\CurrentControlSet\Control\FileSystem
“NtfsMftZoneReservation”
This sets the MFT zone to a static size (usually maximum).
This setting is designed for servers and you will only find it referenced at Microsoft as such.
While this setting can cut down on fragmentation (as in splitting the MFT) it does not keep the MFT itself from becoming fragmented (which defrag handles).
Personally I view this as a non-issue for home users but it won’t hurt performance.
Section 4 – Tweaks that don’t work.
NtfsMemoryUsage=2 Tweak
See here.
—
QOS bandwidth Tweak
Dispelled in XP (PDF). Why are we still even talking about this?
Correcting Some Incorrect Claims About Windows XP QoS Support
There have been claims in various published technical articles and newsgroup postings that Windows XP always reserves 20 percent of the available bandwidth for QoS. These claims are incorrect. The information in the “Clarification about QoS in End Computers That Are Running Windows XP” section of this article correctly describes the behavior of Windows XP systems.
—
Superfetch In XP
There has been much ado of late about the existence of a ” Superfetch ” or ” Superprefetch ” setting. There is no such setting in XP.
—
Always Unload Dll’s
[HKEY_LOCAL_MACHINE\SOFTWARE\Microsoft\Windows\CurrentVersion\Explorer]
“AlwaysUnloadDLL”=dword:00000001
This tweak has been around since the XP days and still appears as a Vista and 7 tweak.
Here is the first and most important point. I can find no evidence whatsoever that this setting works in Windows XP.** In fact, the only official Microsoft technical documentation I can find on this is here (PDF). It clearly and unequivocally states,
“For operating systems prior to Windows 2000, you can shorten the inactive period by adding the following information to the registry.
HKEY_LOCAL_MACHINE Software Microsoft Windows CurrentVersion Explorer AlwaysUnloadDll”
** Registry monitoring tools JV16, Regworks, and Regmon were used. I can find no evidence that this key was EVER accessed.
For arguments sake, let’s just say that this setting does work in XP. Windows XP uses a complex and efficient process to manage memory operations. It keeps the dll loaded in case you need it again. For example, if you open XYZ and then close it the dll remains in memory. If you open XYZ again it will launch quicker because the dll is already in memory. When/if XP needs the space in memory for something else it will make the space by unloading the dll(s) that aren’t being used. If this setting actually did work, you have hurt your overall performance because you unloaded a dll when it didn’t need to be and caused the system to have to load it again when called upon.
note – For those who state that this tweak would only work in IE. The key is “Explorer” as in the shell, not “InternetExplorer” the browser. Also, whether you make a new key, sub key, entry, or any combination makes no difference.
—
Set Irq Priority
[HKEY_LOCAL_MACHINE\System\CurrentControlSet\Control\PriorityControl]
“IRQ8Priority”=dword:00000001
I can find no documentation that XP supports this setting. I can find no evidence that this setting works in XP.** If it did work I fail to understand any advantages you might gain. I’m not even sure if it’s possible to reassign IRQ priorities in this manner XP and if you could I’m pretty sure that this key wouldn’t be how you do it (XP uses/accesses/manages IRQ’s differently than previous versions of Windows).**** They use irq 8 because it’s (usually) the CMOS/real time clock.
** Registry monitoring tools JV16, Regworks, and Regmon were used. I can find no evidence that this key was EVER accessed.
****see the MS document Scheduling, Thread Context, and IRQL
—
IoPageLockLimit
[HKEY_LOCAL_MACHINE\SYSTEM\CurrentControlSet\Control\Session Manager\Memory Management]
“IoPageLockLimit”=dword:somevalue
I can find no official documentation on this regarding XP. Suggestions seem to indicate that this setting doesn’t work on any NT based OS from W2K SP1 and beyond. I can find no evidence that this setting works in XP.**
** Registry monitoring tools JV16, Regworks, and Regmon were used. I can find no evidence that this key was EVER accessed.
—
Increase Number Of Cores At Boot
A.K.A – /numproc tweak
See:
Tweaking Myth: Decrease boot time with msconfig (PDF) (pity his motivation was a guide that came out years after mine!)
Section 5 – Bad tweaks specific to Windows 8
—
Windows 8 SSD Tweaks
Windows 8 does not need any SSD tweaks.
Please see my article Windows 8 SSD Settings, Etc.
—
NtfsDisableLastAccessUpdate
[HKEY_LOCAL_MACHINE\SYSTEM\CurrentControlSet\Control\FileSystem]
“NtfsDisableLastAccessUpdate”=dword:00000001
NtfsDisableLastAccessUpdate Windows 8 default is now 1. Tweak not needed for Windows 8.
—
WaitToKillServiceTimeout
[HKEY_LOCAL_MACHINE\SYSTEM\CurrentControlSet\Control]
“WaitToKillServiceTimeout”=”5000”
Windows 8 has changed the default value to 5000 which is what we tweakers have been doing for years!
Cheers to Microsoft for following our lead! 😉
Tweak not needed.
Section 6 – Other bad tweaks.
Tweaks you may not want to use and why.
Disable Search Indexing
This applies to Windows 7 and 8 only.
OK, most people agree that Indexing in XP and Vista sucks. Go ahead a disable it for XP and Vista if you desire. But for Windows 7, you know the handy, dandy Start Menu Search Box? Yup, disabling Indexing renders it useless. Configuring Indexing to suit your needs is a better option:
Type indexing in the Start Menu Search Box and choose Indexing Options (Control Panel > Indexing Options) > Click the Modify button to add or remove folders.
—
Disable System Restore
Folks, if you do not have an alternative 3rd party backup and use it regularly then please don’t disable this. You may need it to get out of trouble.
If you do have a reliable 3rd party backup program then go ahead and disable it (I do). I use Macrium Reflect.
—
The noguiboot (no GUI Boot) Tweak
See my article here.
—
Disable IPv6
A.K.A – Internet Protocol Version 6 (TCP/IPv6)
For many users this is an essential component. HomeGroup, VPN, DirectAccess and other parts of the operating system use this.
You should keep ipv6 enabled even if your ISP doesn’t provide ipv6 connectivity yet.
“The Argument against Disabling IPv6
It is unfortunate that some organizations disable IPv6 on their computers running Windows Vista or Windows Server 2008, where it is installed and enabled by default. Many disable IPv6-based on the assumption that they are not running any applications or services that use it. Others might disable it because of a misperception that having both IPv4 and IPv6 enabled effectively doubles their DNS and Web traffic. This is not true.
From Microsoft’s perspective, IPv6 is a mandatory part of the Windows operating system and it is enabled and included in standard Windows service and application testing during the operating system development process. Because Windows was designed specifically with IPv6 present, Microsoft does not perform any testing to determine the effects of disabling IPv6. If IPv6 is disabled on Windows Vista, Windows Server 2008, or later versions, some components will not function. Moreover, applications that you might not think are using IPv6 such as Remote Assistance, HomeGroup, DirectAccess, and Windows Mail could be.
Therefore, Microsoft recommends that you leave IPv6 enabled, even if you do not have an IPv6-enabled network, either native or tunneled. By leaving IPv6 enabled, you do not disable IPv6-only applications and services (for example, HomeGroup in Windows 7 and DirectAccess in Windows 7 and Windows Server 2008 R2 are IPv6-only) and your hosts can take advantage of IPv6-enhanced connectivity.” Support for IPv6 in Windows Server 2008 R2 and Windows 7 (PDF)
—
Enable HPET
See Timer Tweaks Benchmarked
– – –
ProfilesDirectory
See: Ed Bott – Don’t move your Windows user profiles folder to another drive (PDF)
As you know I’ve always advocated moving your My Documents / Libraries folder to a drive or partition. The method I’ve always suggested is using the Microsoft supported method of using “Move”. See: Move Your Libraries
It seems somewhere there are tweaks being posted that involve moving your Profile folder using the ProfilesDirectory setting. The downside of using this unsupported tweak is “Using this setting to redirect folders to a drive other than the system volume blocks upgrades.” as folks who used this tweak and tried to upgrade to 8.1 just found out. See the article listed above for more info.
Section 7 – Bad SSD Tweaks.
—
* Windows 8 does not require any SSD tweaks. See section 5 above.
—
The following was originally posted in my article SSD Tweak Guide (sort of). Some of this repeats info from above.
These are tweaks that are either unnecessary, don’t do anything, or hurt performance.
Many of these are based on the misguided assumption that the SSD will wear out quickly.
True, SSD’s are only good for so many writes (unless they are DRAM). But, the number of writes an SSD is good for is, well, astronomical.
Let’s take this quote from Anandtech (PDF) :
“Intel estimates that even if you wrote 20GB of data to your drive per day, its X25-M would be able to last you at least 5 years. Realistically, that’s a value far higher than you’ll use consistently.” This was written August, 2009 and SSD lifespans are getting better all the time.
Truth be told you’ll most likely move on to a new computer before you wear out your SSD.
For example: I have an Intel X25-M SSD (80GB). As of this writing it is approximately 16 months old. It has had 2 firmware updates. It has had installed on it: Windows 7 Home & Ultimate, openSUSE 11.2 & 11.3 , many Virtual Machines, and more programs than you can shake a stick at. Because of this and all the testing I do it has been restored from an image dozens of times. It has also been beat on by numerous benchmark tests. To this date I haven’t seen any loss in performance.
1 – Disable The Pagefile.
What better place for a pagefile than on an SSD?
Yeah, I know, folks are always saying disabling the pagefile is a tweak. I’ve covered this topic many times over the years (look around my site). Windows (all versions) were designed to use a pagefile. Many programs you may use count it too. BTW, Windows is going to page some stuff to your disk anyway if it needs to. Just leave the pagefile alone.
If you want to optimize it then see: Pushing the Limits of Windows: Virtual Memory (PDF) (personally I think it’s a waste of time).
2 – Disable Indexing
OK, most people agree that Indexing in XP and Vista sucks. Go ahead a disable it for XP and Vista if you desire. But for Windows 7, you know the handy, dandy Start Menu Search Box? Yup, disabling Indexing renders it useless. Configuring Indexing to suit your needs is a better option:
Type indexing in the Start Menu Search Box and choose Indexing Options (Control Panel > Indexing Options) > Click the Modify button to add or remove folders.
3 – System Restore
I know, this was listed in the Optional SSD Tweaks For Windows section above. I put it here for those who didn’t bother to read it. Please do.
4 – Turn Off Windows Write-cache Buffer Flushing on the Device
Yup, this was in the Optional SSD Tweaks For Windows section too. Read it please.
5 – NtfsMemoryUsage=2 Tweak
See my NtfsMemoryUsage=2 Tweak article.
6 -Disable LargeSystemCache
HKEY_LOCAL_MACHINE\SYSTEM\CurrentControlSet\Control\Session Manager\Memory Management
“LargeSystemCache”=dword:000000000
Um, it’s not enabled by default anyway?!
7 – Uninstall Remote Differential Compression
What the? Well, OK, it’s a useless feature for home users and should be uninstalled anyway. But how this ever got listed as an SSD tweak is beyond me. System Resources tweak, OK. Network tweak, maybe. SSD tweak, not.
Conclusion
I’m sure some will argue with my conclusions. I’m always looking for information about new tweaks and why tweaks either do or do not work. I will entertain arguments about this information but I will require a few things:
1 – You must submit documentation for your argument from a legitimate source. In matters involving the registry it should be from Microsoft or from some entity of equal weight.
2 – I hear things like “my benchmarking” and “my tests”. That, to be quite frank, is a load of crap. What “benchmarks”? What “tests”? Any benchmarks/tests used in your argument must be fully documented. They must also be able to be replicated and if your argument has any merit, I will attempt to do just that. If it can’t be replicated it fails the scientific method and the argument is null. I’ve already benchmarked/tested these settings extensively.
I know this sounds rather harsh but I get email from people wanting to argue this without anything to back up their argument.
-END-

The Freeware XP Machine
&
The Windows 7 Freeware Machine
Have both been updated.
[Read more…] about Freeware Machine Articles Updated

Microsoft has issued an important out of band update for XP, 2K3, Vista, 2K8, and 7.
Simply run Windows Update to install it.
Microsoft Security Advisory (2607712)
[Read more…] about Out Of Band Windows Update

How to use Windows 7’s Backup and Restore.
[Read more…] about Backup Using Windows 7 Backup And Restore

Windows 7 has the ability to create a System Image.
[Read more…] about Using Windows 7 System Image

Lots of updates available that patch 22 vulnerabilities. Updates available for XP, 2K3, Vista, 2K8, and 7.
Microsoft Security Bulletin Summary for August 2011

 This is an updated and reformated version of Installing Windows 7 (previously found here)
Installing Windows 7
A start-to-finish, step-by-step guide to properly installing Windows 7.
created 15 October, 2009
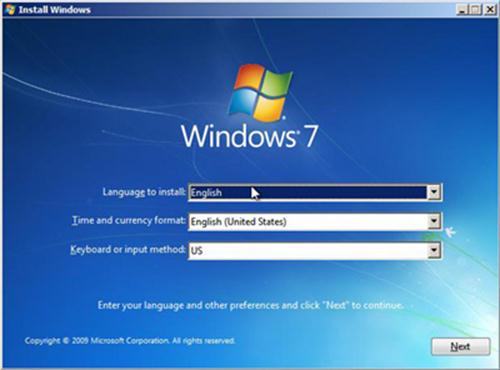
Please read through this entire guide before doing anything.
If you do not have Windows 7 Service Pack One on your install DVD you can get it here:
Windows 7 SP1
If you want to download refreshed Windows 7 SP1 ISOs you can get them here:
Download Windows 7 Disc Images (ISO Files)
1 – Download all your drivers.
To find out all the specifics of your computer and its hardware download Speccy and run it (I just use the portable version).
You can get the drivers from the website of the manufacturer of you computer and/or hardware (Google is your friend).
If you cannot find a specific Windows 7 driver for your hardware then download the latest one for Vista (it is possible it may work).
Once you’ve got them all, burn them to a CD and/or a USB drive.
2 – Backup any and everything you may want that is currently installed on the computer. This means to a location other than the computer that 7 is to be installed on. For a few suggestions on how look here for Windows Vista, and here for Windows XP.
3 – Optional but highly recommended, Wipe the target installation drive. No self-respecting Geek would ever do an upgrade install to a new OS (previous to Win10). If you insist on doing an upgrade then skip this step. I usually use an Acronis Disk Director boot disk for this but there are other tools available. Please note, I do not recommend using any method other than the installation disk to format the drive. I’ve heard scattered reports of problems using other methods. For UEFI systems I prefer to wipe the drive and then let Windows do its thing on install.
This is for non-UEFI systems:
My preferred method is to backup all my files to an external hard drive (this is what I have). Then boot computer with either an Acronis Disk Director boot disk or UBCD4Win disk. Once I boot these up I delete and wipe the partitions, then create new ones (ensure the partition you install 7 on is an active partition). I format the partitions again from the Windows 7 disk during the install.
Advanced users who aren’t afraid of the command line see Windows 7 Installation Advanced Drive Formatting below.
*Avoiding the 200MB partition: Folks have discovered that on an unpartitioned drive Windows 7 will create a 200MB system partition. This is easily avoided by creating a partition before attempting to install Windows 7 (see above). (for some this partition will be 100MB)
*Bitlocker requires this partition. (thanks to eaglewind for the tip!)
TrueCrypt is a better alternative.
**Exception for SSD drives to avoid the 200MB partition and partition / format the drive.
Partitioning is a little different for SSD (Solid State Drives). This is because of something called NTFS partition alignment. Basically this refers to where on the drive the partition starts. Vista and 7 will create a single partition optimally for SSD’s. XP and most program boot disks will not. If possible you should partition the disk under an already installed Windows 7 or Windows Vista machine and then proceed with the usual installation steps. If not then this is the way to do it:
Windows 7 Installation Advanced Drive Formatting
1 – Boot up from the Windows 7 installation disc.
2 – Choose Repair your computer.
3 – In the System Recovery Options screen, choose Use recovery tools… and click Next.
4 – Open the Command Prompt.
5 – Type diskpart and hit Enter.
6 – Type list disk . Find the disk you wish to install Windows 7 on. If you only have one disk then it will show as disk 0. If you have multiple disks find the drive you wish to install 7 on.
7 – Type select disk 0 (or use the number of the disk you wish to install Windows 7 on)(note – that is a zero)
8 – Type list partition. There shouldn’t be any.
9 – Type create partition primary.
10- Type select partition 1.
11- Type active.
12- Type format quick.
13- When finished reboot and begin your installation.
( DiskPart Command-Line Options )
*The above section must have really been good. It has been ripped off around the web.
Example of diskpart (click on thumbnail for a larger image)
Please note: This is for a single partition setup. If you need multiple partitions on the SSD then you can shrink the Windows 7 partition after you install.
More info on Windows 7 and SSD’s:
Engineering Windows 7 – Support and Q&A for Solid-State Drives
Windows 7 Enhancements for Solid-State Drives (ppt slides viewed thru Google cache)
MUST READ! Anandtech SSD article #1 and article #2.
3a – How I Partiton My Hard Drives
BIOS (non-UEFI) System
Single disk system – Operating System on first partition – Docs (libraries) on the second partition made from the remaining space.
Multi-disk system – OS on first drive – Docs (libraries) on second – Other drives for storage.
Multi-disk system (advanced) – OS on first drive – Second drive, a second Page File on the first partition (only if it is as fast as the OS drive), Docs (libraries) on second partition – Other drives for storage.
UEFI System
Single disk system – Recovery on 1st partition, EFI on 2nd partition, Operating System on 3rd partition – Docs (libraries) on the second partition made from the remaining space.
The rest as above.
4 – Consider hardware upgrades.
– Memory – Get +2GB for Windows 7 32-bit, 8GB (of more) for 64-bit. Speccy (linked to above) can tell you what kind of memory your system has, look under the Hardware > Memory section.
– Video Card – A 1GB (or more) card would put you in excellent position to enjoy Windows 7. A good place to start looking for which card to buy would be AnandTech. Check their Guides / System Buyers Guides and pick your price range. For the more high end minded folks, you can check [H]ardOCP and AnandTech for those reviews and recommendations (good computer hardware advice can also be found in their forums).
– Hard Drive – Get rid of it. At least for the OS drive. SSDs are wicked fast and are cheap. As of this writing I prefer Samsung and Crucial SSD’s.
*You can do the above upgrades yourself. They are not complicated, can be done in a few minutes, and usually involve little more than a screwdriver. Take your time and read the guides that come with the hardware (we Geeks call that RTFM). If that guide leaves you confused simply do a Google search, i.e. “how to install a hard drive”.
5 – Clean The Inside Of Your Computer. As anyone who works on others computers can tell you, the inside of a computer can get quite nasty. I’ve worked of computers that have left me sneezing and longing for a shower. Cleaning your computer can reduce heat inside the box allowing it to last longer (heat is the enemy of a computer). Bleepingcomputer has a good guide.
6 – Download the following Windows Update:
KB3102810 Installing and searching for updates is slow and high CPU usage occurs in Windows 7 and Windows Server 2008 R2
I want you to install this after you install your drivers and BEFORE you run Windows Update.
Installing Windows Seven
Installing Seven is almost idiot proof. I will show just a few select screenshots. Pop in the DVD and let’er rip. The few questions you have to answer are straight forward.
Partition Sizes: Officially listed as 16 GB available hard disk space (32-bit) or 20 GB (64-bit). I would recommend 30 GB as a good size for a partition, more if you have the space. Remember once multiple partitions are set up, it is easier to make the partition larger than you think you need at the beginning and shrink it than it is to make a minimum size partition and have to enlarge it later. (please see How I Partiton My Hard Drives above for how I do my partitioning)
Clean Install ( I recommend using these steps regardless to whether or not you have a full or upgrade disk)
You cannot do a clean install from an upgrade disk.
There are several workarounds. See: Paul Thurrott – Clean Install Windows 7 with Upgrade Media
I would recommend doing it as he describes in Method #1:
1 – Wipe drive/partition (see above for partitioning recommendations)
2 – Install Seven. If using an upgrade disk, DO NOT ENTER YOUR KEY
3 – If using an upgrade disk. On first boot,install your drivers then run Windows Update until there are no more updates.
4 – In the start menu search box type activate , enter your key and then activate Windows.
Choose Upgrade or Clean Install.
To do a clean install click on Custom (advanced).
As stated above I highly suggest a clean install. See the backup warnings???
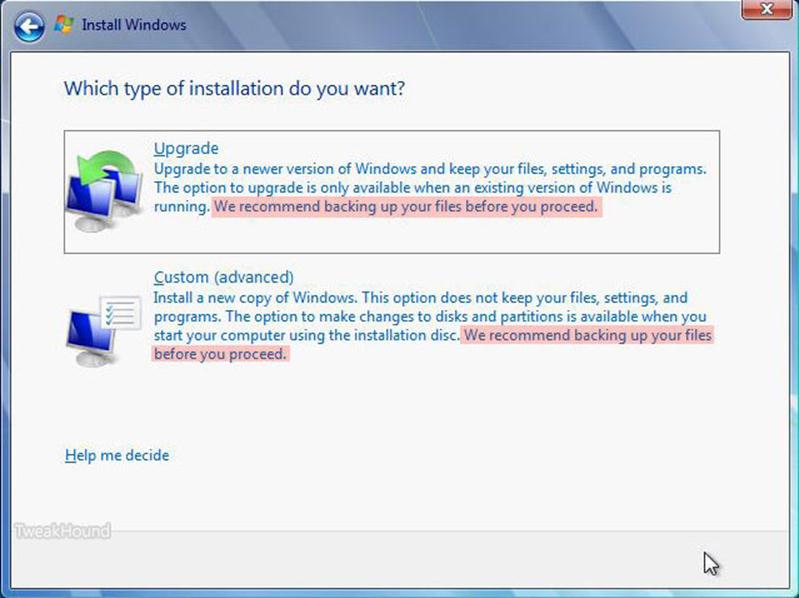
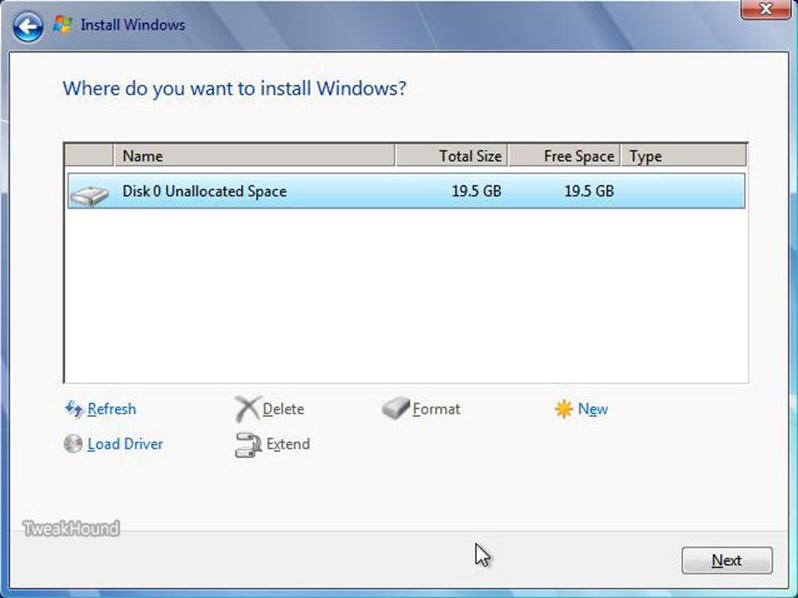
Click on Drive options (advanced) to be able to format your partition.
Got RAID or is your disk not showing up? Click Load Driver.
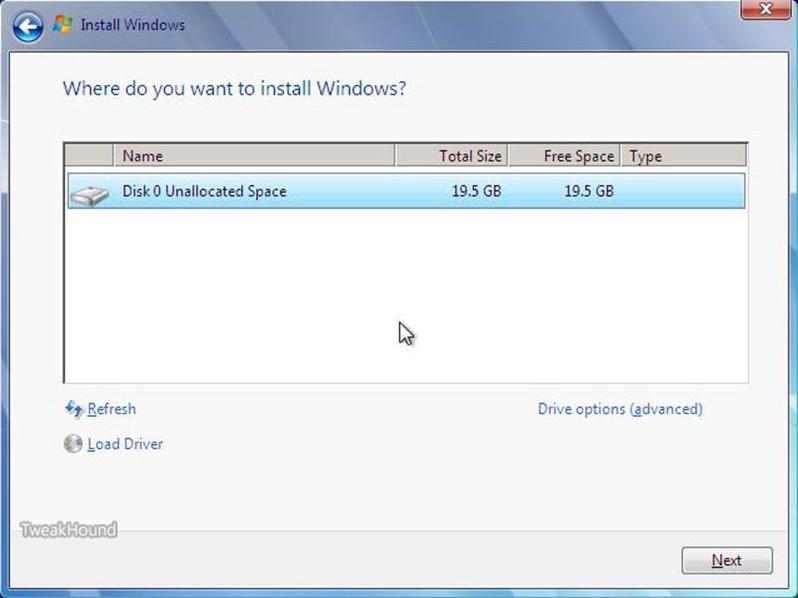
Here are your drive options.
See above for partition recommendations (I’ve got 19.5 here because the screenshots were taken from a virtual machine).
You should at least format the partition.
First Boot
If you are going to disable UAC the do so now (see below for how).
Uninstall stuff you aren’t going to use.
Open the Control Panel:
– From the default screen – Go to Start > Control Panel > Programs > Uninstall a program > Turn Windows Features on or off
– Better option, switch view to Large Icons (look on the upper right of the Control Panel window for “View by:” Then go to Programs and Features > Turn Windows Features on or off.
– Fastest way – Press the Windows + R keys and type appwiz.cpl > Turn Windows Features on or off.
Deselect (uncheck) things you don’t want. What is available depends on the edition of 7 you have. If you see something listed here that isn’t in your list don’t worry, you don’t have it. I choose to uninstall:
-Games (all)
-Print and Document Services (all) (careful, check out the individual parts)
-Remote Differential Compression
-Tablet PC Components
-Windows Search (only if you aren’t going to use indexing)
Click OK and then reboot if prompted
Install Drivers
tip #1 – To quickly access Device Manager, hit the Windows + R keys and type devmgmt.msc
tip #2 – In Device Manager, if an item has an exclamation icon then it needs a driver.
The order I use to install drivers is:
-Chipset
-RAID and/or other drivers involving storage
-Graphics
-Sound
-LAN
Setup Advanced Cleanup
Press the Windows + R keys, type cleanmgr /sageset:50 .
Select the options you desire, I choose them all. Click OK and close out the window.
Press the Windows + R keys, type cleanmgr /sagerun:50 .
(note – there is a space between the r and the /)
See HERE and HERE for more on this.
* You can use this command at any time for regular disk cleanups. I use the number 50 because it is easy to remember, you can use any number you want.
*tip – this works in Safe Mode too.
Windows Update
Above I said to download the following Windows Update:
KB3102810 Installing and searching for updates is slow and high CPU usage occurs in Windows 7 and Windows Server 2008 R2
Install it now and reboot.
Now Run Windows Update. Deselect everything and install Internet Explorer 11 there and reboot.
Block Windows 10 upgrade (GWX) related nonsense by using GWX Control Panel. Run it now and reboot.
Now run Windows Update and keep running it until all Critical Updates are installed and any Optional Updates you want are installed. Updated drivers may be available too.
Optional – After all critical updates are installed Run Windows Update but do not install anything. Close Windows update then run my script here:
https://www.tweakhound.com/2015/11/01/remove-and-block-gwx-in-windows-7-2/
Then Run Windows Update again and install any/all optional updates
Backup – Make An Image (I used an Acronis TI Boot Disk)
(please note I did not say install a backup program (yet). Both Acronis True Image and Norton Ghost have the ability to make boot disks)
Install Your Programs
***Very important.
If you intend to disable User Access Control (UAC) as I have then you should do this BEFORE YOU INSTALL ANY PROGRAM. Not doing so can lead to problems later.
To Disable UAC:
– Type or copy and paste UserAccountControlSettings.exe into the Start menu search box.
– In the resulting window, move the slider all the way to the bottom.
– Reboot
PAY ATTENTION to what you are installing (in other words, don’t keep clicking Next). Don’t install more than you need. Don’t install toolbars or let it change your home page either. Decide what apps you want to do what. For instance:
I use Winamp Lite (and I use a very basic install for that) as the Default for playing .wav and .mp3 files because it opens faster and with a smaller footprint than say Windows Media Player or iTunes. Also, I have no application launching when I insert a music CD or DVD either.
Major Applications
I recommend you install the major applications first (i.e. anti-virus, software firewalls, Office, and the applications that come with your hardware). Always use the custom or advanced installation method and pay attention to the options screens. I install all the applications to the same drive as the OS. That is because I use backup program, and use it often! Pick and choose the parts you install carefully. If you don’t install it. Avoid allowing anything that isn’t necessary to “load at startup.” As you install each application, download (if you haven’t already) and install all updates and patches before you move on to the next application. I prefer to load my backup program first and make an image before I go further. The very next thing I install is anti-vrus software.
Minor Applications
Next install the minor applications (Sound, graphics, utilities, etc.) Check for the most recent versions first. Before you install them, decide which applications you want to perform what. If you have multiple applications that can do or play the same thing, decide which you prefer. For example; I have Windows Media Player, Winamp, MediaMonkey, and iTunes all wanting to be the default player for many of the same files. If not configured properly, they will fight for dominance. Giving each player it’s own default settings doesn’t mean you can’t ever play it in another application. After you install each application, open them and double check configuration settings, some applications don’t play nice!
Use cleanmgr /sagerun:50 again!
Move Your Libraries
This is a critical step in the way I set up computers. A problem free backup / restore process depends on you having your docs, music, pics, etc. on a drive or partition other than the one Windows 7 is on. Using this method you do not have to worry that some issue (virus, crash, hardware failure, etc) will mean losing your data.
How To Move Windows 7 Libraries
Decide where you want to move these to.
A second disk is your best option but in a single disk system a second partition will do.
Right-click on your User Name in the Start Menu and choose Open.
Select the libraries you wish to move and copy / paste them to the new location.
Pick the stuff you wish to be safe from any problems.
I would do at least: Contacts, Downloads, My Documents, My Music, My Pictures, My Videos.


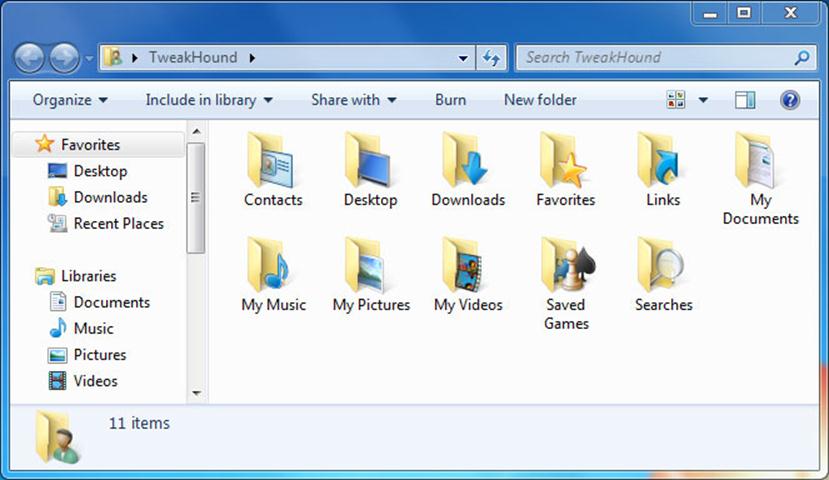
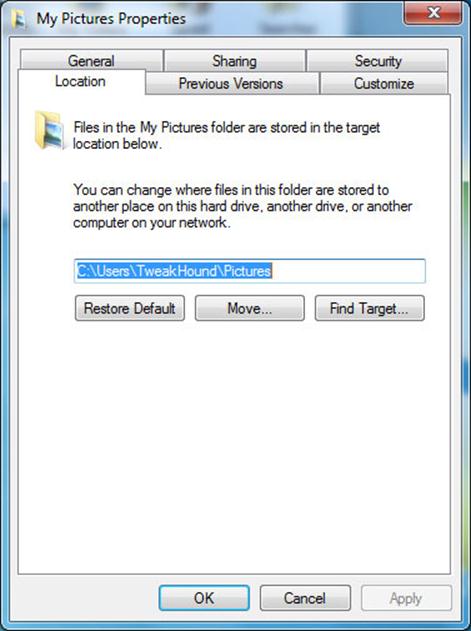
Once you have finished copying the files. Go back to the original Library, right-click on each folder you moved.
Choose Properties from the menu. In the resulting window, click on the Location tab, and then the Move… button.
Browse the the location you copied the files to.
Click once on the folder you want it moved to and then click the Select Folder button (bottom right of the screen).
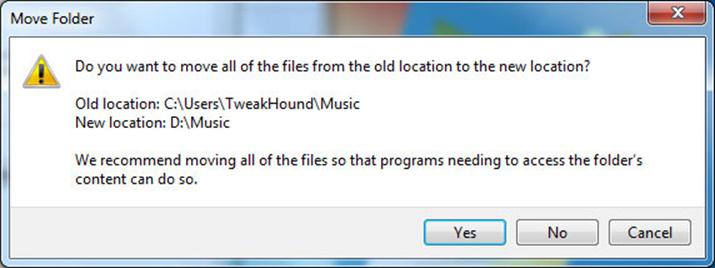
This screen will pop up. Click Yes.
Repeat this step for all the folders you copied.
Add new folders to your Library
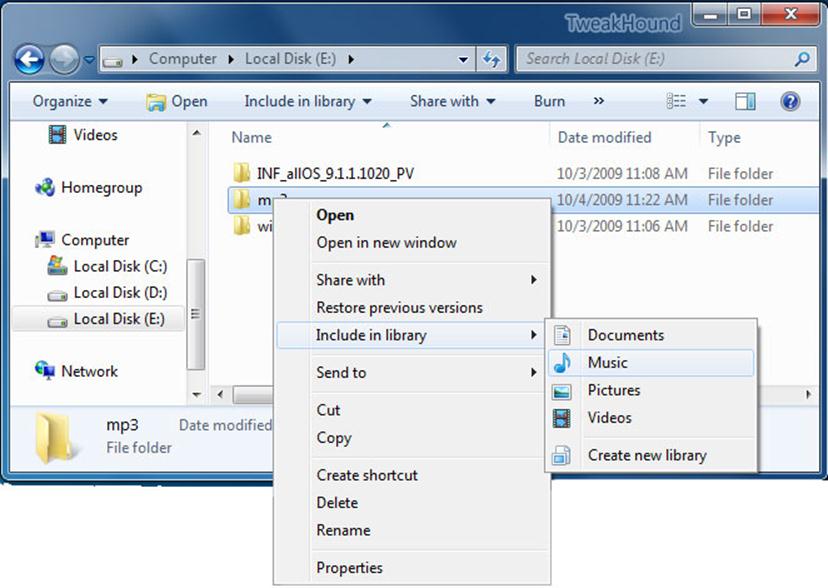
All your files do not have to be in the actual library folder. Windows 7 lets you add folders from other locations to your library without actually moving them into the actual library location.
To add a folder to a library. Right-click on that folder and choose Include in library > and choose the appropriate library.
Configure Your Email
If your ISP software didn’t do it, configure your email now.
Configure Programs That Start With Windows 7
Get everything you possibly can out of the System Tray (by the clock in the lower right hand of the screen). The best way to do this is in the applications options. If that fails, use Autoruns.
Autoruns
Download Autoruns.
Extract the folder to your root drive (usually C). Open the Autoruns folder and double-click autoruns.exe. Click on the Logon tab, Uncheck anything you do not want to start with Vista. The fewer things the better. If you don’t know what it is, leave it alone. Advanced users may want to go to the SERVICES tab and make modifications there.
Autoruns (click on image for a larger picture)
CCleaner
Download and install CCleaner Slim.
Configure it – Poke around and choose your options (I enable Run CCleaner when the computer starts).
Run it.
CCleaner (click on image for a larger picture)
Final Cleanup & Defrag
– Start up in Safe Mode and use cleanmgr /sagerun:50 again!
– Run CCleaner.
Next, go to START > ALL PROGRAMS > ACCESSORIES > SYSTEM TOOLS > DISK DEFRAGMENTER. Highlight the drive you installed Windows 7 on, click the DEFRAGMENT button. This will take a while. When finished shut down and restart.
Get there faster: type dfrgui in the Start Menu search box.
Backup
Whatever backup method you prefer, make a backup.
You’re done!