Windows 10 Backup And Recovery Options
In this article:
1 – Reset this PC
2 – System Restore
3 – Accessing Windows Recovery Settings Offline
4 – Windows 7 Backup
5 – File History
6 – Recovery Media
Folks who’ve been around here for a while know I’m a freak about backups. Having good backups means recovering from viruses, malware, and hardware failure is not only possible but quick.
You should always use more than one backup method in case one fails (redundancy). My preferred method of backup is using Macrium Reflect to create a system image. See my articles on Macrium Reflect for how I do it. I also take advantage of Windows built-in backup methods. Since some folks will ask, here are my recommended backup plans:
1 – For non-mission-critical systems:
Macrium Reflect image (offline, at least monthly, see link above for how I do it)
+
Make a System Image for Refresh
+
File History (plus a second backup method for libraries run monthly)
2 – For mission-critical systems
Macrium Reflect image (offline, at least bi-weekly, see link above for how I do it)
+
Make a System Image for Refresh
+
System Restore
+
File History (plus a second backup method for libraries run bi-weekly or shorter)
Before we continue, it is critical that you have a recovery disk. Having a backup does no good if you can’t use it. For Win 10 you can use either the install DVD, or you can create recovery media. Also critical is getting your Libraries off your OS drive / partition. See the Move Your Libraries section of this article.
*Note – There is a good chance that your computer’s manufacturer has completely screwed up the Win 10 built-in backup methods just as they did with previous Windows versions. If this is the case, then this section may or may not be of use to you. It is one of the reasons I always perform a clean install of an OS myself.
**There are many methods to backup computers and data. See: Backup Article Greatest Hits – Vol. 1
Win 10 has several backup / restore methods:
1 – Reset this PC
2 – System Restore.
3 – Windows 7 Backup
4 – File History
See: Recovery options in Windows 10
Reset this PC
Refresh and Reset were new to Windows 8, renamed to Reset this PC and improved in Win 10. IMHO this is one of Win 10’s killer features.
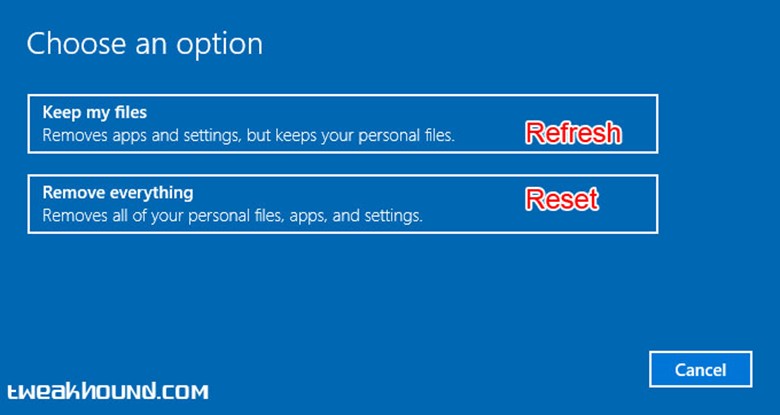
Settings > Update & security > Recovery > Reset this PC > click Get started >
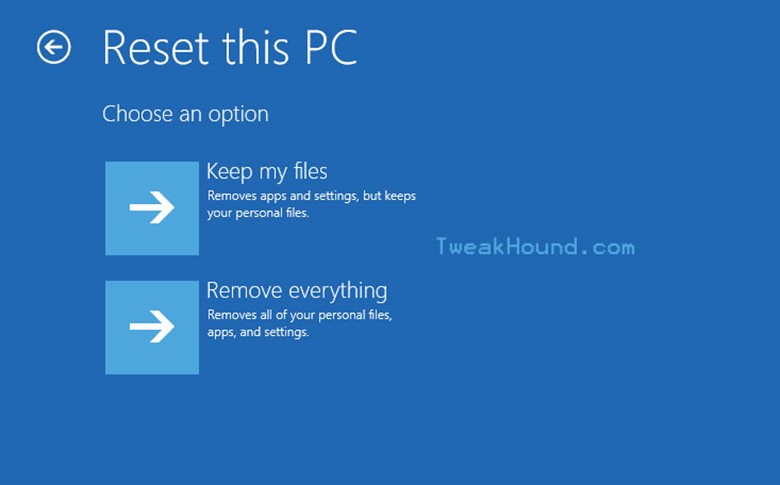
choose either Keep my files or Remove everything.
If your computer is not bootable, see the section Accessing Windows Recovery Settings Offline below.
Official Microsoft Descriptions:
Keep my files
Reinstalls Windows 10 and keeps your personal files.
Removes apps and drivers you installed.
Removes changes you made to settings.
Removes any apps your PC manufacturer installed. (If your PC came with Windows 10, apps from your PC manufacturer will be reinstalled.)
Remove everything
Reinstalls Windows 10 and removes all your personal files.
Removes apps and drivers you installed.
Removes changes you made to settings.
Removes any apps your PC manufacturer installed. (If your PC came with Windows 10, apps from your PC manufacturer will be reinstalled.)
***Warning
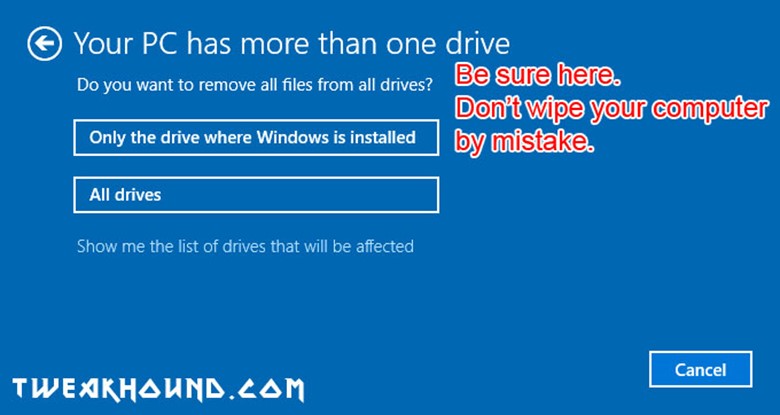
When/If you come to the screen that says Your PC has more than one drive, be very careful.
If you are unsure choose Only the drive where Windows is installed.
Screenshot from Remove everything step 2:
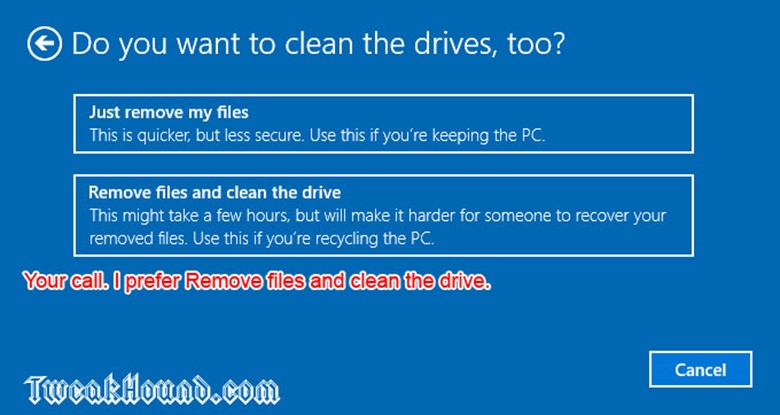
Screenshot from Remove everything step 3:
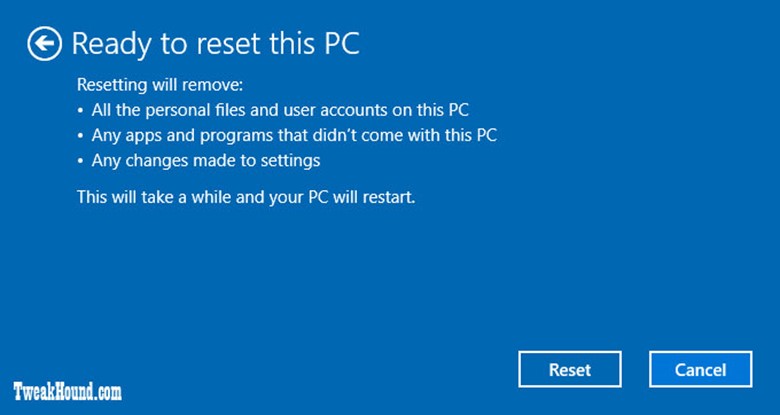
Screenshot from Remove everything step 4. Last chance to bail out.
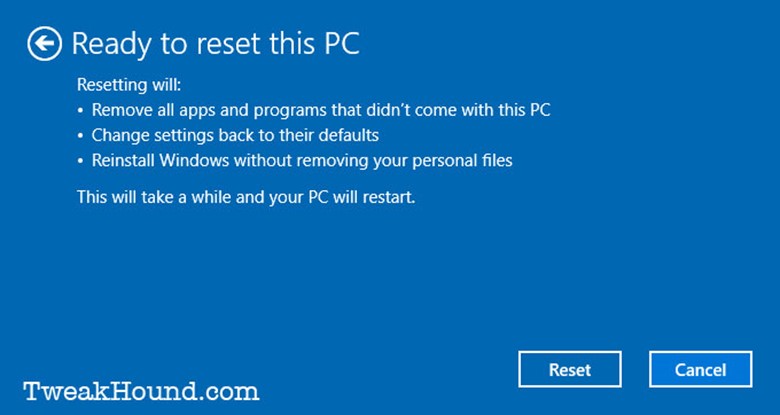
Screenshot from Keep my files step 2:
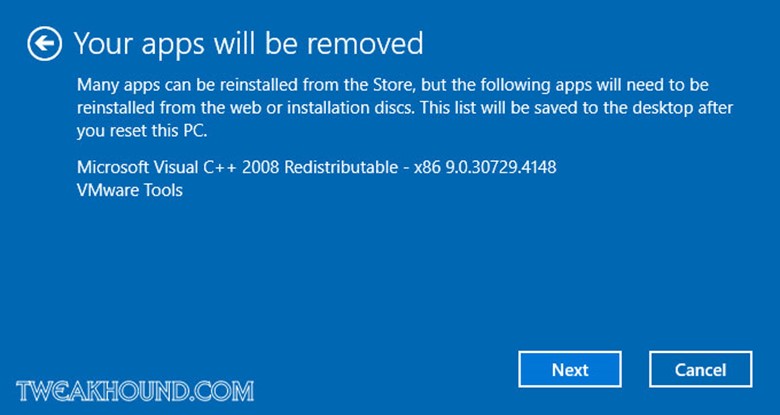
Screenshot from Keep my files step 3: Last chance to bail out.
System Restore
For those familiar with it, System Restore in Win 10 works like it did in Windows 7. From Microsoft:
System Restore uses restore points to return your system files and settings to an earlier point in time without affecting personal files…System Restore affects Windows system files, programs, and registry settings. It can also make changes to scripts, batch files, and other types of executable files created under any user account on your computer. System Restore does not affect personal files, such as e-mail, documents, or photos, so it cannot help you restore a deleted file…Restore points are created automatically every day, and just before significant system events, such as the installation of a program or device driver. You can also create a restore point manually.
Using System Restore
Press the Windows + R keys > type systempropertiesprotection.exe and hit Enter.
Or
Enter systempropertiesprotection.exe in the search box. Pretty self-explanatory.
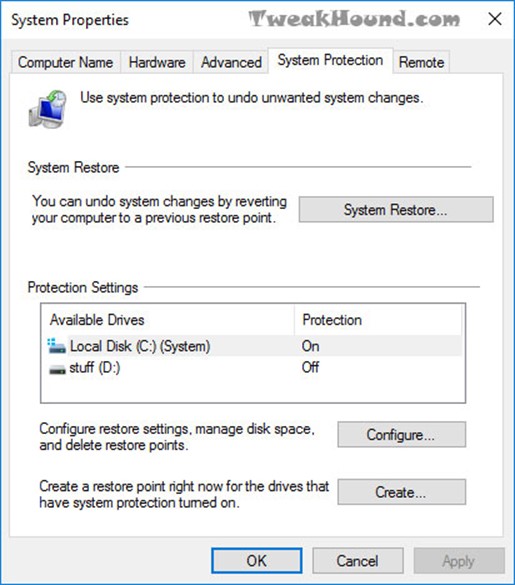
If System Restore is on, Win 10 will automatically make a backup before making major changes. Many programs will too. If you want to restore a backup, click the System Restore button.
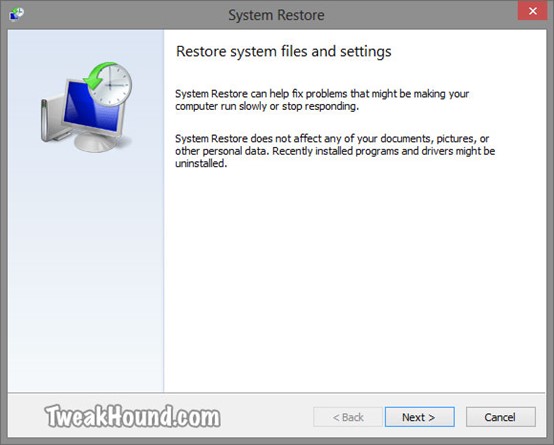
The most recent restore point will be shown. Check the box next to Show more restore points to go further back. Highlight a restore point of your choice and click Next.
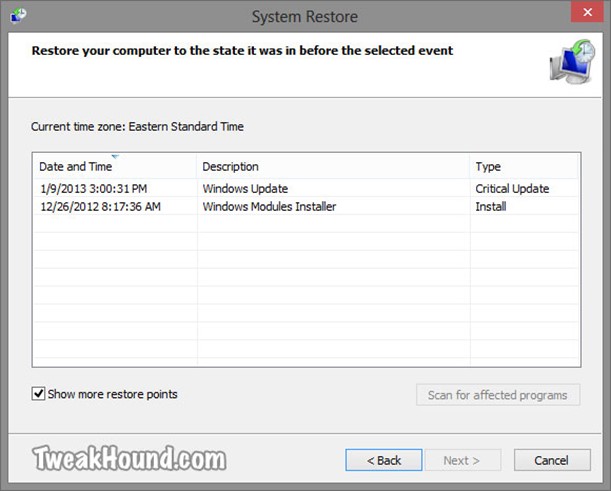
Click Finish to start restore, or …
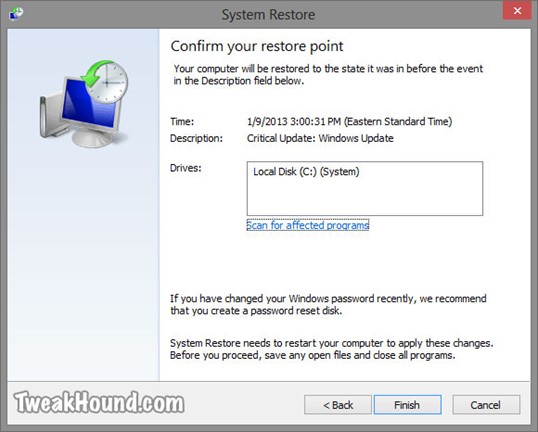
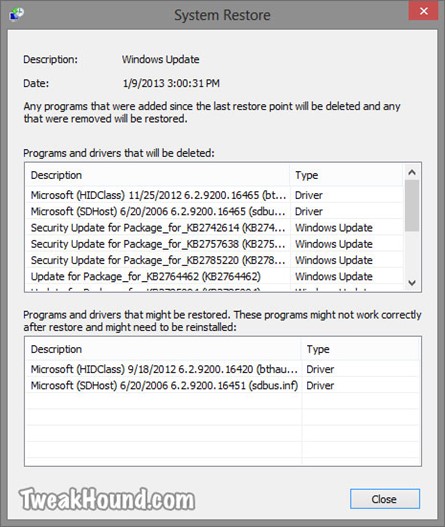
Click Scan for affected programs to see, um… affected programs!
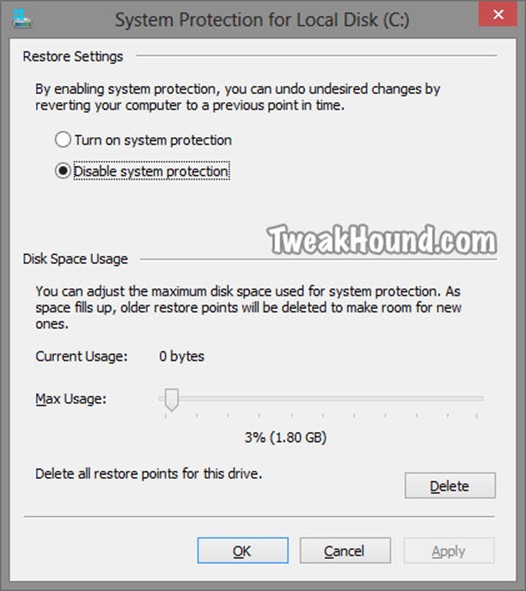
Disable System Restore
I’ve purposely included several pictures in this System Restore section to show that this program is actually useful. This is in the hope that I can persuade those of you who do not keep active backups not to disable this.
Disabling System Restore does have a few advantages including speeding up Windows Updates and saving disk space (though you can control that). Since I use Macrium Reflect all the time I do not use System Restore.
For those who do want to disable System Restore
Press the Windows + R keys > type systempropertiesprotection.exe and hit Enter.
To disable System Restore click the Configure… button.
In the resulting window click the circle next to Disable system protection and click Apply.
Although the above step is supposed to clear all restore points, it doesn’t hurt to click the Delete button.
Accessing Windows Recovery Settings Offline
If you can’t boot into Windows, you can use the above tools by booting from your Windows 10 DVD orWindows 10 Recovery Media.
If booting from a recovery disk, choose your keyboard.
If booting from the Win10 DVD, choose Repair your computer.
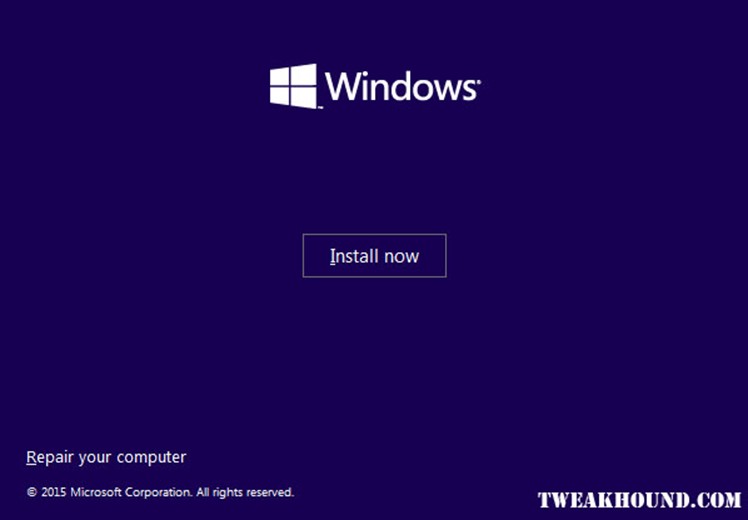
Click Troubleshoot.
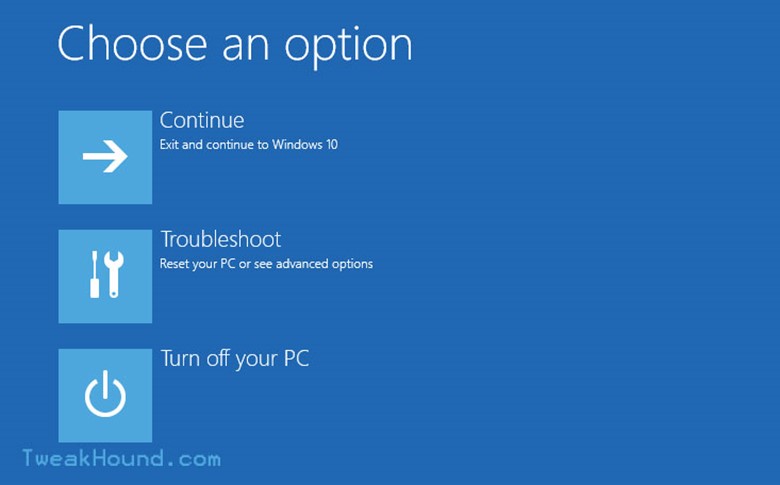
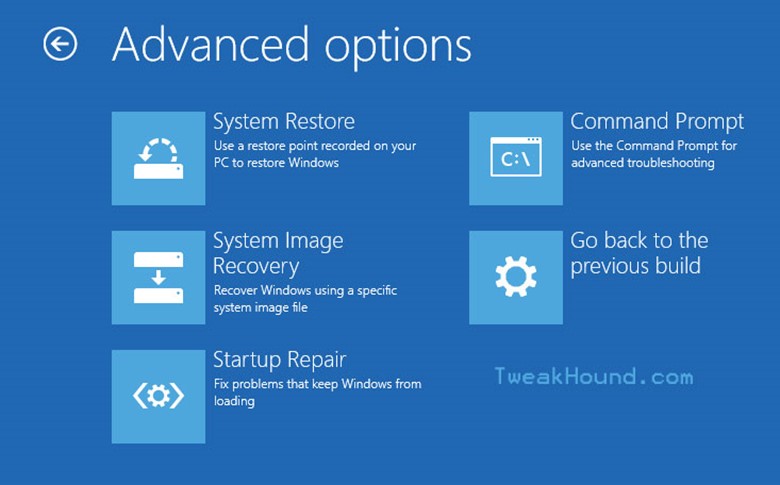
Click Reset, or Advanced options
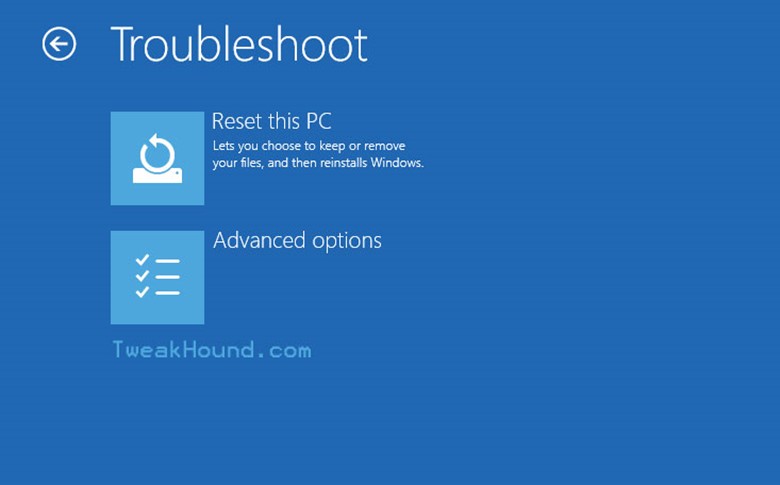
For Reset you can choose to keep files or start fresh.
Advanced options allow several ways to restore including, restore points, system images, and Startup repair. You can even roll back to a previous build if need be.
Windows 7 Backup
In Windows 10 you can backup files just like you could in Windows 7.
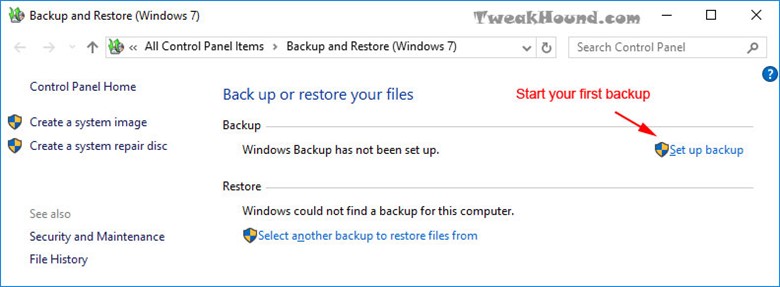
Go to: Control Panel\All Control Panel Items\Backup and Restore (Windows 7)
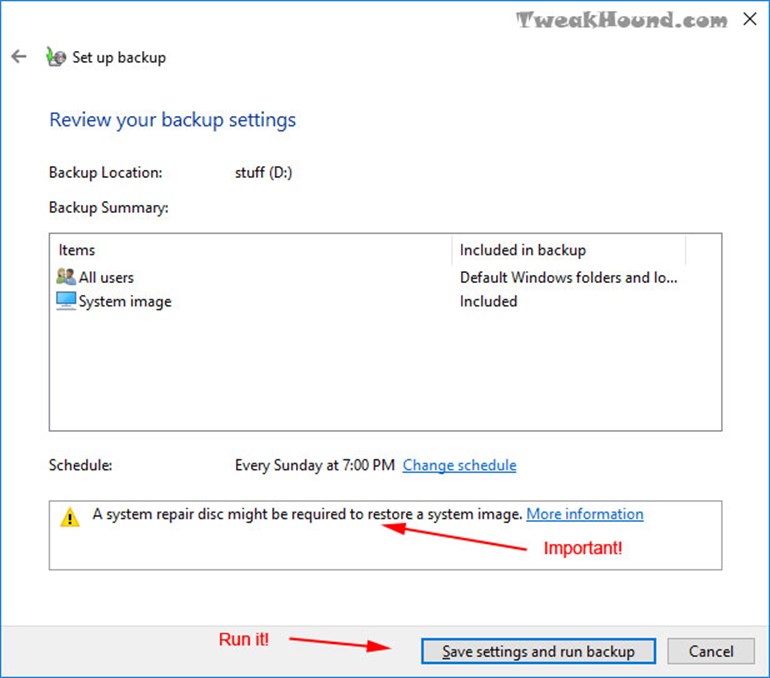
Click Set up Backup
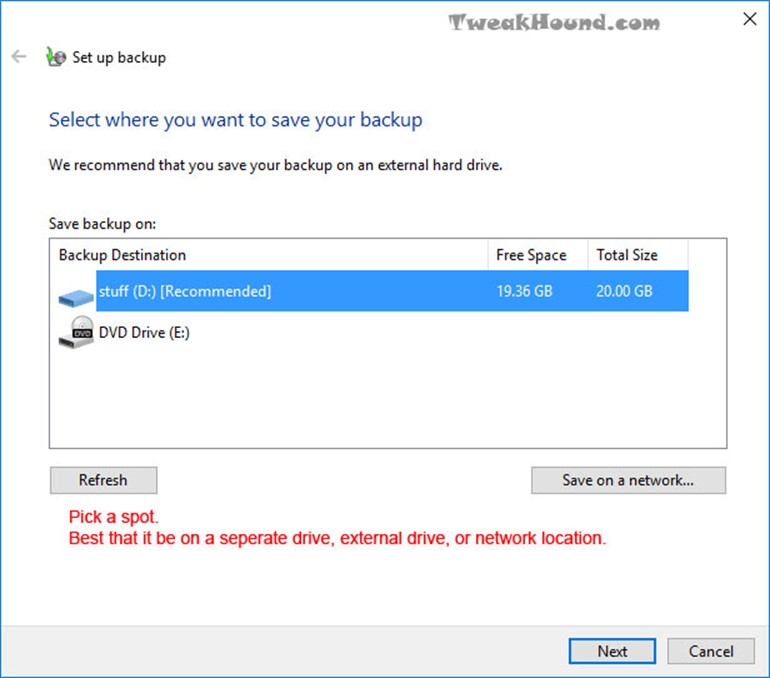
Pick a backup location.
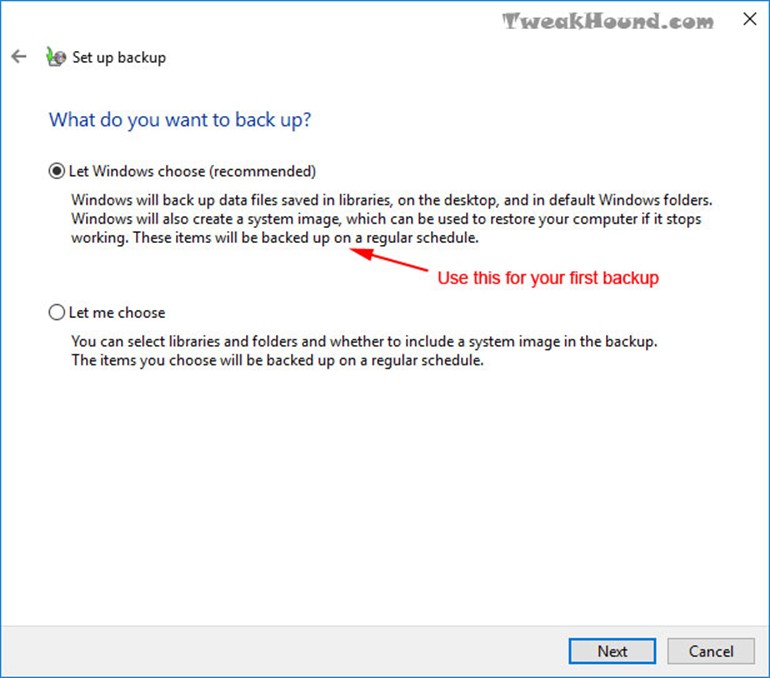
You should do Let Windows choose at least once.
Run it.
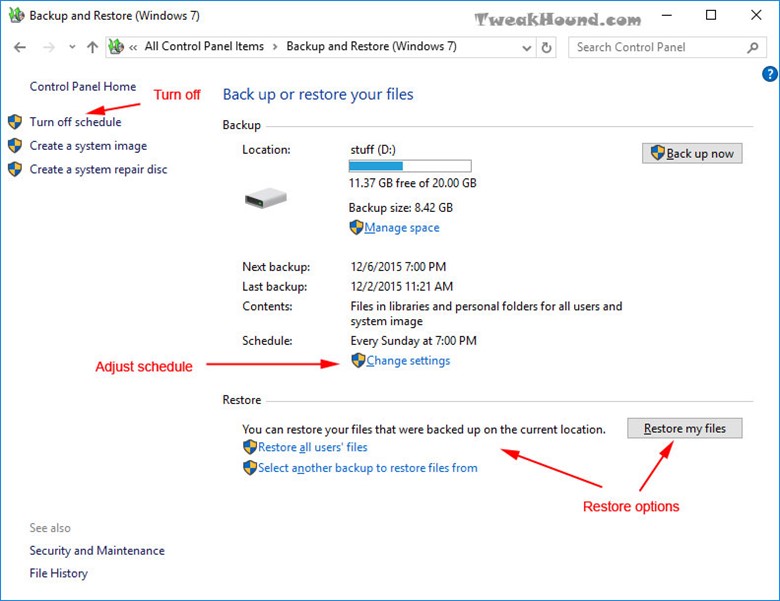
Once you have run your first backup, you can adjust many backup settings here. This is also where you go to restore files.
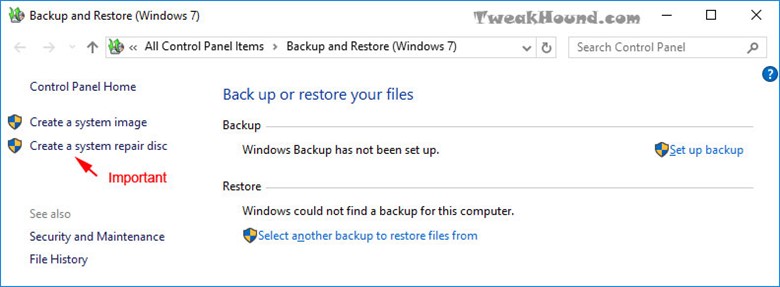
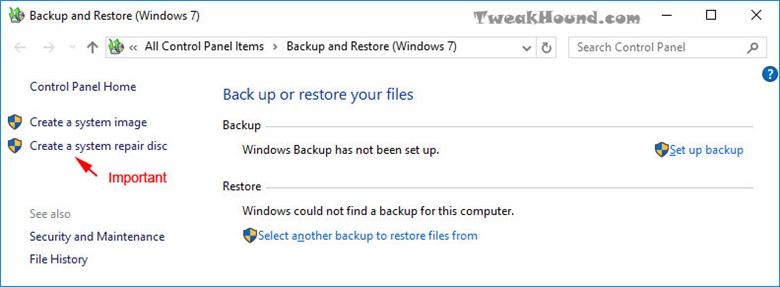
If you ever have to repair or restore files when your computer won’t boot, it is CRITICAL that you have already created a system repair disc. See the Recovery Media section of this article.
File History
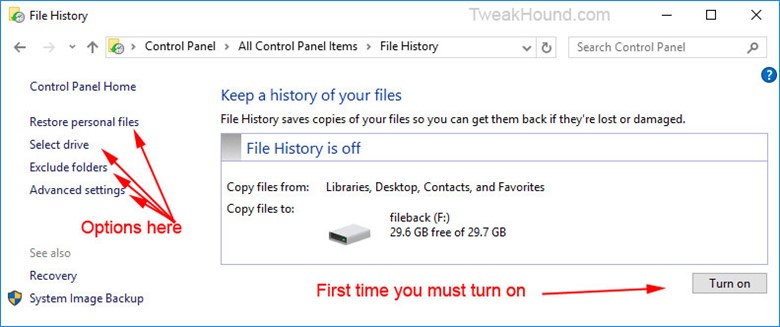
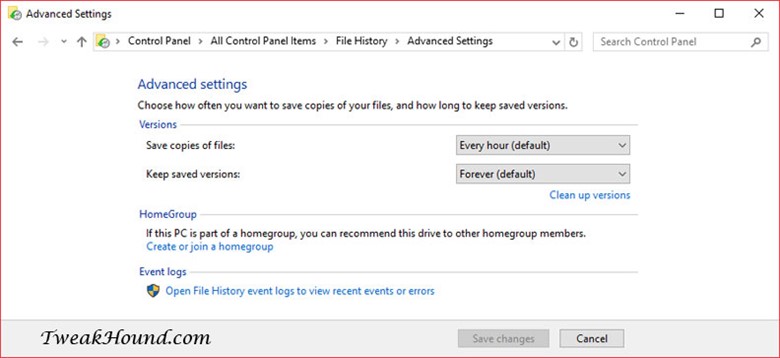
This is an awesome feature will constinuously back up all your important stuff. See Microsoft’s, How to use File History (guide with video). See also: What if something goes wrong in File History? One thing though. If you are on a single drive system, you’ll need to configure a network location or an external drive for backup.
Old app: Control Panel\All Control Panel Items\File History
or
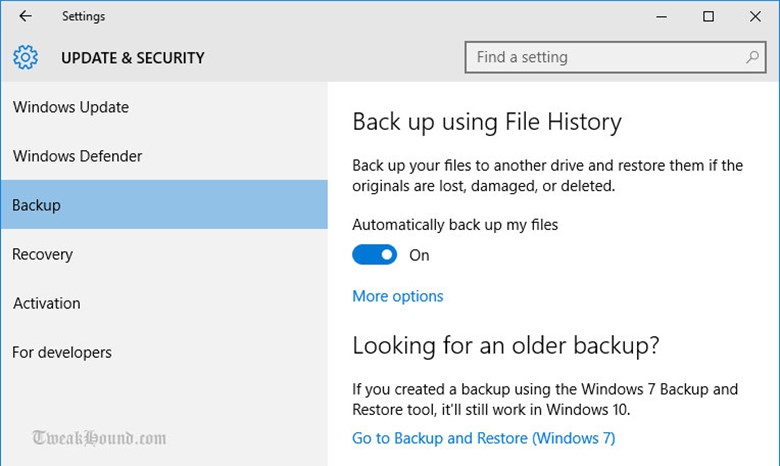
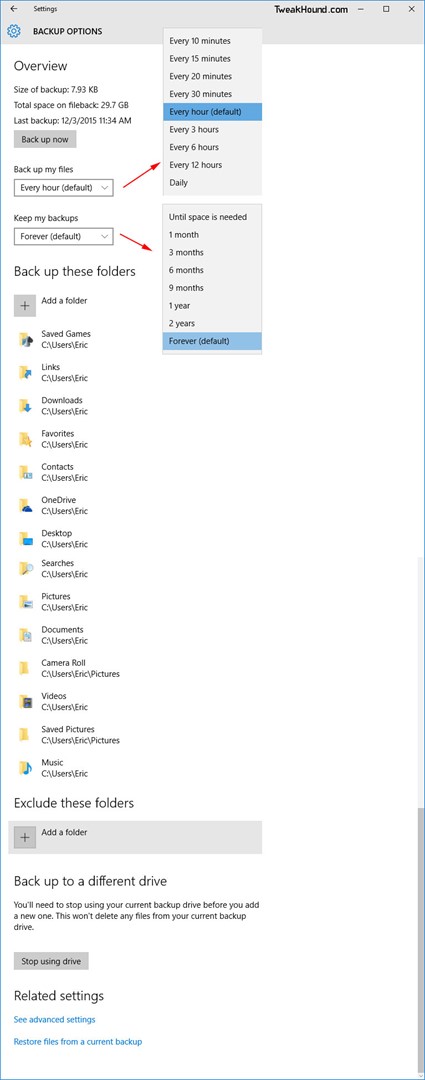
New app: Settings > Update & security > Backup > Back up using File History
Old app: Control Panel\All Control Panel Items\File History
In this example I am using a 32GB flash drive formatted NTFS.
External drive
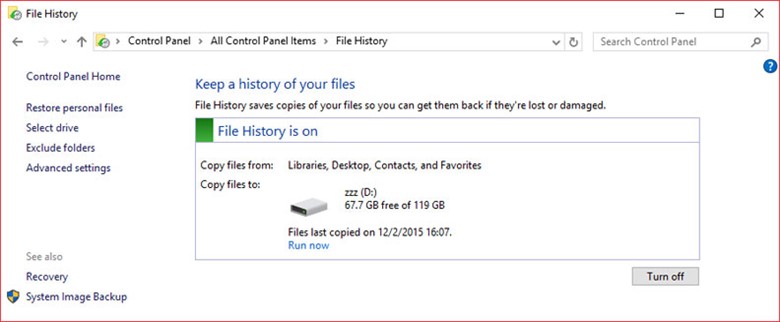
Control Panel\All Control Panel Items\File History\Advanced Settings
New app: Settings > Update & security > Backup > Back up using File History
More options
Tip
You can add Onedrive, Dropbox, etc, as a network drive. Just Google it.
Recovery Media
You can create a bootable DVD or flash drive.
DVD
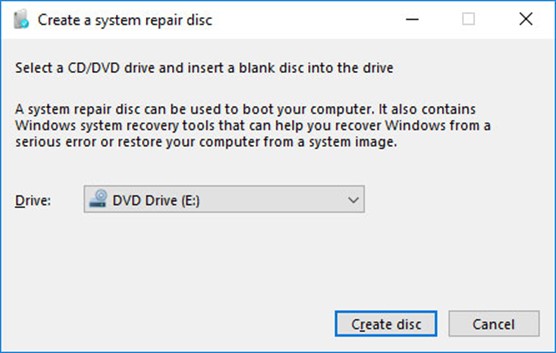
Easy way: Press the Windows + R keys > type recdisc > press Enter.
or
Control Panel\All Control Panel Items\Backup and Restore (Windows 7) > Create a system repair disc.
USB
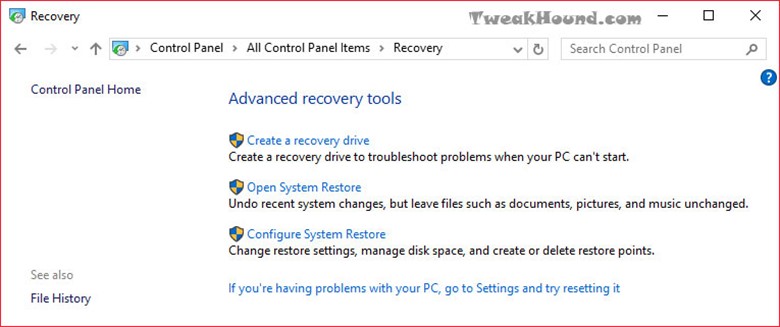
Go to: Control Panel\All Control Panel Items\Recovery > Create a recovery drive
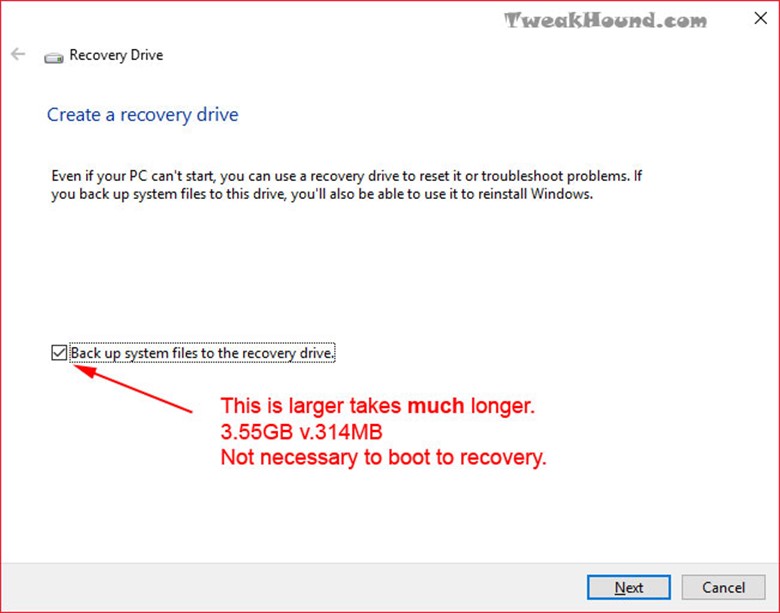
If you are just trying to create media that will boot into recovery, uncheck the box, Back up system files. Backing up takes a long time, and it’s unnecessary to create media that will boot into recovery. However, if you have the time and a flash drive big enough, this can be useful (at least 4GB free formatted, so get an 8GB). You can actually reinstall Win 10 with this.
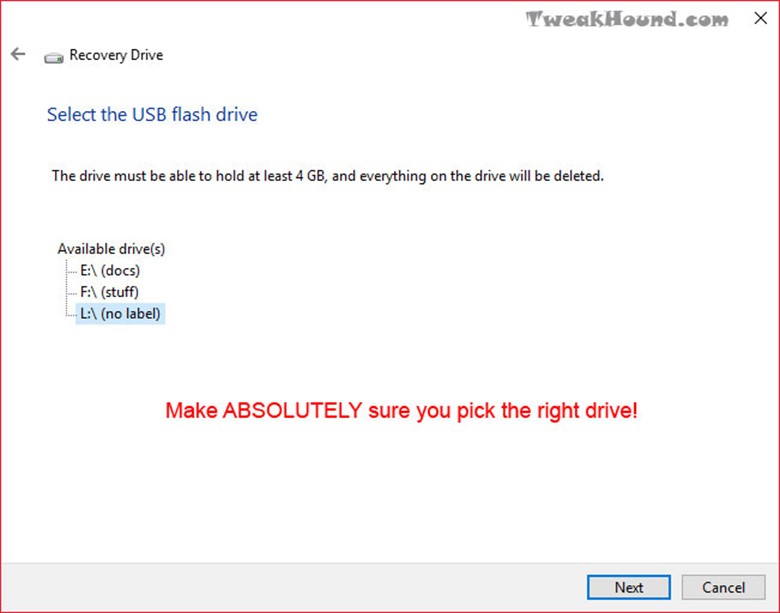
Pick your flash drive. Now check again to make sure!
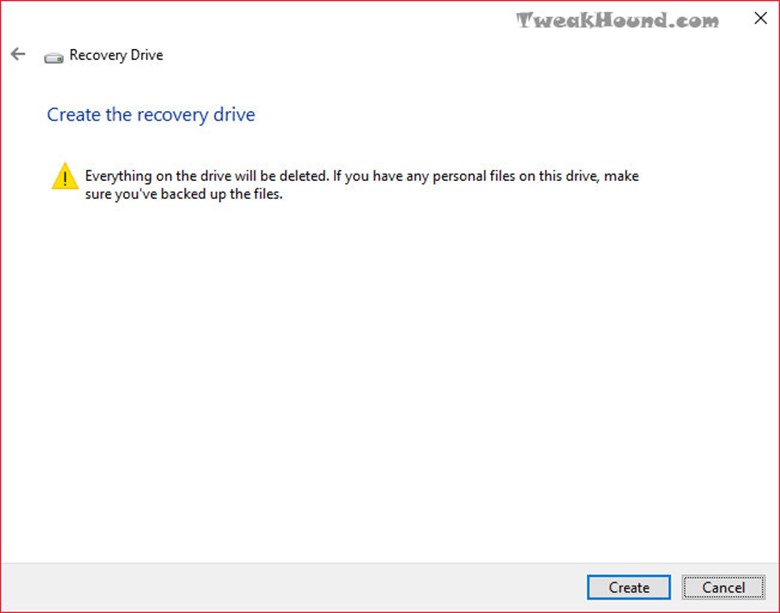
Yeah, yeah. Click Create.
You can also do this from a downloaded Win 10 ISO.
See: Download Windows 10 TH2 ISO And Create Media
Hi Eric,
Thanks for a masterpiece again.
I have posted about your guide in my favorite security forum: malwaretips.com
Appreciate the hard work you put in.
Thank you
I went through it page by page. Nicely done.
I notice in your Wise Disk cleaner part your showing version 8, there at version X which has Windows WinSxS (not show in version 8).
not a big deal but thought I mention it.
Hey Eric,
I guess gone are the days where we would pour thru Black Viper’s tables to figure out what to disable. Kudos to BV of course, but it’s nice we don’t have to worry about Windows services all that much anymore.
I would recommend disabling 2 additional services — Remote Registry (maybe I’m old school and this doesn’t matter anymore, but the name of the service is still downright scary), and Connected User Experience & Telemetry (thanks but no thanks MSFT).
Great guide and thanks as always for your efforts,
Steve
Thanks Steve. Remote Registry is disabled by default. Connected User Experiences and Telemetry is taken care of here via O&O Shutup10.
I’ve noticed a small typo on page 17 under File History. The seventh word has an extra ‘s’ in it (constinuously).
Also the grammar of the first sentence does’nt seem quite right. I suggest leaving out the second and third words.
Eric: The registry hack for removing the word “Shortcut” from new shortcuts doesn’t seem to work in my version of Win 10 Pro 64b (20H32 v19042.746 Experience pack 120.2212.551.0). Instead the hex for link appears to operate as an incrementing count. For instance, say the Hex is showing 17 00 00 00 when I open RegEdit; I can set the Hex to 00 00 00 00 but on restart it shows 18 00 00 00. I wonder if it’s me, or MS?
Try:
Windows Registry Editor Version 5.00
[HKEY_CURRENT_USER\SOFTWARE\Microsoft\Windows\CurrentVersion\Explorer]
“link”=hex:1e,00,00,00
Where is the .reg to make the tweaks to a new system?
https://www.tweakhound.com/2020/12/30/tweaking-windows-10-version-20h2/19/
(Libraries) Just an FYI copy pasting the folders to a new location is an unnecessary step. The move dialog will do the work of moving the files in those folders for you, save yourself a couple of seconds and an insignificant amount of bytes on the web.
Peace, Love, Donuts,
Rita
A folder with the name of the library needs to exist in the location you want to move it to. The files are still moved. Copy/paste is just as fast and easy as your way.
Since Windows 10 is funky, if anyone reads these comments I have something to add, particularly for y’all gamers.
#1 Heed the warning and /do/ not remove windows apps from your machine with O&O, user only is enough. It deleted my app manifest so a batch reinstall did not work, and couldn’t find a way to restore it. Windows Store works fine for everything but Cortana, you need to do an extra step to get her back, even if only to disable, its a windows 10 trend that follows to my next suggestion.
#2 Go into gaming settings and just disable Game Mode/Game bar, don’t remove the app from user or computer. While it has no affect, every game you run calls the game bar and will pop an error saying its missing, I assume it has to do with the processes that start up Full Screen Optimizations calling game bar as well, regardless if its disabled it will never load. It is safe to uninstall the console companion.
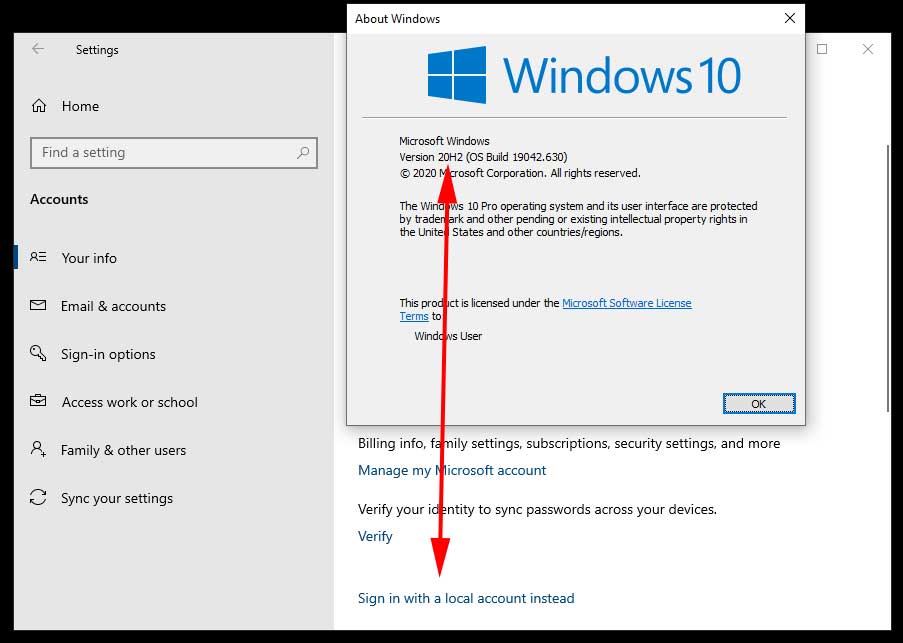
In 20h2 there is no longer the option “sign in with a local account instead” after you have signed in with a Microsoft account. I had a coworker do this by mistake and now I cannot remove his Microsoft account from the workstation. Is there a way to manually remove the Microsoft account?
???
Hi Eric,
you may provide a reg-hack which patches the Windows 10 version number (not product key) to a recent one?
Reason:
MS does not deliver any apps via [Get], in my case today the free HTML5 Video Downloader by Arcadio Garcia (link below),
if they do not meet version # 10586.0 at least.
Last December I updated the OS for the sake of another app which left me in a total language mix, missing device and BT manager, a deliberate removed group policy editor (gpedit) but a proper reinstalled Cortana, Edge and all the other stuff MS cr*ps users lawn with.
Hence I re-installed my former shutupped/winslapped and outbound firewall protected v10240 again but been left in the rain
now when it comes to add simple addons from MS.
There is no rason whatsoever a downloader or else shan’t run on even older version than mine, just the usual
MS ignorance driven by complacency.
Your sincerely
Michael Damian
AFAIK there is no permanent way to do this.
Cheers Eric,
maybe the Hound digs that out one day 😉
Take care.
Nice and cool guide!
I just wanted to offer a tool for better power plan settings editing
https://forums.guru3d.com/threads/windows-power-plan-settings-explorer-utility.416058/