Windows 10 Backup And Recovery Options
In this article:
1 – Reset this PC
2 – System Restore
3 – Accessing Windows Recovery Settings Offline
4 – Windows 7 Backup
5 – File History
6 – Recovery Media
Folks who’ve been around here for a while know I’m a freak about backups. Having good backups means recovering from viruses, malware, and hardware failure is not only possible but quick.
You should always use more than one backup method in case one fails (redundancy). My preferred method of backup is using a system image via Acronis True Image. See my article Backup Using Acronis True Image Home for how I do it. I also take advantage of Windows built-in backup methods. Since some folks will ask here are my recommended backup plans:
1 – For non-mission critical systems:
Acronis True Image (offline, at least monthly, see link above for how I do it)
+
Make a System Image for Refresh
+
File History (plus a second backup method for libraries run monthly)
2 – For mission critical systems
Acronis True Image (offline, at least bi-weekly, see link above for how I do it)
+
Make a System Image for Refresh
+
System Restore
+
File History (plus a second backup method for libraries run bi-weekly or shorter)
Before we continue, it is critical that you have a recovery disk. Having a backup does no good if you can’t use it. For Win10 you can use either the install DVD or you can create recovery media. Getting your Libraries off your OS drive / partition is critical. See the Move Your Libraries section of this article.
*Note – There is a good chance that your computer’s manufacturer has completely screwed up the Win10 built-in backup methods just as they did with previous Windows versions. If this is the case, then this section may or may not be of use to you. It is one of the reasons I always clean install an OS myself.
**There are many methods to backup computers and data. See: Backup Article Greatest Hits – Vol. 1
Win10 has several backup / restore methods:
1 – Reset this PC
2 – System Restore.
3 – Windows 7 Backup
4 – File History
See: Recovery options in Windows 10
Reset this PC
Refresh and Reset were new to Windows 8, renamed to Reset this PC and improved in Win10. IMHO this is one of Win10s killer features.
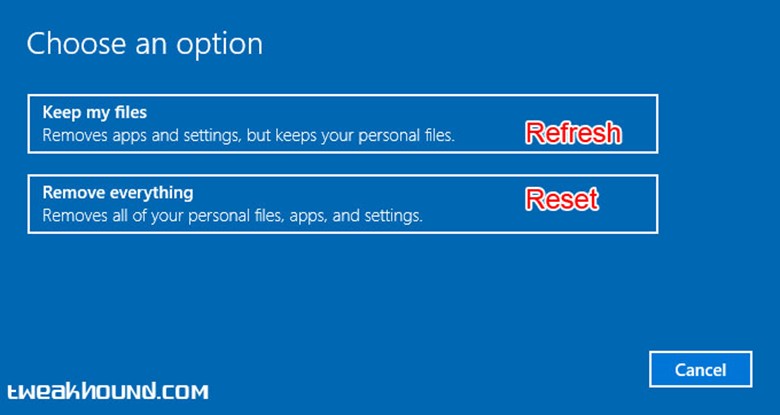
Settings > Update & security > Recovery > Reset this PC > click Get started >
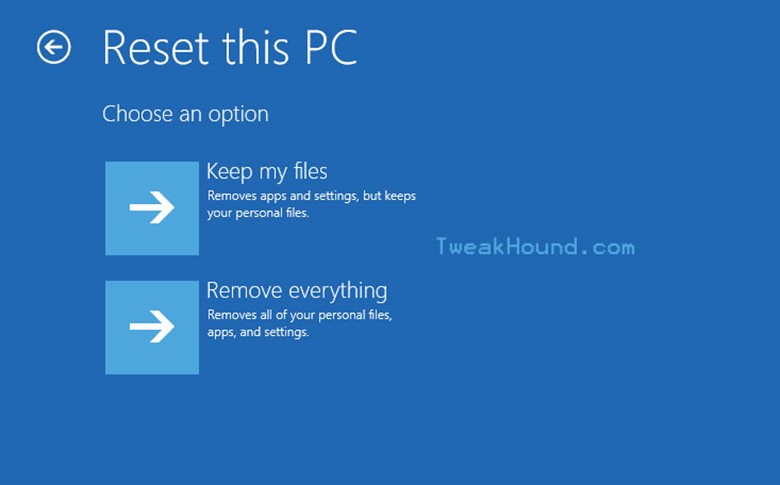
choose either Keep my files or Remove everything.
If your computer is not bootable, see the section Accessing Windows Recovery Settings Offline below.
Official Microsoft Descriptions:
Keep my files
Reinstalls Windows 10 and keeps your personal files.
Removes apps and drivers you installed.
Removes changes you made to settings.
Removes any apps your PC manufacturer installed. (If your PC came with Windows 10, apps from your PC manufacturer will be reinstalled.)
Remove everything
Reinstalls Windows 10 and removes all your personal files.
Removes apps and drivers you installed.
Removes changes you made to settings.
Removes any apps your PC manufacturer installed. (If your PC came with Windows 10, apps from your PC manufacturer will be reinstalled.)
***Warning
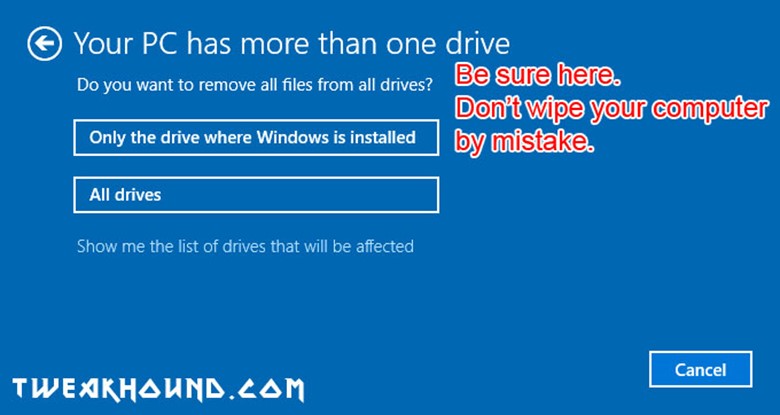
When/If you come to the screen that says Your PC has more than one drive, be very careful.
If you are unsure choose Only the drive where Windows is installed.
Screenshot from Remove everything step 2:
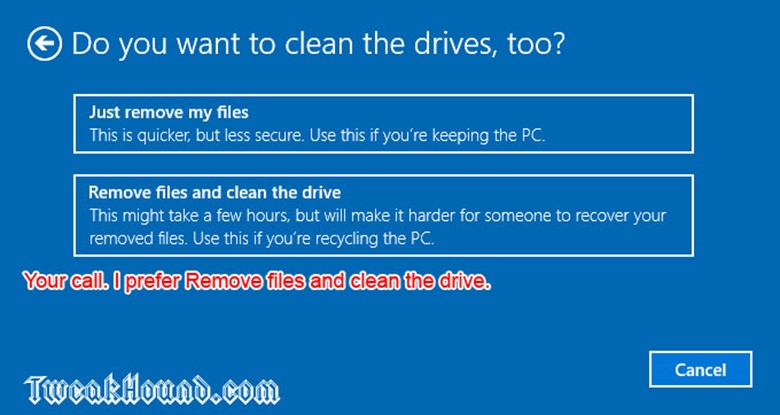
Screenshot from Remove everything step 3:
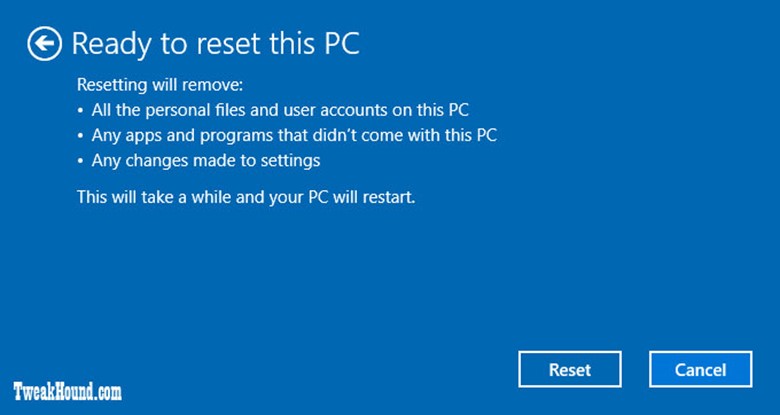
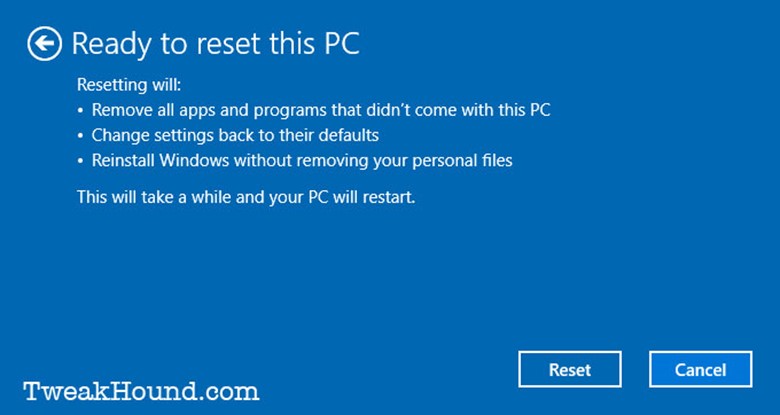
Screenshot from Remove everything step 4. Last chance to bail out.
Screenshot from Keep my files step 2:
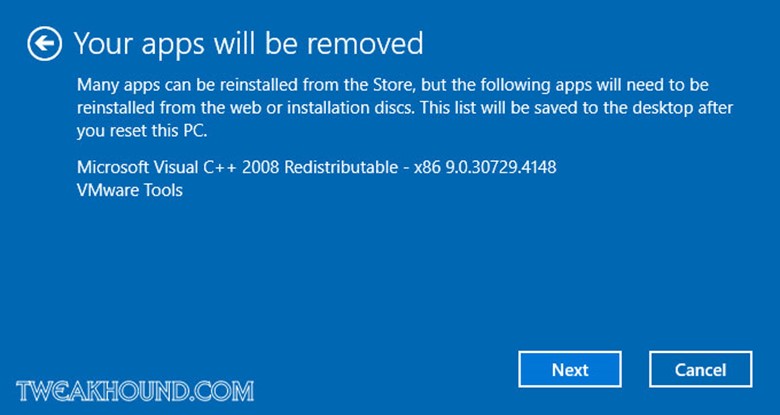
Screenshot from Keep my files step 3: Last chance to bail out.
System Restore
For those familiar with it, System Restore in Win10 works like it did in Windows 7. From Microsoft:
System Restore uses restore points to return your system files and settings to an earlier point in time without affecting personal files…System Restore affects Windows system files, programs, and registry settings. It can also make changes to scripts, batch files, and other types of executable files created under any user account on your computer. System Restore does not affect personal files, such as e-mail, documents, or photos, so it cannot help you restore a deleted file…Restore points are created automatically every day, and just before significant system events, such as the installation of a program or device driver. You can also create a restore point manually.
Using System Restore
Press the Windows + R keys > type systempropertiesprotection.exe and hit Enter.
Or
Enter systempropertiesprotection.exe in the search box. Pretty self-explanatory.
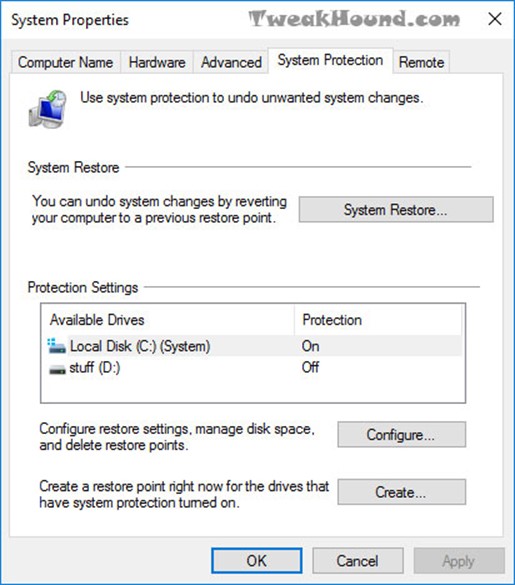
If System Restore is on, Win10 will automatically make a backup before making major changes. Many programs will too. If you want to restore a backup Click the System Restore button.
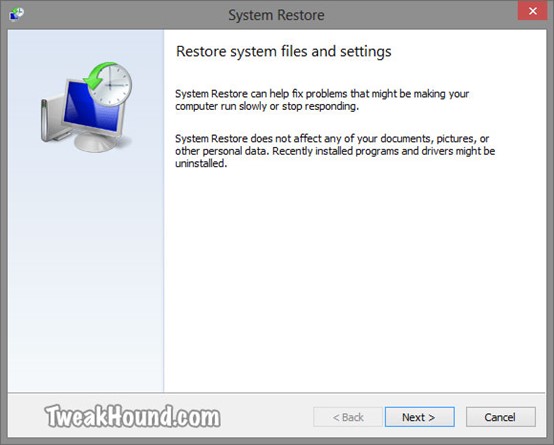
The most recent restore point will be shown. Check the box next to Show more restore points to go further back. Highlight on restore point of your choice and click Next.
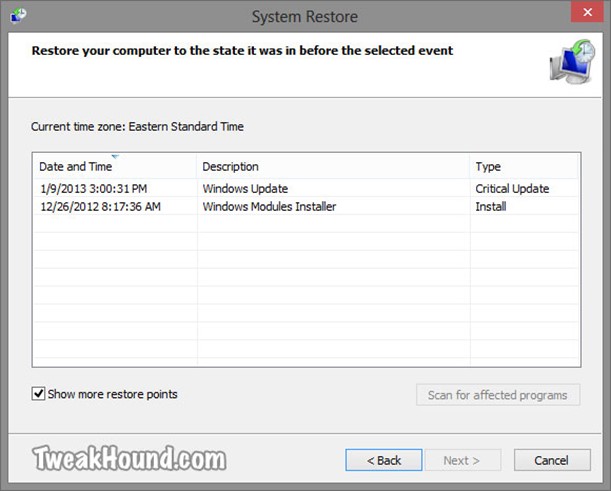
Click Finish to start restore, or …
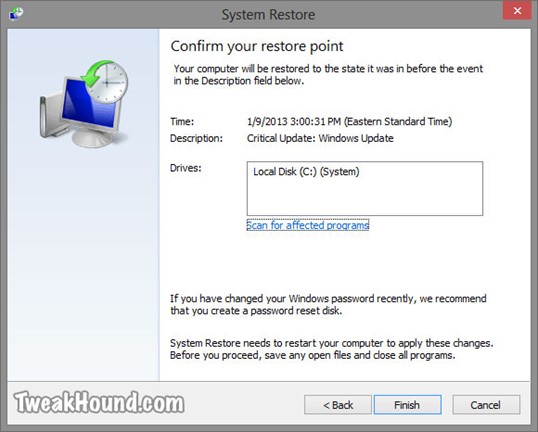
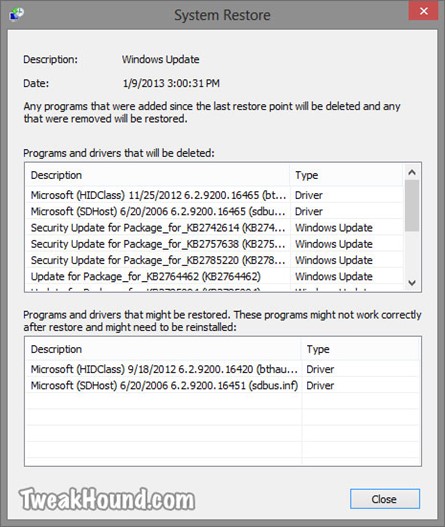
Click Scan for affected programs to see, um… affected programs!
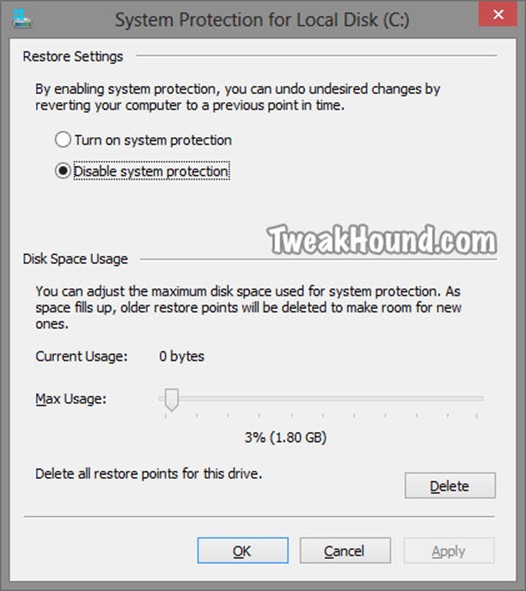
Disable System Restore
I’ve purposely included several pictures in this System Restore section to show that this program is actually useful. This is in the hope that I can persuade those of you who do not keep active backups not to disable this.
Disabling System Restore does have a few advantages including speeding up Windows Updates and saving disk space (though you can control that). Since I use Acronis True Image all the time I do not use System Restore.
For those who do want to disable System Restore
Press the Windows + R keys > type systempropertiesprotection.exe and hit Enter.
To disable System Restore click the Configure… button.
In the resulting window click the circle next to Disable system protection and click Apply.
Although the above step is supposed to clear all restore points, it doesn’t hurt to click the Delete button.
Accessing Windows Recovery Settings Offline
If you can’t boot into Windows you can use the above tools by booting from your Windows 8 DVD or Windows 8 Recovery Media (see my article Create Windows 8 Recovery Media ).
If booting from a recovery disk choose your keyboard.
If booting from the Win10 DVD, choose Repair your computer.
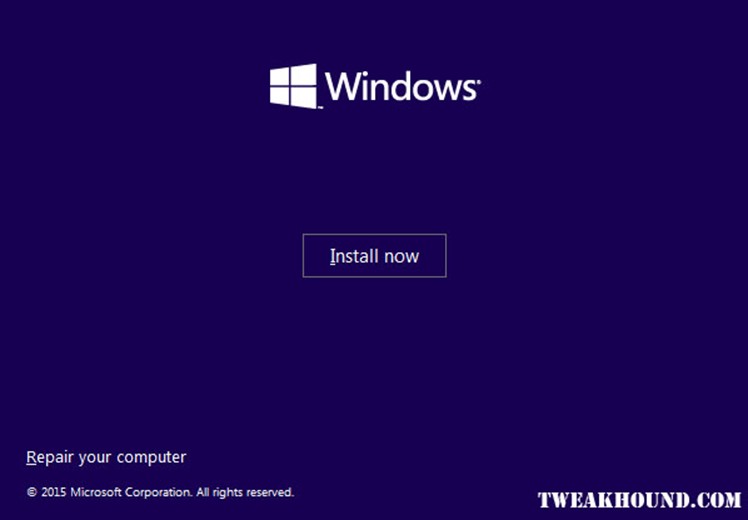
Click Troubleshoot.
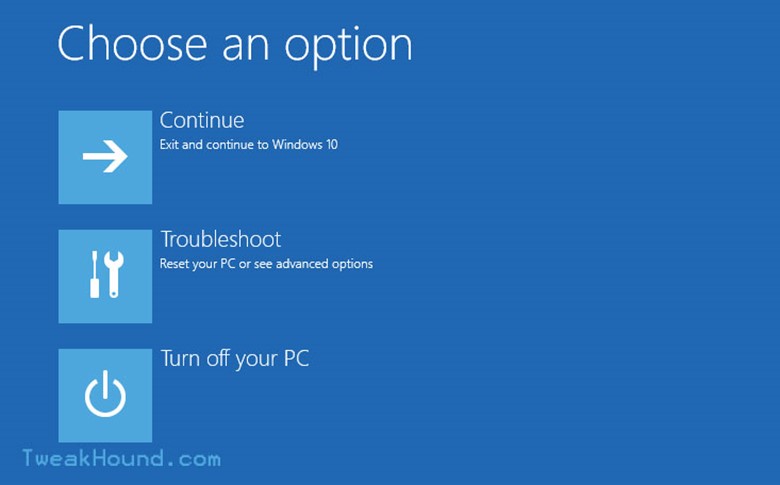
Click Reset, or Advanced options
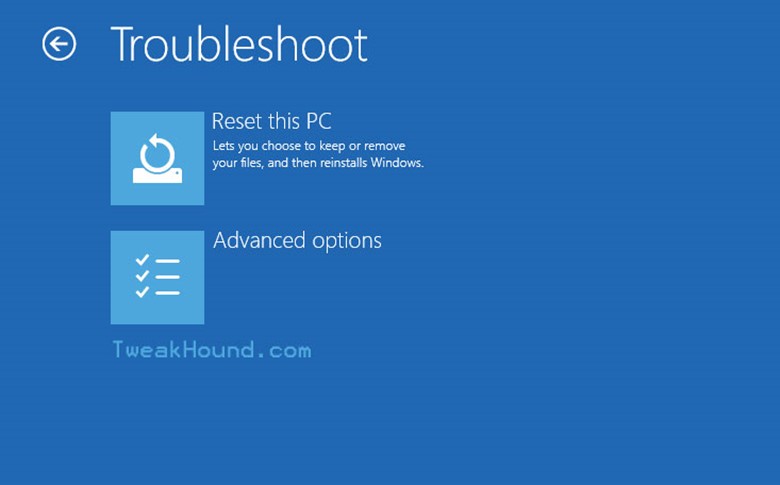
For Reset you can choose to keep files or start fresh.
Advanced options allow several ways to restore including, restore points, system images, and Startup repair. You can even roll back to a previous build if need be.
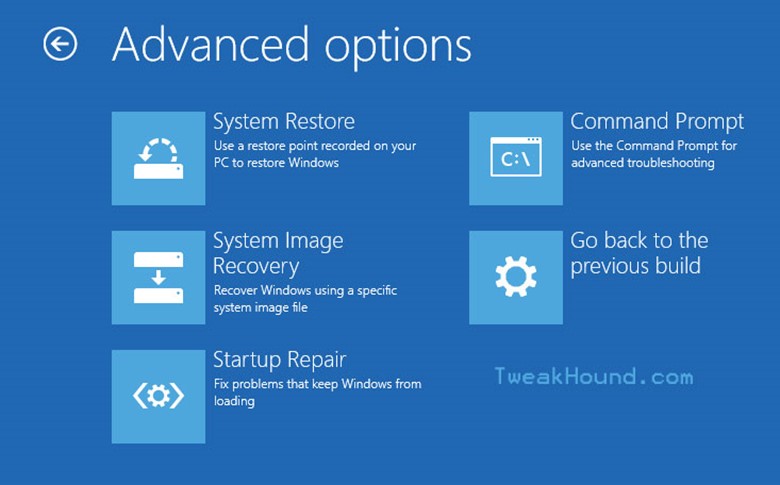
Windows 7 Backup
In Windows 10 you can backup files just like you could in Windows 7.
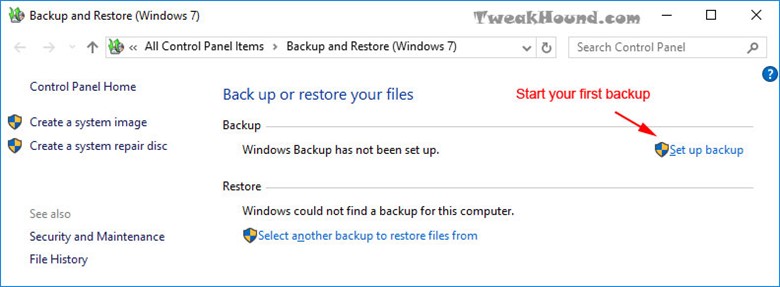
Go to: Control Panel\All Control Panel Items\Backup and Restore (Windows 7)
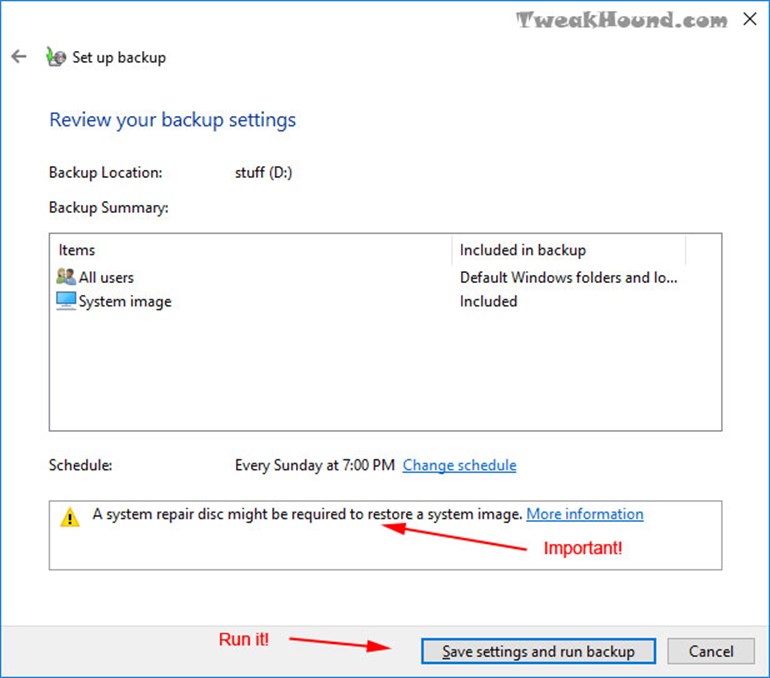
Click Set up Backup
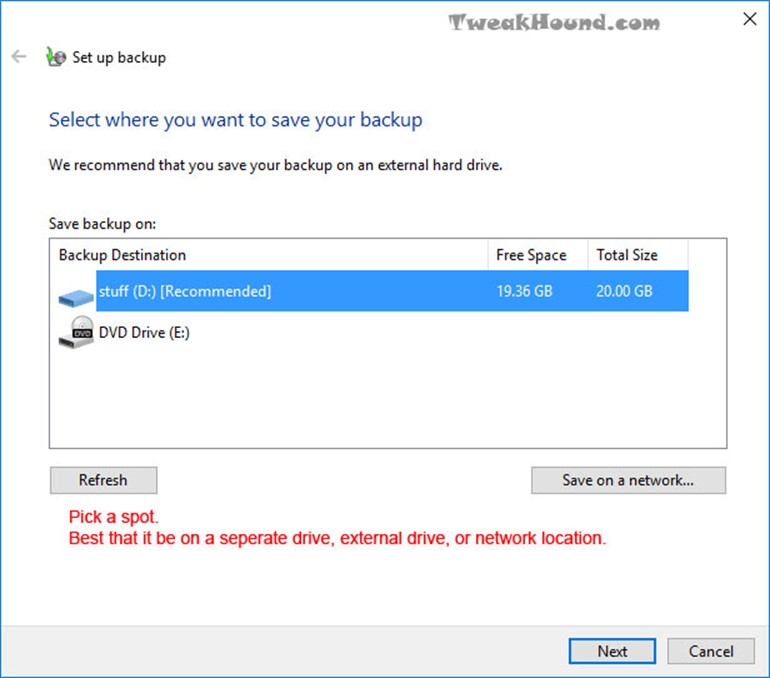
Pick a backup location.
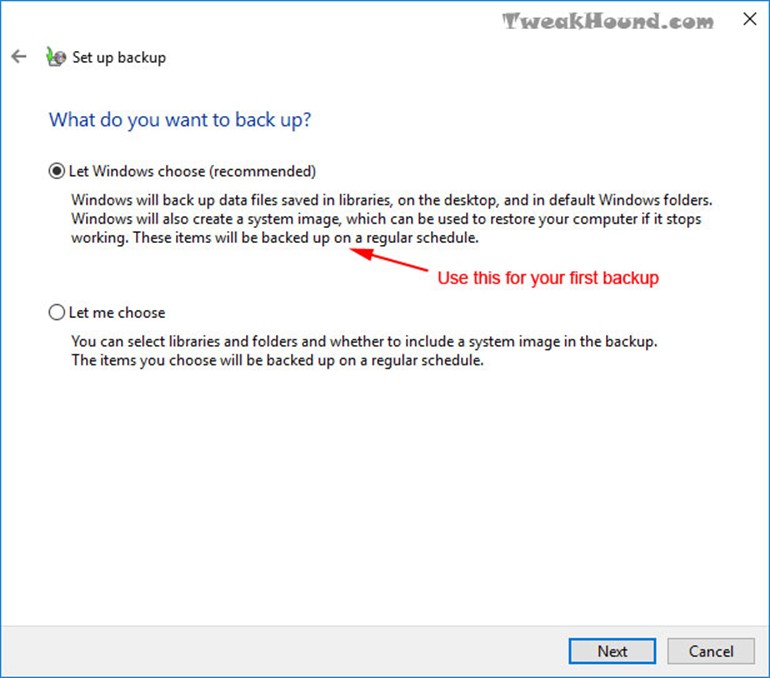
You should do Let Windows choose at least once.
Run it.
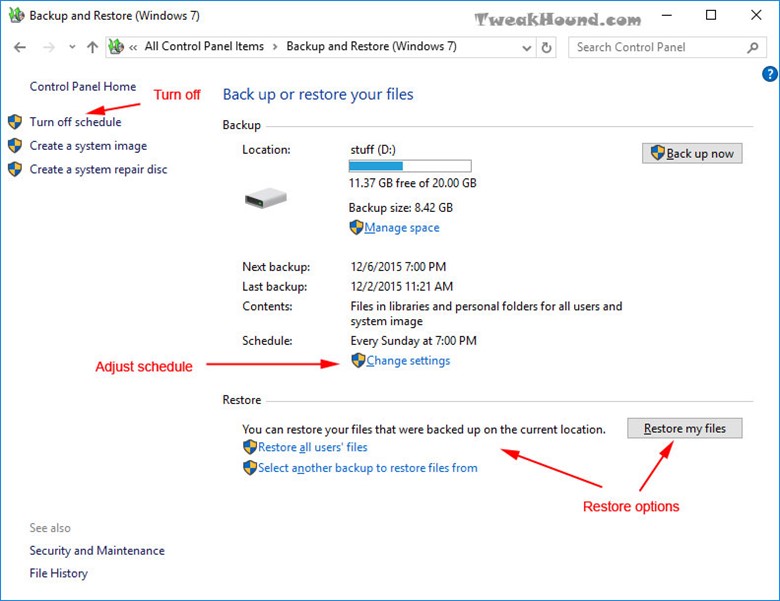
Once you have run your first backup, you can adjust many backup settings here. This is also where you go to restore files.
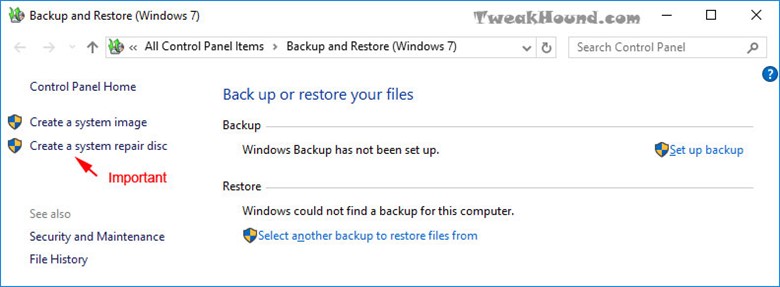
If you ever have to repair or restore files when your computer won’t boot it is critical you have a system repair disc. See the Recovery Media section of this article.
File History
This is an awesome feature. Basically all your important stuff backed up constantly. See Microsoft’s, How to use File History (guide with video). See also: What if something goes wrong in File History? One thing though. If you are on a single drive system, you’ll need to configure a network location or an external drive for backup.
Old app: Control Panel\All Control Panel Items\File History
or
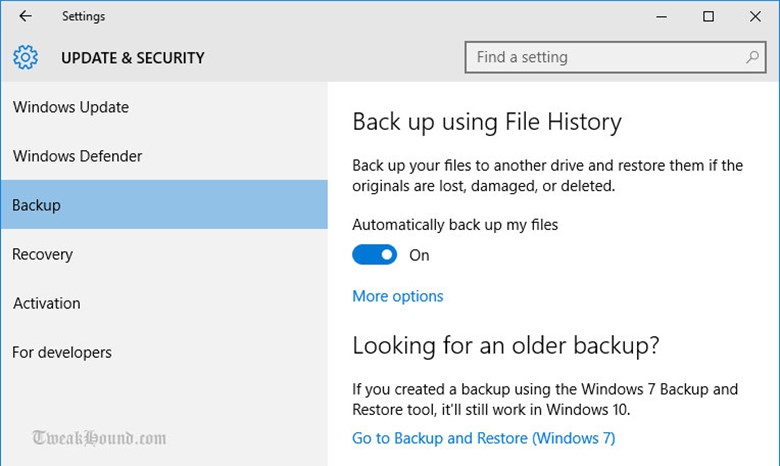
New app: Settings > Update & security > Backup > Back up using File History
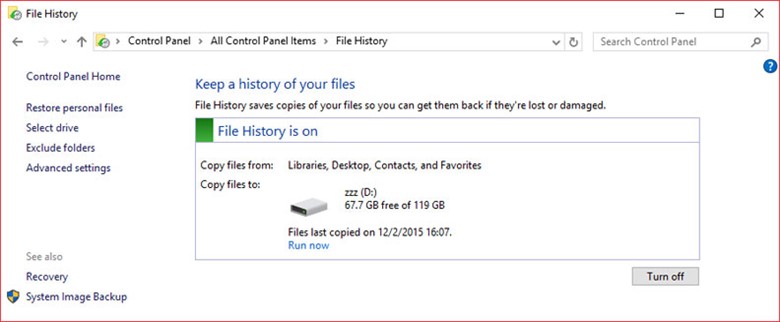
Old app: Control Panel\All Control Panel Items\File History
In this example I am using a 32GB flash drive formatted NTFS.
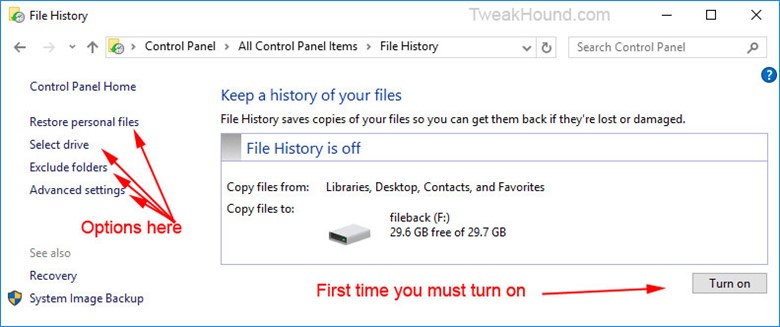
External drive
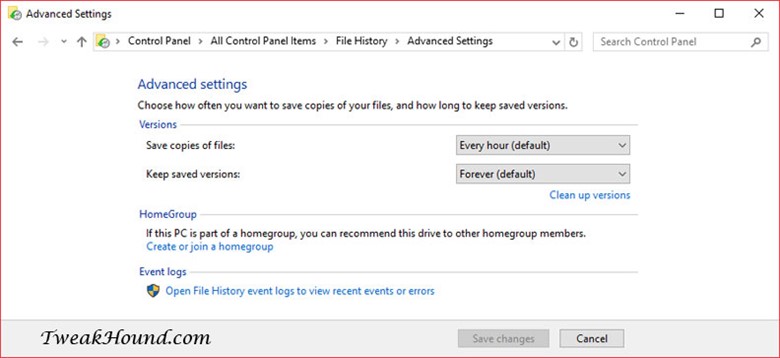
Control Panel\All Control Panel Items\File History\Advanced Settings
New app: Settings > Update & security > Backup > Back up using File History
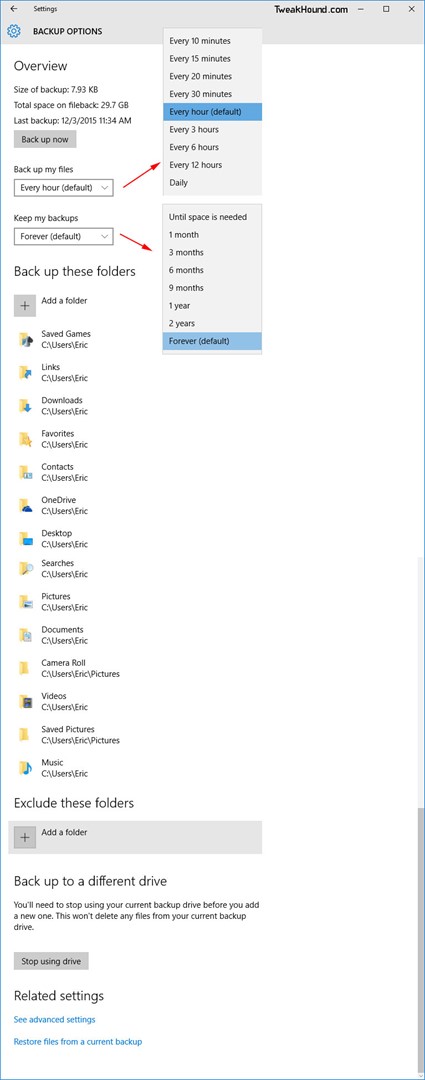
More options
Tip
You can add Onedrive, Dropbox, etc, as a network drive. Just Google it.
Recovery Media
You can create a bootable DVD or flash drive.
DVD
Easy way: Press the Windows + R keys > type recdisc > press Enter.
or
Control Panel\All Control Panel Items\Backup and Restore (Windows 7) > Create a system repair disc.
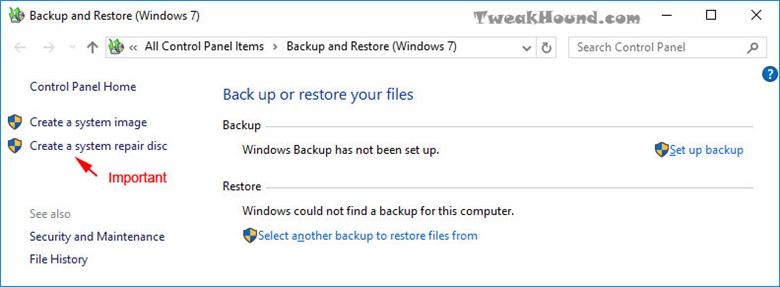
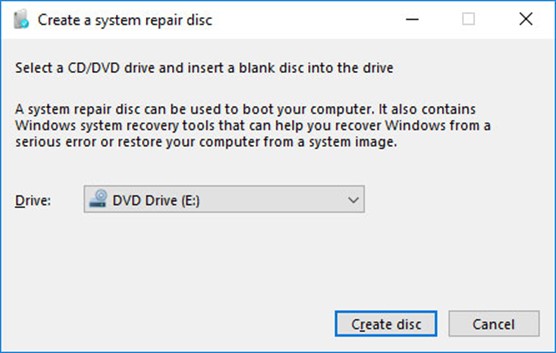
USB
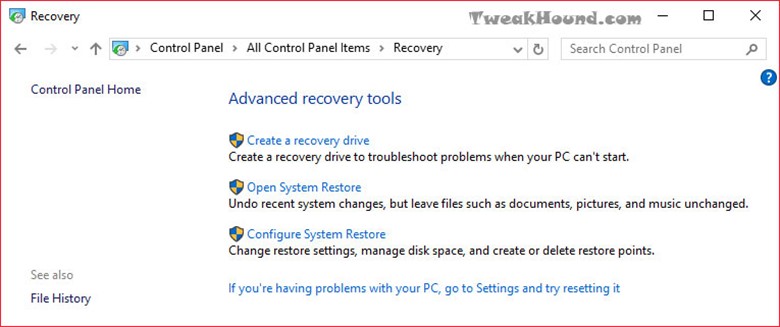
Go to: Control Panel\All Control Panel Items\Recovery > Create a recovery drive
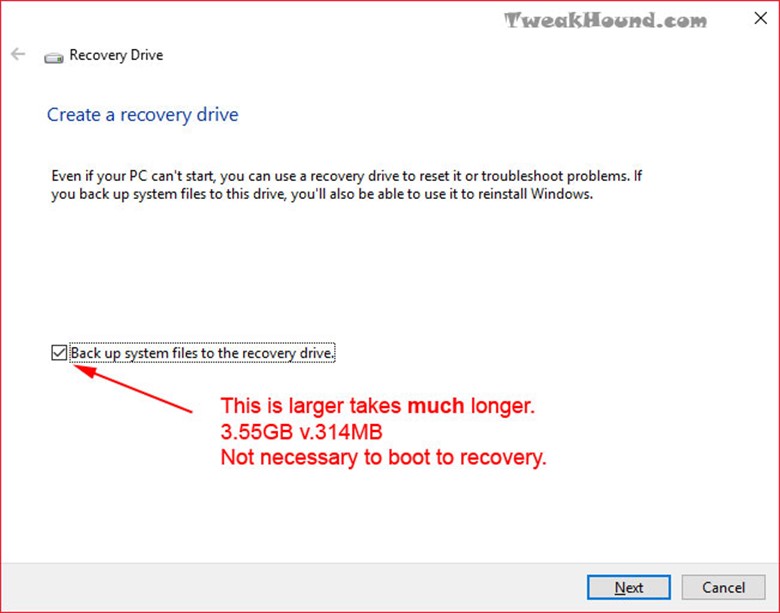
If you are just trying to create media that will boot into recovery uncheck the box. Back up system files takes a long time and is not necessary to create media that will boot into recovery. However, if you have the time and a flash drive big enough this can be useful (at least 4GB free formatted so get an 8GB). You can actually reinstall Win10 with this.
Pick your flash drive. Now check again to make sure!
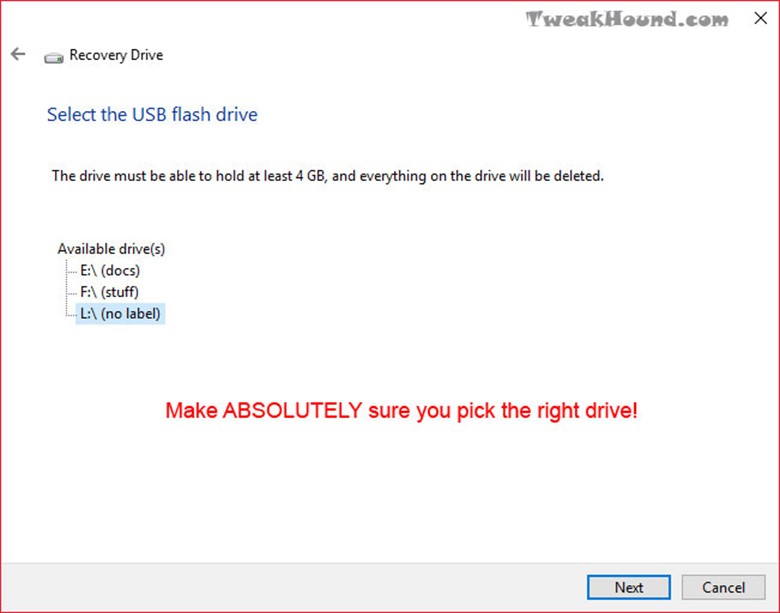
Yeah, yeah. Click Create.
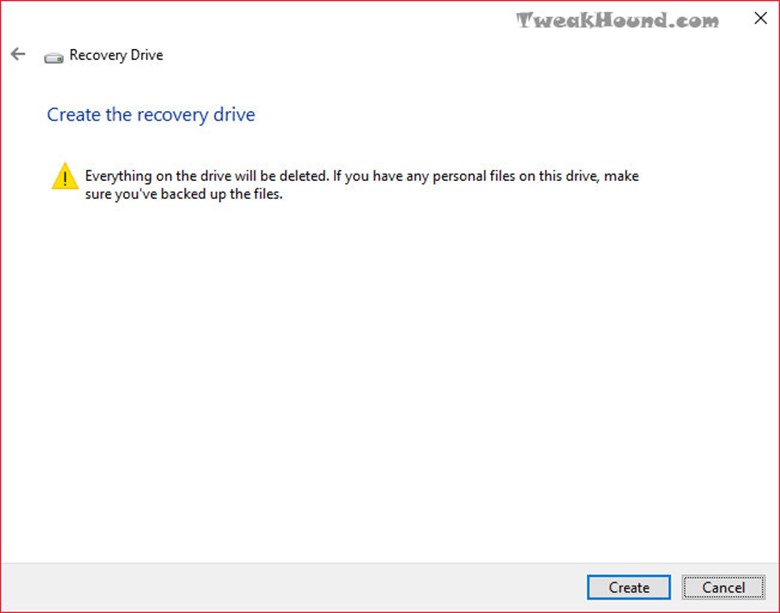
You can also to this from a downloaded Win10 ISO.
See: Download Windows 10 TH2 ISO And Create Media

I think Classic Shell is far superior to anything out there and free.
Hi Eric,
Excellent job. I will have to re-read the whole thing again… My favorite is moving all the DOCS, Pix and Misc. to a separate drive. In this way, I can do more frequent OS backups that will not fill the backup drive too fast.
Issues on my end:
1. When I try to change Geolocation Service to AUTOMATIC, I get “the system cannot find the file specified”. Any suggestions?
2. On your tweaks p. 13, you have more options. On Shutdown settings, I only have SLEEP and LOCK. You additionally have: Turn on fast startup and Hibernate. Are you running Win 10 Enterprise?
Suggestion: It would be great to compile everything into a PDF file that can serve as desktop reference.
Geolocation: https://technet.microsoft.com/en-us/windows/dn764773.aspx?f=255&MSPPError=-2147217396
Shutdown settings may vary depending on setup.
PDF: https://www.tweakhound.com/buy-tweaking-windows-10/
This is funny and just for a point of reference I have worked in IT primarily in Computer and Network installation, support, maintenance for 21 years now and have read Eric’s guides since Windows XP as it is one of the easiest ways to get great info on the manipulation of Operating systems and he is about as complete as it gets.
Anyway the way I organize my files is on seperate hard drives internally and with USB media containers most often now (I have 2 64 Gb’s I use and on 256 GB one as well given to me by Corsair. My computer is set up with 3 hard drives (which I would like to grow to 5 with two or 7 in raid sets in 0,1 and 10 (0,1 being options with 5 and 10 being with 7). The first of course is the OS drive otherwise generally known as C:\ and the other two are P:\ programs, and M:\Media which I organize relatively often and I have backups and everything of course external from the OS drive which is also a Corsair Pro SSD and the things on it are often used, and active programs such as Office etcetera but not generally big saves (I like to keep SSD’s relatively light in volume)!
Two things…
1) Excellent job Eric! One thing I miss is the Logoff, Shutdown, and Restart tiles to which I pin to my taskbar…But hey that’s just me..
2) Might as well make it a sixer…LOL
Excellent work! This really takes all the “mystery” out of running and securing this OS…at least for me. A quick “typo” to correct. On page 3, when copying the GOD MODE title, the space between the period after the word MODE, and the first parentheses has to be removed for it to work.
Thank you again for all your hard work!
Fixed. Thanks!
Defragment and optimize your drives bug
There is a bug in Win 10, V 1511 build 10586.17 setting for “defragment and optimize your drives”. If I turn my HDD defrag schedule to ON, my SSD gets switched on too. If I turn OFF SSD defrag, HDD defrag is also turned off. I have defrag for all drives turned off turned OFF and will do it manually.
I have 8Gs of RAM on a 32bit Windows with SSD on a laptop and it boots twice as fast (average 30 sec.) as Windows 10 32 or 64bit (1 min. +) – and Windows 32 bit can only use 4Gs of RAM max.!
Same programs and all drivers all up to date on both so go figure!
https://msdn.microsoft.com/en-us/library/windows/desktop/aa366778%28v=vs.85%29.aspx