Windows 10 Networking
Most network related tasks can be done in the Settings app > Network & Internet > Ethernet. Most of these take you to the old Control Panel settings.
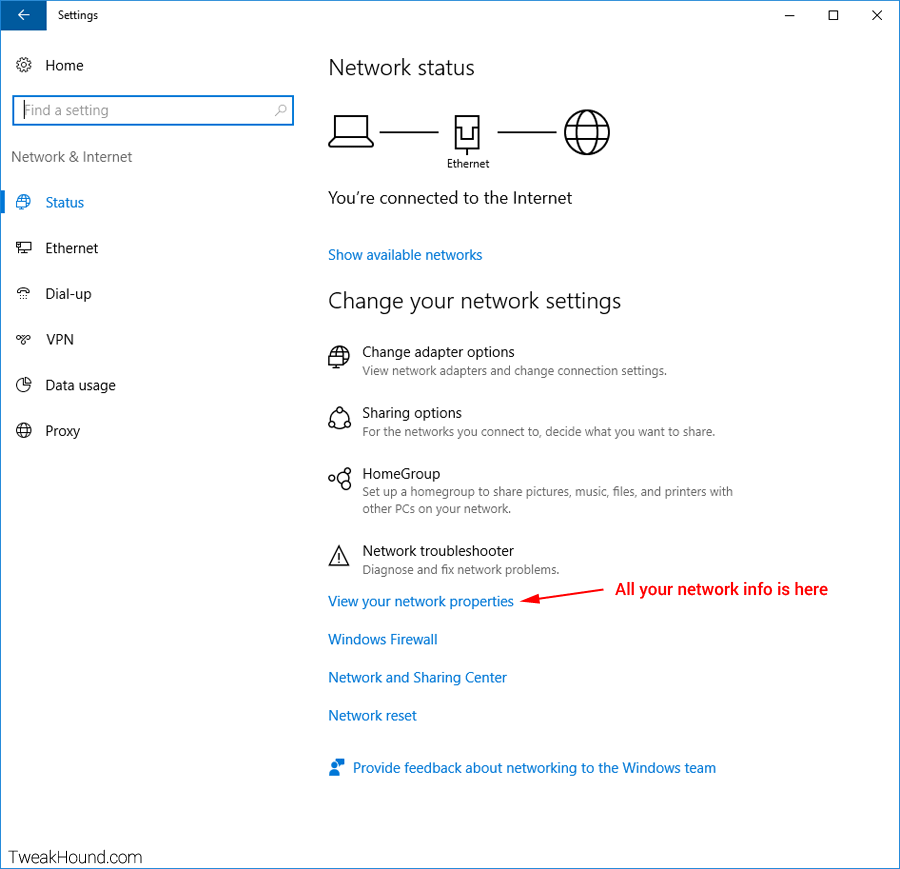
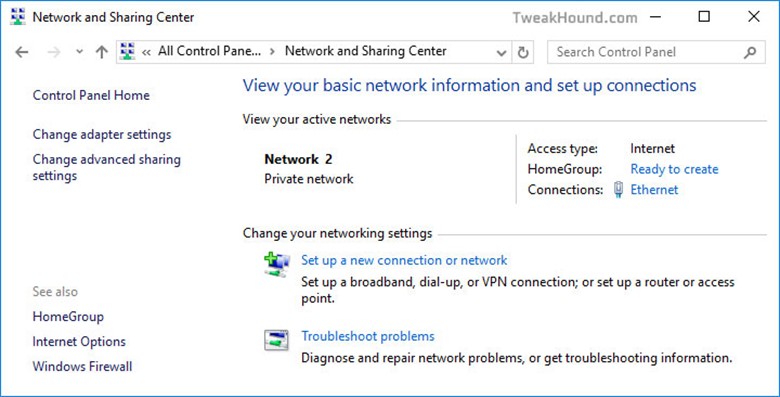
Control Panel\All Control Panel Items\Network and Sharing Center
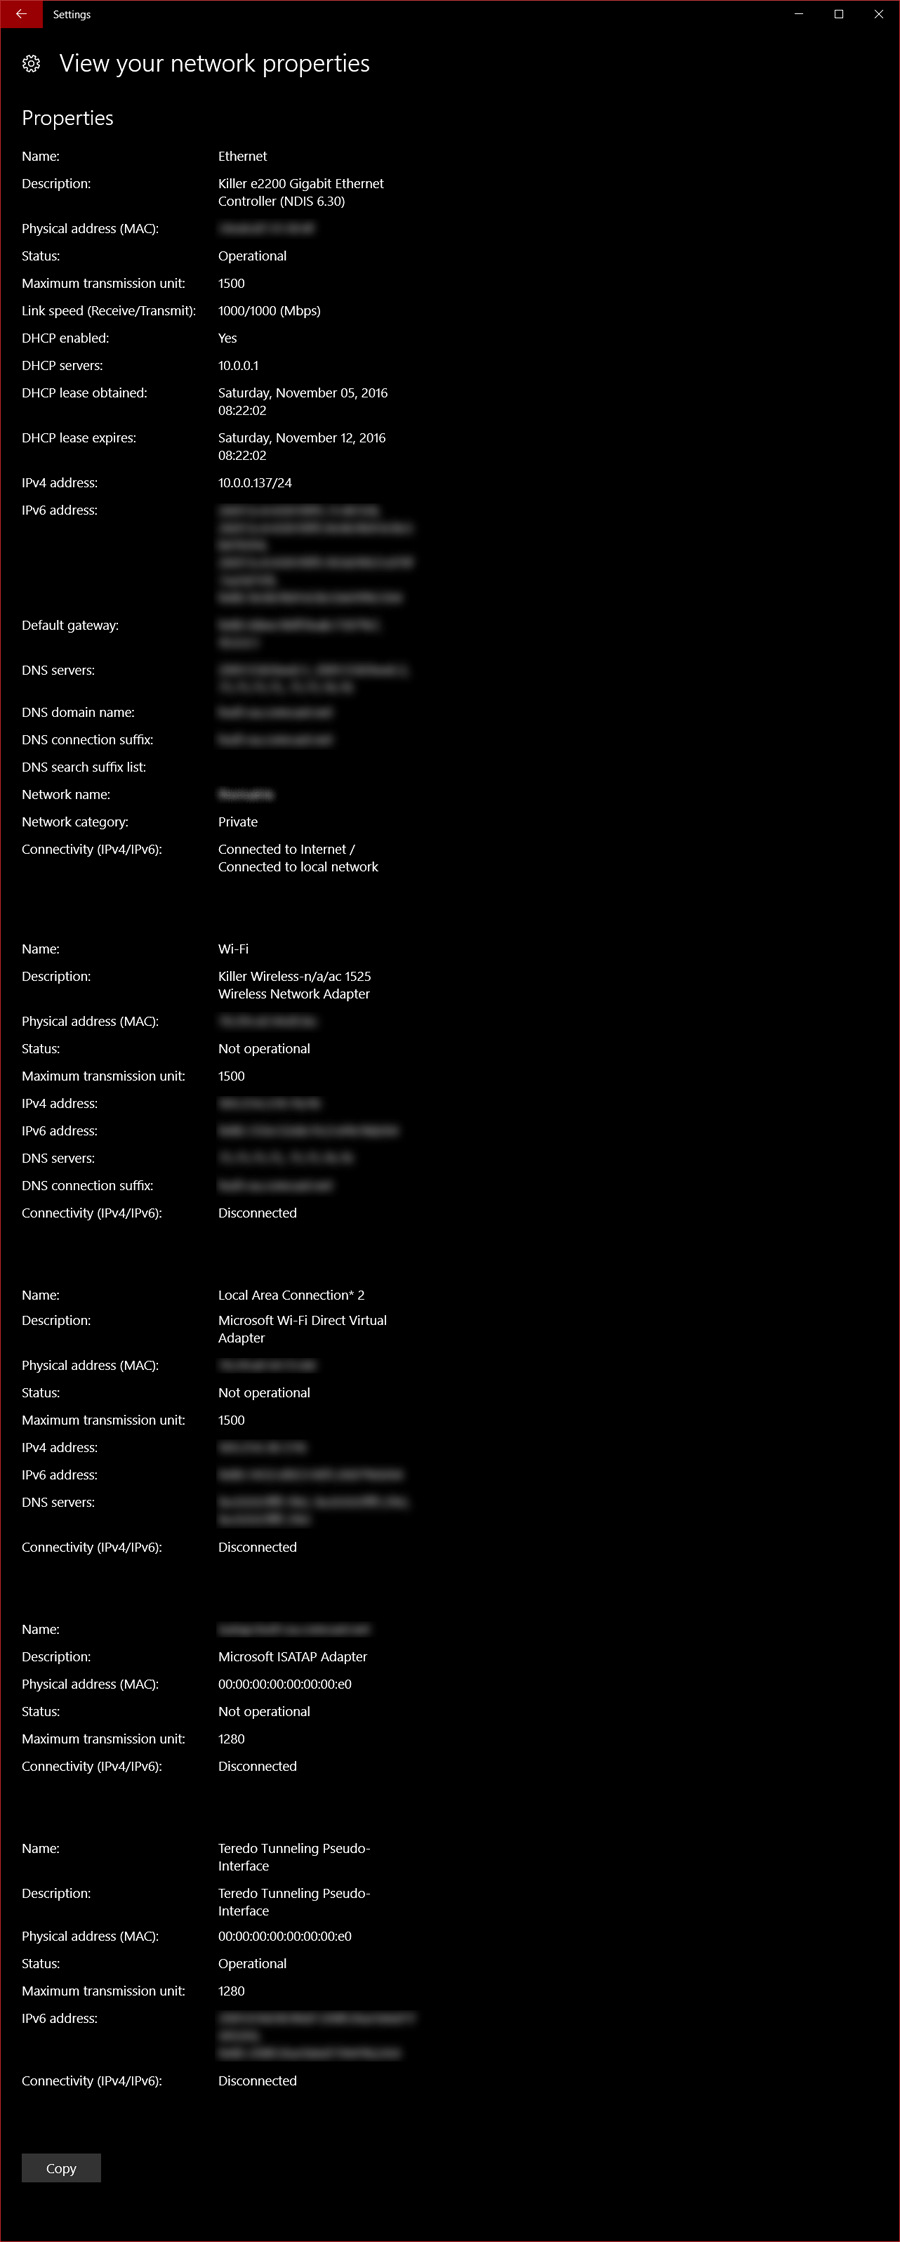
View your network properties:
Sharing
Just a few quick notes here. Please see Windows 7 Home Networking FAQ’s (applies to Windows 10 too).
*Thankfully the HomeGroup has been removed in Win10 1803.
If you are having issues with network browsing see: Fix Windows 10 Network Browsing
Home Networking Tips
My home network is a mixed mess of Windows 7, openSUSE, Linux Mint, and Win10. These all interact via a standard Windows workgroup. I’ve found Windows 10 workgroup networking to be a little wonky (to be kind). Here are a few tips that have made my home networking easier:
Use A Local Account
You can use a Microsoft account or a Local account. Switching to a Local account can aide workgroup browsing.
To switch to a Local account, go to Settings > Accounts > Sign in with a local account instead. Reboot when finished.
Use A Password
Whether you use a Microsoft Account or Local Account, you have the option of using a Password, PIN, or Picture password to sign-in. If you are not using a password, try switching back to using one. To do this go to Settings > Accounts > Sign-in options > and choose Password. Reboot when finished.
Use Windows Credential Manager
This is the tip that IMHO is most likely to help you. Essentially this pre-loads your login to other computers.
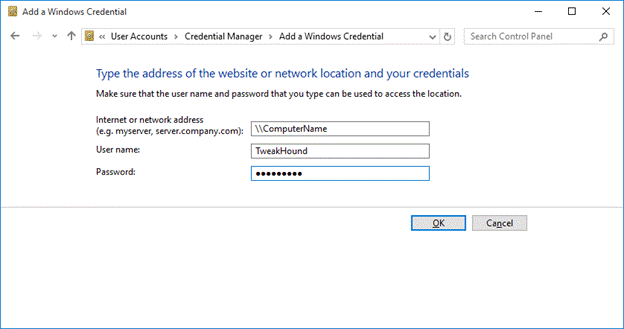
Go to Control Panel > User Accounts > Credential Manager (Or type Credential Manager in the search box).
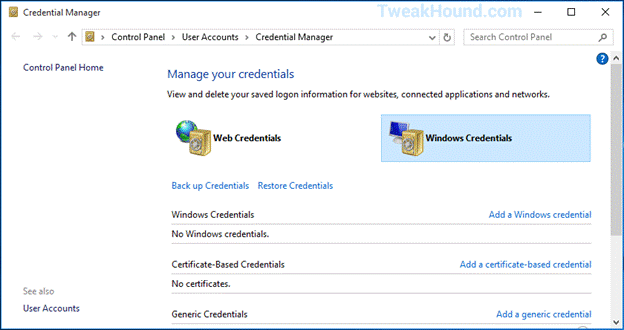
On the Windows Credentials line, click on Add a Windows credential.
Fill in the computer name (preceded by \\ ), the user name (must exist on the target computer), and that users password.
To this for all the computers you want to connect to.
Reboot when finished.
Helpful links:
Changes to file sharing over a network in Windows 10
How To Share Files and Folders over a Network for Workgroups in Windows Server 2003
Windows 10 Network Tweaks
There are two ways to adjust network settings in Win10. I’ll call them The New Way and The Old Way. The New Way adjust networking services at the OS level. The Old Way adjusts services at the actual adapter. I use both ways.
*These tweaks will not increase performance or increase download speed. So why tweak it? The tweaks here are designed to cut down on network chatter and to secure your box (see here for an example of the chatter I’m talking about). Let me make this clear though. I’ve seen no network performance improvement using these tweaks and I do not believe any home users will. These settings do not cover Services, for those see the Services section of this guide.
The New Way
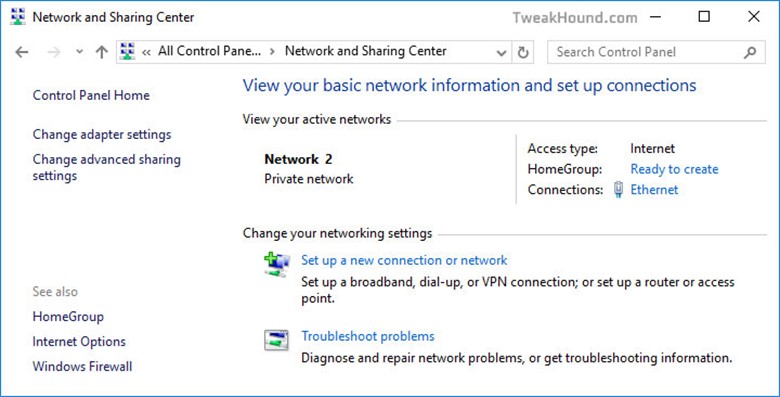
Open Network and Sharing Center
From the desktop, right-click on the network icon in the taskbar > choose Open Network and Sharing Center. Or
Search charm > type Network and Sharing Center
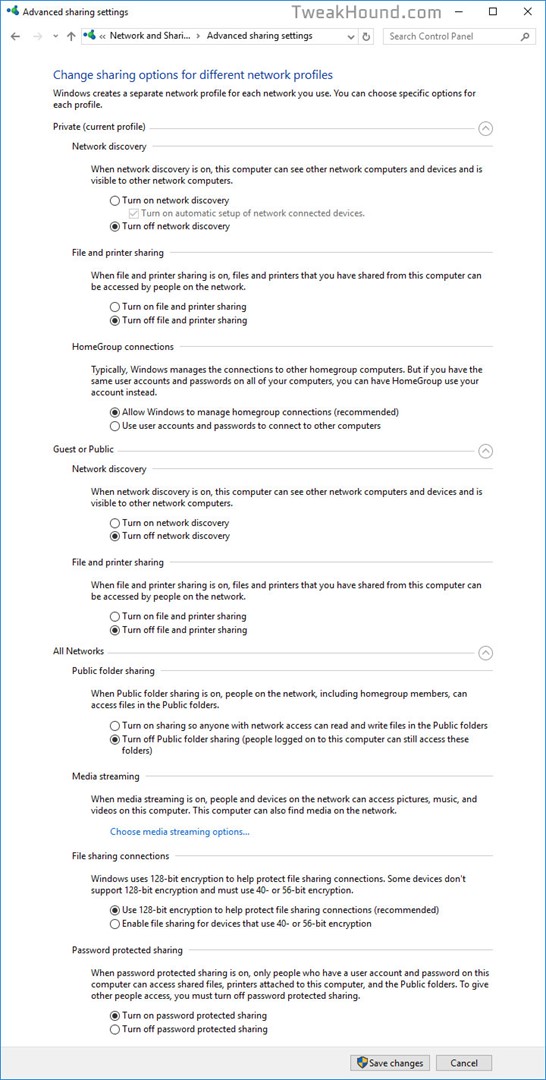
Next, click on Change advanced sharing settings.
I’m going to make this really easy. If and only if you aren’t networked, select every “Turn off” box and click the Save changes button. If you are networked to any sort of computer, device, etc. then skip to The Old Way.
The Old Way
I do not recommend the average user attempt these tweaks.
Again, a warning. Backup your computer before doing these. The purpose of these tweaks is specifically to remove functionality. Understand before acting!
Possible settings to disable:
Client for Microsoft Networks
This IS the Workstation Service. This service is complex and third party applications may depend on this being there.
Disabling this is often recommended for SERVER hardening.
Essential if networked.
If you are going to disable this, I highly recommend:
Doing this tweak completely separate from all other actions, and, disabling this, File and Printer Sharing for Microsoft Networks, rebooting and checking all your applications and error logs.
Very advanced users may also want to block the associated ports via the firewall.
QOS
Unneeded for the home user, (and in truth is unused in most home environments).
File and Printer Sharing for Microsoft Networks
Needed if you connect to another computer or vice versa. (see Client for Microsoft Networks above)
Microsoft Network Adapter Multiplexor Protocol
Not enabled by default. Unneeded in home environment. Used for network teaming
Internet Protocol Version 6 (TCP/IPv6)
For many users this is an essential component. HomeGroup, VPN, DirectAccess and other parts of the operating system use this.
You should keep ipv6 enabled even if your ISP doesn’t provide ipv6 connectivity yet.
“The Argument against Disabling IPv6
It is unfortunate that some organizations disable IPv6 on their computers running Windows Vista or Windows Server 2008, where it is installed and enabled by default. Many disable IPv6-based on the assumption that they are not running any applications or services that use it. Others might disable it because of a misperception that having both IPv4 and IPv6 enabled effectively doubles their DNS and Web traffic. This is not true.
From Microsoft’s perspective, IPv6 is a mandatory part of the Windows operating system and it is enabled and included in standard Windows service and application testing during the operating system development process. Because Windows was designed specifically with IPv6 present, Microsoft does not perform any testing to determine the effects of disabling IPv6. If IPv6 is disabled on Windows Vista, Windows Server 2008, or later versions, some components will not function. Moreover, applications that you might not think are using IPv6 such as Remote Assistance, HomeGroup, DirectAccess, and Windows Mail could be.
Therefore, Microsoft recommends that you leave IPv6 enabled, even if you do not have an IPv6-enabled network, either native or tunneled. By leaving IPv6 enabled, you do not disable IPv6-only applications and services (for example, HomeGroup in Windows 7 and DirectAccess in Windows 7 and Windows Server 2008 R2 are IPv6-only) and your hosts can take advantage of IPv6-enhanced connectivity.” Support for IPv6 in Windows Server 2008 R2 and Windows 7
Internet Protocol Version 4 (TCP/IPv4)
Essential
Microsoft LLDP Protocol Driver
Microsoft’s version of LLDP. Not the same as LLTD (below). Discovers stuff on your network (advanced users see here). I recommend most users leave this as is. Not needed if you aren’t accessing anything except the internet on your network.
Link-Layer Topology Discovery Mapper I/O Driver & Link-Layer Topology Discovery Responder
Basically this enables the pretty little Network Map in Vista and Windows 7. There is no Network Map in Windows 8 so I can only assume this was left in for legacy reasons.
From what I’ve observed these protocols are basically inactive until you or someone on your network tries to view the network map.
———————————————
Adjusting Network Settings
Press the Windows + R keys and type ncpa.cpl
Or
Use the Search charm and type ncpa.cpl
Or
Control Panel > Network and Sharing Center > Change adapter settings

Then right-click on the adapter you wish to edit and choose Properties.
*Tip – Yes, you can configure each connection differently!
*Tip – While your here, if you aren’t going to use one of the connections, disable it (right-click > Disable).
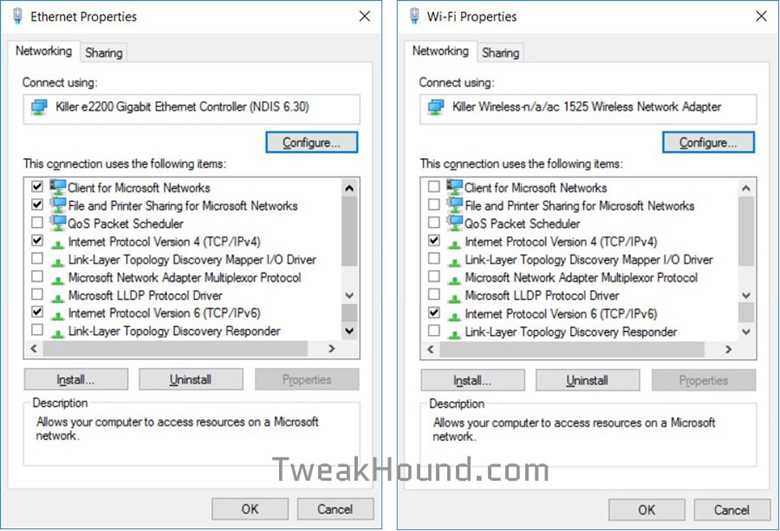
In the above example I basically disabled Windows networking on Wi-Fi while maintaining internet access.
The Link Layer/LLDP stuff isn’t “needed”.
See: Link Layer Topology Discovery protocol(LLTD) & Disabling Network Discovery/Network Resources
Many more network settings are in the Windows 10 Privacy Settings section of this guide.

I think Classic Shell is far superior to anything out there and free.
Hi Eric,
Excellent job. I will have to re-read the whole thing again… My favorite is moving all the DOCS, Pix and Misc. to a separate drive. In this way, I can do more frequent OS backups that will not fill the backup drive too fast.
Issues on my end:
1. When I try to change Geolocation Service to AUTOMATIC, I get “the system cannot find the file specified”. Any suggestions?
2. On your tweaks p. 13, you have more options. On Shutdown settings, I only have SLEEP and LOCK. You additionally have: Turn on fast startup and Hibernate. Are you running Win 10 Enterprise?
Suggestion: It would be great to compile everything into a PDF file that can serve as desktop reference.
Geolocation: https://technet.microsoft.com/en-us/windows/dn764773.aspx?f=255&MSPPError=-2147217396
Shutdown settings may vary depending on setup.
PDF: https://www.tweakhound.com/buy-tweaking-windows-10/
This is funny and just for a point of reference I have worked in IT primarily in Computer and Network installation, support, maintenance for 21 years now and have read Eric’s guides since Windows XP as it is one of the easiest ways to get great info on the manipulation of Operating systems and he is about as complete as it gets.
Anyway the way I organize my files is on seperate hard drives internally and with USB media containers most often now (I have 2 64 Gb’s I use and on 256 GB one as well given to me by Corsair. My computer is set up with 3 hard drives (which I would like to grow to 5 with two or 7 in raid sets in 0,1 and 10 (0,1 being options with 5 and 10 being with 7). The first of course is the OS drive otherwise generally known as C:\ and the other two are P:\ programs, and M:\Media which I organize relatively often and I have backups and everything of course external from the OS drive which is also a Corsair Pro SSD and the things on it are often used, and active programs such as Office etcetera but not generally big saves (I like to keep SSD’s relatively light in volume)!
Two things…
1) Excellent job Eric! One thing I miss is the Logoff, Shutdown, and Restart tiles to which I pin to my taskbar…But hey that’s just me..
2) Might as well make it a sixer…LOL
Excellent work! This really takes all the “mystery” out of running and securing this OS…at least for me. A quick “typo” to correct. On page 3, when copying the GOD MODE title, the space between the period after the word MODE, and the first parentheses has to be removed for it to work.
Thank you again for all your hard work!
Fixed. Thanks!
Defragment and optimize your drives bug
There is a bug in Win 10, V 1511 build 10586.17 setting for “defragment and optimize your drives”. If I turn my HDD defrag schedule to ON, my SSD gets switched on too. If I turn OFF SSD defrag, HDD defrag is also turned off. I have defrag for all drives turned off turned OFF and will do it manually.
I have 8Gs of RAM on a 32bit Windows with SSD on a laptop and it boots twice as fast (average 30 sec.) as Windows 10 32 or 64bit (1 min. +) – and Windows 32 bit can only use 4Gs of RAM max.!
Same programs and all drivers all up to date on both so go figure!
https://msdn.microsoft.com/en-us/library/windows/desktop/aa366778%28v=vs.85%29.aspx