 How I use openSUSE 13.2. I hope you find something useful here!
This article will be updated as I find more tips or on the off chance that someone actually sends some in.
last updated – 14NOV2014
This article dedicated to openSUSE forum member James McDaniel (a.k.a jdmcdaniel3) who passed away last December. His contributions to the openSUSE community are missed.
Preamble
Why use Linux?
There are articles all over the web on this subject.
My main reasons: Security, and Free Software.
– – – – –
OPINION – My Thoughts On openSUSE
You see where it says OPINION above? Good…
Where openSUSE Stands
openSUSE is a seriously awesome operating system for serious users. I’ve been using openSUSE for many years (I think 9.3 was my first version). openSUSE while mostly stable is a bleeding edge release. Also “The standard release cycle for the openSUSE Distribution is every 12 months. The life cycle of openSUSE is documented in The Lifetime Wiki Page.” The stable, long term release is called Suse Linux Enterprise. Because it is bleeding edge sometimes configuring things can be difficult. This may require a user to actually think for themselves and, heaven forbid, do a Google search or two.
Should You Use openSUSE?
If you have ever taken your computer to Geek Squad, or used those “one-click” fix your PC programs you see on TV then openSUSE may be too difficult for you to start using Linux with. If you have partitioned a drive and installed Windows, or are comfortable editing the registry and fixing hardware and software issues yourself then go for openSUSE.
BTRFS
openSUSE 13.2 defaults to a new file system called BTRFS. As of 13.2 I am not using it. I still use Ext4.
See here for more: https://www.tweakhound.com/2014/10/15/tweakhounds-btrfs-notes/
– – – – –
Notes On This Article
This article is specifically not for Linux newbies.
I use the KDE desktop exclusively.
Also, as much as I would like to be I am not a Linux expert. Like most ‘Nix users I learn by researching and doing.
– – – – –
How I use openSUSE
I use 3 operating systems; Windows 7, Windows 8.1, and openSUSE 13.2. I spend the majority of my time in openSUSE. I use virtual machines to run things like Office 2010 when needed.
Fellow Geekos: I rarely use the Factory repos. Even more rare is my use of developmental kernels. I do tend to use things like KDE Upstream. I also often compile my kernels (because I can).
My setups are something like:
1 – Desktop: Dual-boot Win 8.1, openSUSE 13.2
2 – Desktop: Triple-boot Win 7, Win 8.1, openSUSE 13.2
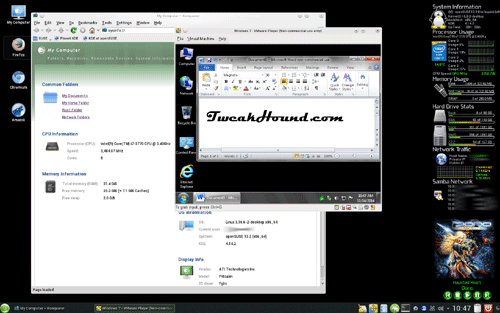
My Desktop – Click pic for larger image:
– – – – –
Have You Found This Guide Useful?
Please help me keep helping you!

– – – – –
Official openSUSE Links
First and most important tip is where to get help: The openSUSE Forums
This is THE place for any openSUSE user to find help and info. (I am NOT an active member there.)
There is a small but hardcore group of regulars that really know their stuff.
openSUSE Official Links:
Home
Download
Discover It
Portal:13.2
*openSUSE Documentation
*openSUSE: Documentation List of Manuals
****Unofficial Guide to openSUSE 13.2
Dual-Boot
See how I do it here:
For UEFI: Dual Boot openSUSE 13.2 and Windows 8.1 UEFI
For standard/legacy BIOS: Dual-Boot openSUSE 12.3 And Windows (still good for openSUSE 13.2)
On With The Tip, Tricks, And Tweaks…
Add Repos
How to add repos: SDB:Add package repositories
See Additional package repositories.
Repos I use:
KDE REPO NOT ACTIVE YET!
“Use this repository, if you want to have the current (and latest) version of the KDE Software Compilation.
As that KDE 4.14 is the last major release for KDE 4, we will just provide maintenance updates for openSUSE 13.2. It would not make sense to make KDE:Current build for openSUSE 13.2 if we deliver the same through maintenance updates.”
KDE _ http://download.opensuse.org/repositories/KDE:/Current/openSUSE_13.2/
zypper ar -f -n KDE http://download.opensuse.org/repositories/KDE:/Current/openSUSE_13.2/ KDE
KDE:Extra – http://download.opensuse.org/repositories/KDE:/Extra/openSUSE_13.2/
zypper ar -f -n KDE:Extra http://download.opensuse.org/repositories/KDE:/Extra/openSUSE_13.2/ KDE:Extra
Packman – http://packman.inode.at/suse/openSUSE_13.2/
zypper ar -f -n packman http://packman.inode.at/suse/openSUSE_13.2 packman
Mozilla – http://download.opensuse.org/repositories/mozilla/openSUSE_13.2/
zypper ar -f -n mozilla http://download.opensuse.org/repositories/mozilla/openSUSE_13.2 mozilla
Virtualbox and Virtualization http://download.opensuse.org/repositories/Virtualization:/openSUSE13.2/openSUSE_13.2/
zypper ar -f -n Virtualization http://download.opensuse.org/repositories/Virtualization:/openSUSE13.2/openSUSE_13.2 Virtualization
Wine (disabled mostly) – http://download.opensuse.org/repositories/Emulators:/Wine/openSUSE_13.2/
zypper ar -f -n wine http://download.opensuse.org/repositories/Emulators:/Wine/openSUSE_13.2 wine
libdvd– http://opensuse-guide.org/repo/13.2/ libdvdcss/
zypper ar -f http://opensuse-guide.org/repo/13.2/ libdvdcss
Also: Official repos added at install (updates, oss, etc.)
Finding Additional Software
Go here: http://software.opensuse.org/find and enter the name of the package.
SSD Setup:
– You need to use Ext4, Btrfs, FAT, GFS2, XFS as the filesytem.
– You need to add discard as an option in your fstab for all the partitions on the SSD.
i.e. / , /home , but only for Ext4, Btrfs, FAT, GFS2, XFS formatted partitions (not swap, or Windows, etc.).
To edit your fstab to enable discard (trim)
– How I do it (openSUSE 12.3/KDE): press the alt + f2 keys > type kdesu kwrite > navigate to and open /etc/fstab >
find the partitions mentioned above > add discard to that line.
– What mine looks like:
/dev/disk/by-id/XXXXXX/ ext4 noatime,acl,user_xattr,discard
/dev/disk/by-id/XXXXXX/home ext4 noatime,acl,user_xattr,discard
– – – – –
Mounting Windows Drives
This is how I mount Windows drives.
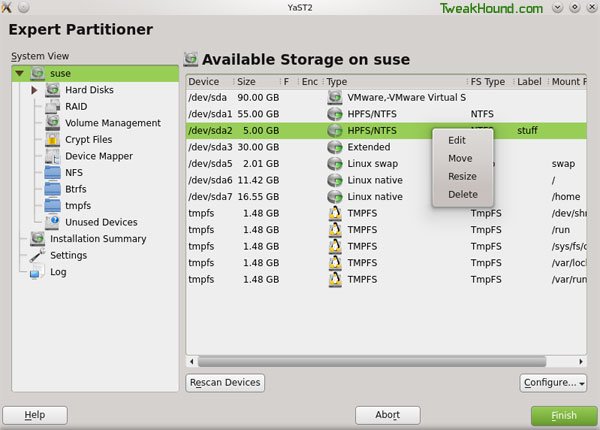
First I mount them via YaST Partitioner. Go to YaST > System > Partitioner
Right-click on the partition you wish to mount and choose Edit.
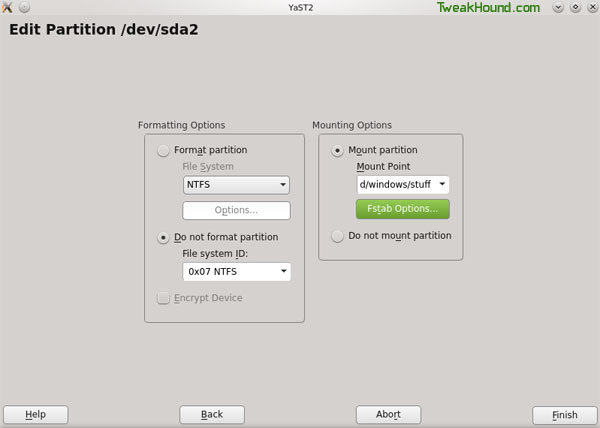
In the Mounting Options section, check the circle next to Mount partition.
Type in where you want to mount it. I like to mount my Windows partitions in a folder called Windows in my home folder.
I type /home/YOURUSERNAME/windows/NAMEFORYOURWINDOWSDRIVE
Now click Finish and Finish to exit out of Partitioner. Your new folder should appear an be accessible on reboot.
Next we are going to edit our FSTAB file. This is where openSUSE looks for info on what and how to mount drives/partitions.
Press the Alt + F2 keys and type kdesu kwrite /etc/fstab , enter your root password when prompted.
Edit your entry so that the end section looks like this:
/dev/disk/by-id/XXXYYY-part2 /home/tweakhound/windows/backups ntfs-3g defaults,locale=en_US.UTF-8 0 0
/dev/disk/by-id/XXXXXX-part1 /home/tweakhound/windows/docs ntfs-3g defaults,locale=en_US.UTF-8 0 0
Be sure to save fstab before closing.
– – – – –
Install Video Drivers
AMD / ATI
Nvidia Easy Way, or Nvidia Hard Way
*Important
If you have a laptop that uses NVIDIA Optimus technology you should investigate a project called Bumblebee.
I’m using it with success but the installation and setup isn’t for the faint of heart.
You must pay exacting attention to the info provided in the links below and read through everything before continuing:
1 – Main openSUSE Page: http://en.opensuse.org/SDB:NVIDIA_Bumblebee
2 – THE Guide: openSUSE 13.1: install ‘bumblebee’ and disable discrete graphics adapter on NVIDIA Optimus laptop
3 – Another good guide: Bumblebee – Run entire KDE session on NVIDIA
4 – Bumblebee home page: Bumblebee, a project aiming to support NVIDIA Optimus technology under Linux.
openSUSE 13.2 Multimedia
This guide will help you install everything you need to play any multimedia file: openSUSE 13.2 Multimedia Guide
Of course I use the section for KDE.
For best results I Switch system packages to the Packman repo BEFORE using the guide above.
Windows Networking (SAMBA)
Fast and simple method.
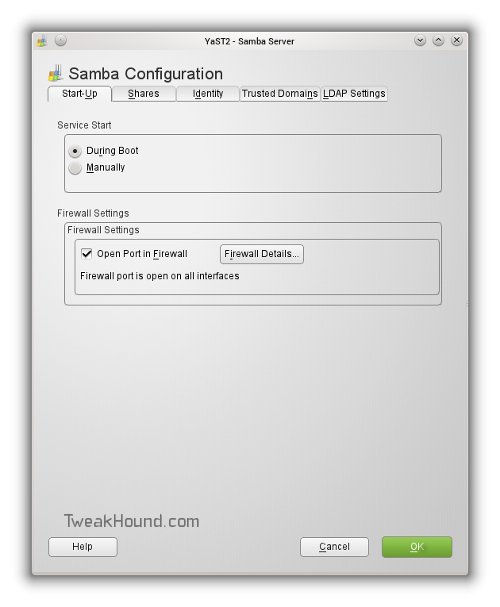
Go to YaST > Networking Services > Samba Server
Start-Up Tab:
Service Start = During Boot
Firewall Settings= check Open Port in Firewall
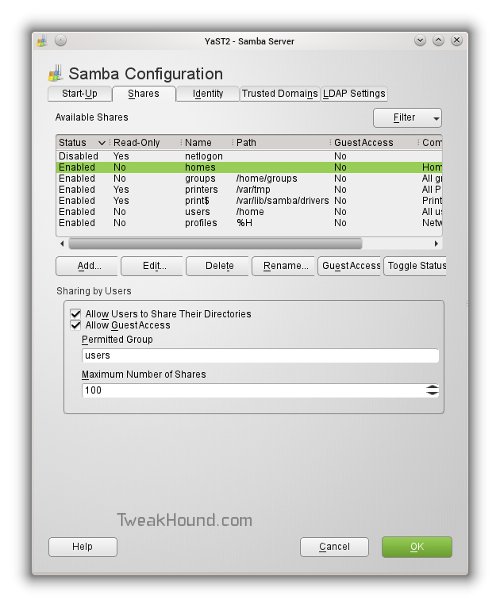
Shares Tab: Sharing by Users section
check Allow Users to Share Their Directories
check Allow Guest Access
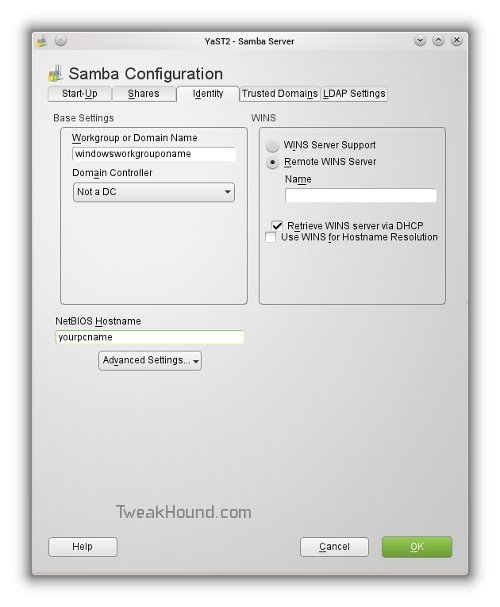
Indentity Tab:
Fill in Workgroup name
Fill in NetBIOS name
Click OK and Reboot.
Advanced settings see S.A.C.T. – Samba Automated Configuration Tool – Version 1.20
– – – – –
Fonts
You can install any TTF fonts from your Windows install (right-click > Actions > Install > Personal).
Additional font repo: http://download.opensuse.org/repositories/M17N:/fonts/openSUSE_13.2/
Additional fonts you may be interested in (available in your standard repos):
fifth-leg-font – Font for the openSUSE Brand
google-roboto-fonts – Default on many Android phones.
ubuntu-fonts – uhh…from the Ubuntu distro.
fetchmsttfonts – Installs the older Microsoft fonts.
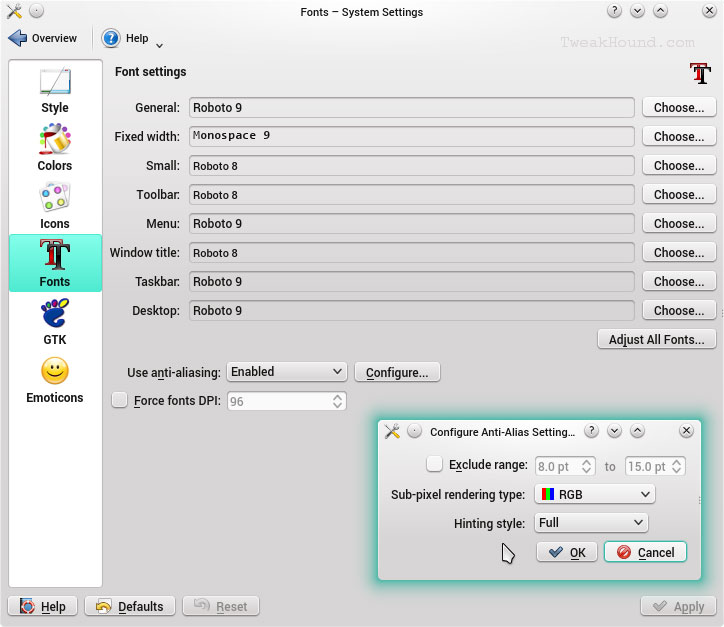
To change system fonts go Start button > Configure Desktop > Application Appearance > Fonts.
These are the settings I use. You’ll have to play with the Use anti-aliasing settings to adjust to your liking.
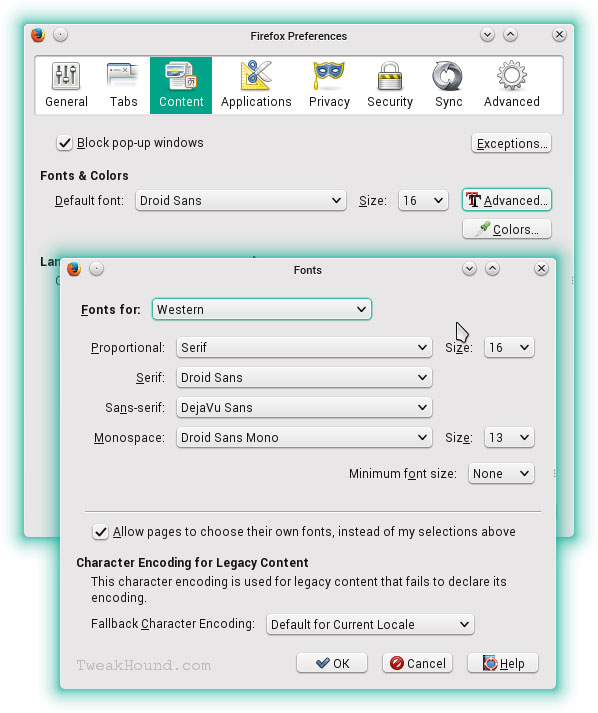
Firefox fonts. In Firefox go to Edit > Preferences > Content > Advanced.
These are the fonts I use:
– – – – –
Disable Desktop Search
Start button > Configure Desktop > Desktop Search > Uncheck Enable Search > Click Apply
– – – – –
Install Amarok 1.4
Hate Amarok 2? Me too! For most folks the alternative can be a program called Clementine. I still prefer Amarok 1.4
– First make sure Amarok 2 is uninstalled.
– Then add kde3-amarok via YaST (it is in repo http://download.opensuse.org/distribution/13.2/repo/oss/)
– – – – –
How To Install RPM’s Without Apper (Kpackagekit)
If you are like me and have uninstalled / not installed default packages you will find Apper will often try to install / reinstall this stuff.
I should note that I disable Apper autostart though this isn’t recommended practice for new users (Personal Settings > Startup and Shutdown > Service Manager > uncheck Apper Monitor).
To get around using Apper I do this:
1- I always download my rpm’s to my Downloads folder.
2 – Add the folder to YaST. Go to YaST > Software Repositories. Click Add.
3 – Choose Local Directory and click Next
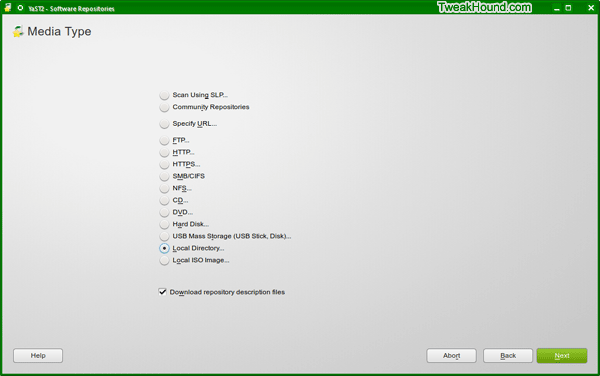
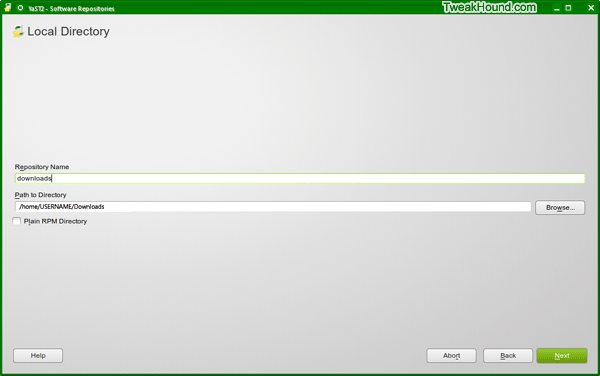
Browse to the folder you want to add, then name it, click Next.
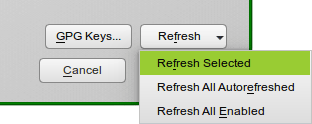
Once added, select your new repo, at the lower-right of the screen click on Refresh and choose either
Refresh Selected or Refresh All Enabled.
Your new repo is ready to go.
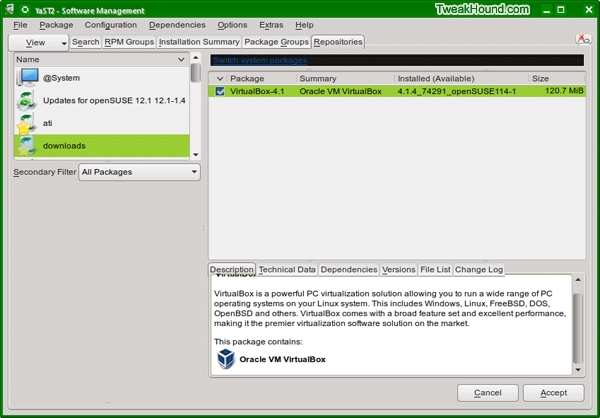
Click View > Repositories to add the Repositories tab.
Under that tab click on the name of your new repo to view it.
– – – – –
Virtualization
Install VMware player: Installing VMWARE Player in openSUSE 12.1 (works for 13.2 also)
Install VirtualBox: Install VirtualBox 4.3 on OpenSUSE 13.1 – Unixmen
– – – – –
Random openSUSE & KDE4 Tips
Run Command
Press the Alt + F2 keys
CCleaner For Linux
There is a CCleaner like program for Linux called Bleachbit. Install it initially via YaST. Then upgrading from the official rpm is easy.
Also KDE has a built-in cleaner called Sweeper (Start > Utilities > Security > Sweeper).
Make mouse select double-click (like Windows).
Go to Personal Settings > Input Devices > Mouse > Double-clcik to open files and folders > click Apply.
Remove That Stupid Desktop Nugget Thingy
In the upper-right there is a icon / nugget /tab. It used to be shaped like a cashew. Thus we get I Hate The Cashew (ihatethecashew).
Go here and use the appropriate one-click install: http://software.opensuse.org/package/plasmoid-ihatethecashew
Install ihatethecashew, right-click on Desktop, choose add Widgets, double-click I HATE The Cashew, done!
Manage Services
Windows users use Services.msc to manage services. In openSUSE 13.1 / KDE4 services are managed in 2 locations.
For KDE4 (users):
Go to Personal Settings > Startup and Shutdown > Service Manager
For System:
YaST > System > System Services (Runlevel)
Get Sysinfo Back
Add repo: http://download.opensuse.org/repositories/KDE:/Extra/openSUSE_13.2/
Install: kio-sysinfo
In Konqueror (NOT Dolphin), go to address sysinfo: (or sysinfo://)
24 Hour Clock
Go to Personal Settings > Local > Date & Time > Time format: > use HH:MM:SS > logout or reboot.
Compile Kernel
Compiling the Linux Kernel, the SUSE way
&
S.A.K.C. – SUSE Automated Kernel Compiler
Set CPU Scaling
C.F.U – CPU Frequency Utility
Tuned
I am experimenting with a package called Tuned-ADM which is new to openSUSE. It allows multiple power options.
See: http://servicesblog.redhat.com/2012/04/16/tuning-your-system-with-tuned/
I’m currently using tuned-adm profile throughput-performance
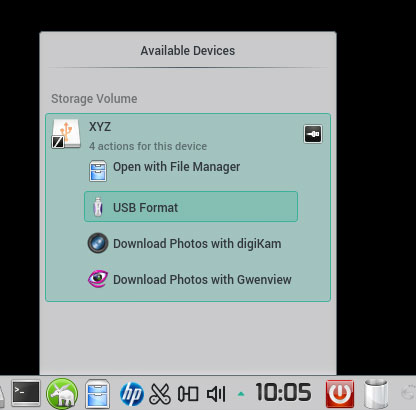
USB Formatter
Enable KDE Extra repo from above and install quick-usb-formatter.
or
http://software.opensuse.org/package/quick-usb-formatter?search_term=quick-usb-formatt
Install quick-usb-formatter. When you insert usb/flash drive you’ll see a new option:
File Hash Checker
Enable KDE Extra repo from above and install kcheckhash
or
http://software.opensuse.org/package/kcheckhash?search_term=kcheckhash
Add ability to check crc32, md5, sha1 and sha256 and other hashes via right-click in Dolphin (Actions > Show hash).
Dropbox
Dropbox is now available in the OSS and KDE Extra repos.
– – – – –
My Karamba Theme
See: TweakHound’s Karamba Theme
For advanced users only!
-END-
Have You Found This Guide Useful?
Please help me keep helping you!

Got a tip? contact me
