 Windows 8.1 may require user interaction to optimize SSD’s depending on how you’ve installed it.
Windows 8 has always optimized itself for SSD’s. It does so by running the Windows System Assessment Tool (WinSAT for short), detecting you have an SSD, and setting the appropriate parameters for an SSD.
Under Windows 8 you could tell that WinSAT had been run because you had a visible WEI score in your system properties.
With Windows 8.1 the WEI score is no longer displayed and if you have upgraded to Windows 8.1 WinSAT isn’t run.
To optimize Windows 8.1 for an SSD you only need to run WinSAT, reboot, wait a few minutes for it to change the settings (just to be sure), reboot. Done.
(When I say wait a few minutes I mean let it sit idle for at least 5 minutes.)
Windows 8.1 Clean Install
On a clean install I have observed that WinSAT will run by itself eventually. On the same day as install and after installing all drivers / Windows Updates I let my machine sit idle (all power options off). After exactly 1 hour WinSAT ran. When I came back to the machine over an hour after that I rebooted and found that Windows 8.1 had optimized itself for SSD’s.
Whether you installed Windows 8.1 on an SSD or moved Windows 8.1 to an SSD, or upgraded from Windows 8 to 8.1 all that is required is to run wisat.
This tool discovers you have Windows 8 installed on and SSD and adjusts the appropriate system settings (see below).
Most users see the output of this via the Windows Experience Index.
You should run this tool if:
1 – You’ve just installed Windows 8.1 (and you want the system optimized immediately or just want to be sure it is run)
2 – If you’ve moved Windows 8.1 to an SSD
3 – You upgraded from Windows 8 to 8.1
4- You messed with any settings related to “SSD tweaks”
5 – You aren’t sure if your system is optimized for an SSD.
To run WinSat:
Press the Windows + R keys > type winsat formal and click OK
Windows 8.1’s Built-In SSD Tweaks
Defrag
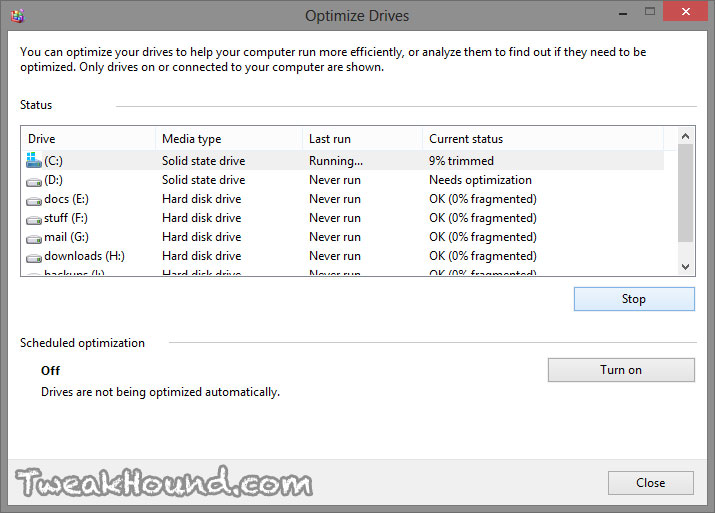
Defrag should be left on. Windows 8 doesn’t defrag SSD’s, it optimizes them (read – runs trim command).
Please see: Windows 8.1 SSD Defrag
Below is the best explanation I could find as of this writing (SOURCE):
Hello, In Windows 7 – we turned off defrag for SSDs as you mention in your entry; but in Windows 8, we have changed the defrag tool to do a general optimization tool that handles different kinds of storage, and in the case of SSD’s it will send ‘trim’ hints for the entire volume;
SSDs are storage devices made of flash memory; flash memory unlike hard disks are block erasable devices – they can be written to at a byte level but need to erased at a block level; Trim is a storage level hint that was introduced in the Windows 7 days to indicate that Windows is not using certain regions of the storage device; NTFS will send these trim hints when files are deleted or moved from those regions; SSDs consume these hints to perform a cleanup in the background called as ‘reclaim’ that helps them get ready for next writes. The SSD may choose to perform the optimization immediately, store the information for later optimization or throw away the hint completely and not use it for optimization since it does not have time to perform this optimization immediately.
In Windows 8, when the Storage Optimizer (the new defrag tool) detects that the volume is mounted on an SSD – it sends a complete set of trim hints for the entire volume again – this is done at idle time and helps to allow for SSDs that were unable to cleanup earlier – a chance to react to these hints and cleanup and optimizer for the best performance. We do not do a traditional defrag (moving files to optimizer there location for space and performance) on SSDs.
Pic: A view of Windows 8 defrag optimizing (running Trim command) on an SSD.
– – – – – – – – – – – – – – – – – – – –
Registry Settings
You can manually change the settings below or download registry file: https://www.dropbox.com/s/9t1cvqhl6fm2ft2/OptimizeWindows81SSD_v2.reg
Superfetch / Prefetch
You settings should be:
1 – Superfetch service should be ENABLED which is the Windows 8 .1 default.
Press the Windows + R keys > type services.msc and click OK > double-click the Superfetch service > set Startup type: to Automatic
2 – The registry settings for PrefetchParameters: EnableSuperfetch, EnablePrefetcher, and EnableBootTrace should look settings should look like this (don’t delete any other keys/values in there):
– – – – – – – If you manually change then use these settings – – – – – – – – –
[HKEY_LOCAL_MACHINE\SYSTEM\CurrentControlSet\Control\Session Manager\Memory Management\PrefetchParameters]
“EnablePrefetcher”=dword:00000003
– – – – – – – What Windows does when it discovers it is installed on an SSD – – – – – – – –
[HKEY_LOCAL_MACHINE\SYSTEM\CurrentControlSet\Control\Session Manager\Memory Management\PrefetchParameters]
“EnablePrefetcher”=dword:00000003
It should be noted that once Windows 8.1 discovers it is installed on a SSD it removes the EnableSuperfetch value entirely.
Leaving the value and setting it to zero amounts to the same thing.
– – – – – – – – – -For Reference – – – – – – – – – – – – – – – –
***Below are the defaults for hard drives, NOT SSD’s
[HKEY_LOCAL_MACHINE\SYSTEM\CurrentControlSet\Control\Session Manager\Memory Management\PrefetchParameters]
“EnableSuperfetch”=dword:00000003
“EnablePrefetcher”=dword:00000003
*NOTE – As of this writing I can’t find a good explanation of the changes in Superfetch in regards to SSD’s. I am sure Mr. Russinovich or someone else at MS will get to it eventually.
(If you can point me towards some official info I would appreciate it)
Until then I offer this from the help section of the Intel SSD Toolbox:
In Microsoft Windows Vist and Windows 7, Superfetch tracks and copies your most frequently used applications to system memory to reduce load times. Superfetch is based on the similar Prefetch feature available in Windows XP. Superfetch/Prefetch is not needed on an Intel SSD under Windows 7 or Windows Vista, and should be disabled for optimal performance.
In Microsoft Windows 8, Superfetch functions differently than in previous versions of Windows, and should not be disabled for an Intel SSD.
– – – – – – – – – – – – – – – – – – – –
ReadyBoot
ReadyBoot is also disabled by running winsat formal. Key:
[HKEY_LOCAL_MACHINE\SYSTEM\CurrentControlSet\Control\WMI\Autologger\ReadyBoot]
“Start”=dword:00000000
Start value changed from 1 to 0
– – – – – – – – – – – – – – – – – – – –
If You Have Moved Windows 8.1 To An SSD
If you initially installed Windows 8 on a hard drive and moved it to an SSD there is an important change to one setting you should be aware of.
The registry key msahci does not apply to Windows 8.
The new key is StorAHCI:
[HKEY_LOCAL_MACHINE\SYSTEM\CurrentControlSet\Services\storahci]
“Start”=dword:00000000
Source: StorAHCI replaces MSAHCI (Windows)
Please see the bottom of this article for full instructions on moving Windows 8 to an SSD..
Optimizing Your SSD In Windows 8.1
“Optimize” is what Microsoft and others call running the trim command.
You can do this manually or schedule it via defrag:
1 – You Windows Search and type defrag > choose defrag on the left side of the screen
or
2 – Press the Windows + R keys and type dfrgui and press OK.
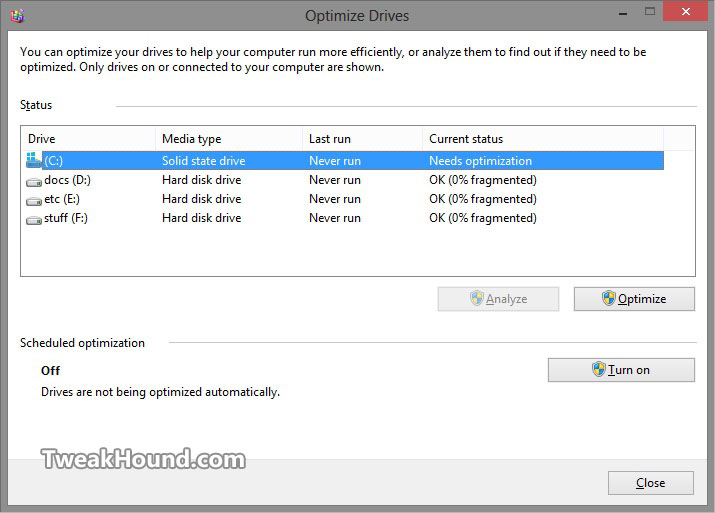
Highlight your SSD > click Optimize > when finished, if schedule is off then click Turn on
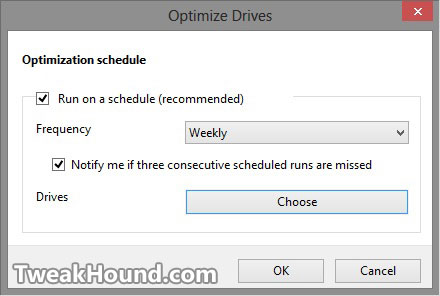
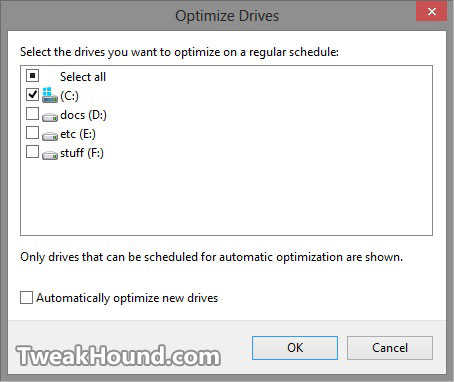
Pick a schedule, and Choose your SSD drive > click OK to exit out of the screens.
Optimizing Your SSD In Windows 8 With Third Party SSD Tools
Several SSD manufacturers have tool to optimize SSD’s. Among these are:
Intel SSD Toolbox
Samsung Magician
Got a link for this section?
*Important note – This tools are NOT required for optimal operation of your SSD.
Samsung Magician Software
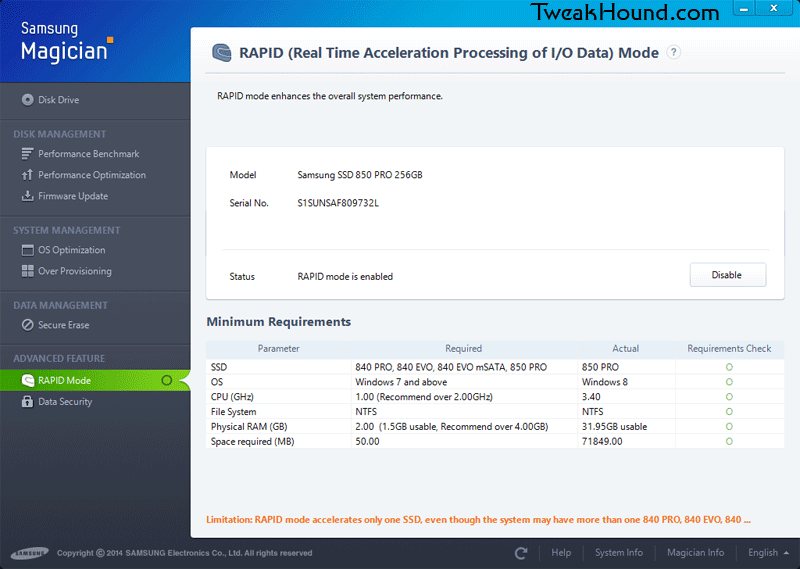
Samsung Magician offers tweaks to various Samsung SSD drives. Among those is Rapid Mode.
See: Samsung Solid State Drive RAPID mode PDF
Under Windows 8.1 Intel says to keep Prefetch/SuperFetch enabled for their SSD’s but Samsung offers a different take:
How does RAPID mode compare to SuperFetch?
Superfetch is an important Windows feature which preloads certain frequently used applications into DRAM to
improve initial program launch. RAPID is different in that it caches both application files as well as frequently used
user data. RAPID also caches both read and write I/O.
Since my drive supports Rapid Mode I have enabled it and disabled SuperFetch.
How To Transfer Windows 8 To New SSD
1 – Keep your configuration as is. Plug in SSD drive (as a spare) and boot up as you normally would.
2 – If possible use a Windows 8 disk to create a new partition on your drive (see: Install Windows 8 – Clean Install With Upgrade Media).
3 – Windows 8 will install correct driver.
I recommend you download and install the latest chipset drivers and/or storage drivers for your system regardless of OS.
Intel recommends you use the Intel RST Drivers for their SSD’s.
Intel RST Drivers can be found here:
http://downloadcenter.intel.com/ see section Solid State Drives and Caching > Intel High Performance Solid State Drive > your SSD model
Intel chipset drivers
4 – Image OS drive
5 – Transfer image to SSD
6 – Start up into your BIOS setup. Check to see if you have an AHCI setting (yes / no ? ). Don’t change anything yet. Exit BIOS setup.
7 – Boot from SSD (windows may install hardware).
8 – If you have an AHCI Change registry setting (Press the Windows + R keys > type regedit > navigate to the key below):
HKEY_LOCAL_MACHINE\SYSTEM\CurrentControlSet\Services\storahci
Change the value for Start to 0.
“Start”=dword:00000000
DO NOT DO THIS IF YOU DON’T HAVE AN AHCI SETTING IN YOUR BIOS.
9 – Reboot
10 – Enable AHCI in BIOS if capable.
Note:
I have confirmed all the information in this article by:
1 – Clean install Windows 8.1 to 2 machines (SSD’s = 1 Intel and 1 Samsung).
2 – Upgrading Windows 8 to Windows 8.1 on 4 machines (SSD’s = 2 Intel, 1 Samsung, 1 Crucial)
-END-
Have You Found This Guide Useful?
Please help me keep helping you!
