Drive & File System Tweaks
Move Your Documents
Vista really hosed things by replacing the My Documents folder.
Moving this info has two benefits:
1 – These files are safe from any OS problems and are unaffected if you need to restore the OS from backup.
2 – Cuts down on disk fragmentation.
In the Classic Start Menu, Click on your User Name icon or In the new menu style click on your User Name.
For each of the folders you want to replace, Copy and Paste them to the desired new location.
(ensure you do not have a folder there by that name)
Next, for each folder you copied,
Right-click on that folder and choose Properties.
Click on the Location pane and then click the Move… button.
Navigate to corresponding folder in the new location
Click Apply, answer Yes in the resulting pop-up (choose Copy and Replace for any other screens).
You can do this for any folder here but I recommend moving:
Contacts
Documents
Downloads
Music
Pictures
Videos
Turn Off Indexing or Configure which drives you want indexed
Warning – One of the touted features of Vista is its Search feature, messing with Indexing will hinder this ability.
I must confess I’ve never understood the fascination with searching or search tools. The better solution is to organize your data from the start.
Once organized you can tell each program where to put files (via preferences). i.e. – All pics go in the Pictures folder, all mp3’s go in the Music folder, etc.
A couple of notes:
1 – Many people have noticed a lot of “disk activity” or “disk thrashing” in Vista. Disabling this will stop SOME of this activity but NOT all. Other Vista services like Prefetch and ReadyBoost account for some of this
2 – Disabling Indexing does not mean you can’t use Windows Search but it does mean searches will take more time.
The fast way to disable all:
Disable the Windows Search service (Start > Run > type services.msc)
Disable Indexing on selected drives:
Click on Computer. Right-click on any drives/partition you do not want Indexed.
In the General pane uncheck Index this drive for faster searching, click Apply,
In the resulting window choose Apply changes to drive X:\, subfolders and files, click OK
Click OK or Continue for any pop-ups, and ignore all for any error messages.
I did this for every drive.
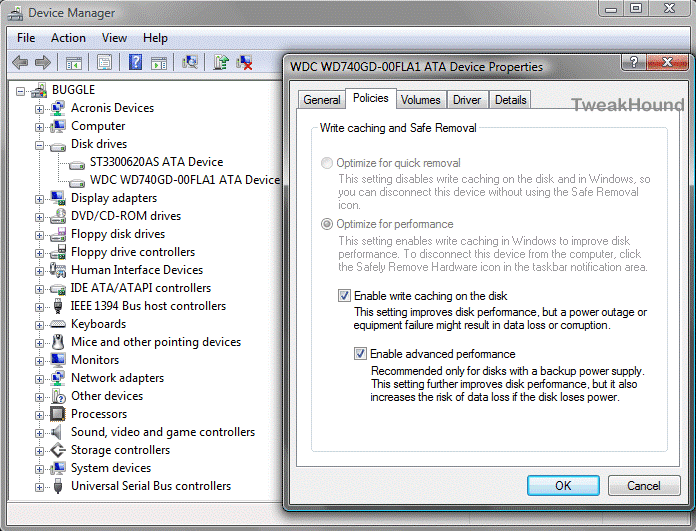
Make Sure Your SATA Drives Are configured For Max Speed
Vista doesn’t always set all the performance options to maximum for your SATA drives.
To set all the options to max, open device manager. Press the Windows + R keys and type devmgmt.msc > expand the Disk drives section by clicking on the plus sign > double-click on the drive you want to configure the click the Policies tab > Check the Optimize for performance button > Check both the Enable write caching on the disk and the Enable advanced performance boxes. See the warnings about power loss? They are there for a reason.

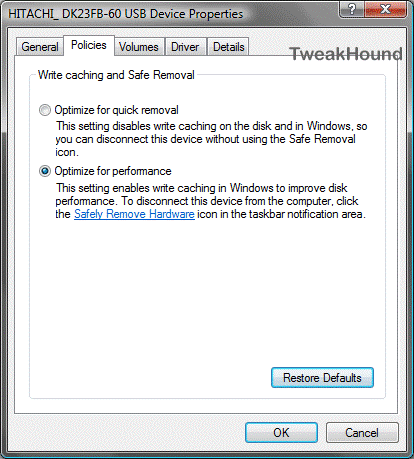
Make Sure Your External Drives Are configured For Max Speed
This tweak isn’t as important unless you are constantly writing/reading to/from an external drive, or, unless you’re a Geek!
Press the Windows + R keys and type devmgmt.msc > expand the Disk drives section by clicking on the plus sign > double-click on the drive you want to configure the click the Policies tab > Check the Optimize for performance button.

Move Print Spool Directory
For most people this tweak works on the machine that the printer is physically attached to.
This tweak is most effective if you move it to a separate drive from your OS, preferably the first partition on that disk or the second partition on that disk if you are using the first for your page file.
from the classic style menu:
Create a new folder on that partition called PrintSpool > now go to START > Printers > click on File at the top left of the window >
scroll down and click Server Properties > click on the Advanced tab >
type the COMPLETE path to the PrintSpool folder you just created (i.e. – D:\\PrintSpool)
from the default style menu:
Create a new folder on that partition called PrintSpool > now go to START > Control Panel > Printers > click on File at the top left of the window >
scroll down and click Server Properties > click on the Advanced tab >
type the COMPLETE path to the PrintSpool folder you just created (i.e. – D:\\PrintSpool)
Regedit Only Tweaks
To access the registry: Press the Windows + R keys > in the resulting windows type regedit and then click OK.
To navigate to or within a specific key you simply click the arrows next to it. If there is no arrow then click on the name of the key itself.
More info on the registry can be found here.
I’ve put these all in a text file for you below. It is called tweakhound_vista_other.txt. To make it a registry file simply rename it to a file with a .reg extension.
i.e. tweakhound_vista_other.reg.
Right-click on this link an click “save link as” or “save target as”. Link = tweakhound_vista_other.txt
; NTFS, Disable 8.3 names and Last Access (speeds up disk access)
[HKEY_LOCAL_MACHINE\SYSTEM\CurrentControlSet\Control\FileSystem]
“NtfsDisable8dot3NameCreation”=dword:00000001
“NtfsDisableLastAccessUpdate”=dword:00000001
; Specifies the time, following user input, during which the system keeps apps from moving into the foreground.
[HKEY_CURRENT_USER\Control Panel\Desktop]
“ForegroundLockTimeout”=dword:00000000
; Faster Shutdown, may cause an error at shutdown with misbehaving apps (ZoneAlarm 7 is one)
[HKEY_LOCAL_MACHINE\SYSTEM\CurrentControlSet\Control]
“WaitToKillServiceTimeout”=”5000”
; Disable Low disk space checks
[HKEY_CURRENT_USER\Software\Microsoft\Windows\CurrentVersion\Policies\Explorer]
“NoLowDiskSpaceChecks”=dword:00000001
; Disable Ballon Tips
[HKEY_CURRENT_USER\Software\Microsoft\Windows\CurrentVersion\Explorer\Advanced]
“EnableBalloonTips”=dword:00000000
“StartButtonBalloonTip”=dword:00000000
“FolderContentsInfoTip”=dword:00000000
