• Skip to primary navigation
  • Skip to main content
  • Skip to primary sidebar

TweakHound

Computer stuff...

  • Home
  • Windows XP
  • Windows Vista
  • Windows 7
  • Windows 8
  • Windows 10
  • Linux
  • Tweak Guides
  • Site Info
    • About
    • About Me
    • TweakHound’s World
    • Contact
    • My Computers
    • Old Articles
    • Privacy Policy
    • Old Index
    • Advanced Search

Ditch Those CD’s! A Guide To Using USB Flash Drives

July 26, 2011, 15:16(EDT) By Eric (a.k.a. TweakHound)

Page 3 – Install Windows XP From A USB Flash Drive

Though there are many ways to do this, this is the way I do it.

This involves more than just making a bootable install USB flash drive because I add SP3 and drivers (for post SP3 hardware) to the image.

1 – Though the program in the next step will do it, I manually add SP3.
– Copy files from the XP CD to a folder called XP.
– Download and extract SP3 to a folder called sp3. (I use 7-Zip for this)
– Open a command prompt window in or navigate to the sp3\i386\update folder.
tip from a reader: “You can also get “Open command window here” in the right-click context menu by holding down the shift-key while right-clicking a folder.”
– In the command window enter update.exe /integrate:X:\xp ( change X to the location of the XP folder you created above ).
A window will pop up showing the files being integrated followed by a “success” screen. For more info on this see here.

2 – Create a folder with XP SP3 + Drivers + Extras
– We are going to use a program called nLite for this. You can add drivers you download yourself, or driver packs, or system update packs to the files.

Start nLite and click Next.

nlite1

Browse to the folder called XP you created earlier and click Next.

nlite2

Click on each section you wish to you and it will be added to be process.
You don’t need to do Service Pack because we already did it. Do not choose Bootable ISO.
Click Next when ready.

nlite3

I added an Update Pack.

nlite4

Here I added chipset and ethernet drivers.

nlite5

I removed a few things.

nlite6

Choose any options you which to change.

nlite7

Did someone say tweaks?!

nlite8

Yes! This may take a while.

nlite9

Click Next and you are done.

nlite10

3 – Now we will create a bootable Windows XP install flash drive.
– We are going to use a program called Win2Flash for this (free but adware).
Run WinToFlash and click the green check mark to start the Wizard.

w2f1

Click Next.

w2f2

Enter the path to the XP folder you created earlier and then the path to your USB drive.
Click Next.

w2f3

Done! Click Next.

w2f4

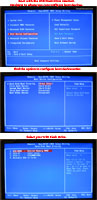
Your USB flash drive should look something like this.

w2f5

Pages: Page 1 Page 2 Page 3 Page 4 Page 5 Page 6 Page 7

Primary Sidebar

Popular Posts

Tweaking Windows 10

Software I Use – 2021 Edition

Timer Tweaks Benchmarked

Win10 – Get Auto-Login Back

Recent Posts

  • Wise Disk Cleaner 11.2.4
  • Patch Tuesday
  • Patch Tuesday
  • Monday News
  • BleachBit 5.0.0
  • Saturday News
  • Patch Tuesday
  • Weekend News
  • New Graphics Drivers
  • RIP Woody Leonhard
buywin10th2

Tags

  • Android
  • Backup
  • Beer
  • Computer Hardware
  • Computer News
  • Cool Tools
  • Freeware
  • How-To's
  • Linux
  • Off Topic
  • openSUSE
  • Playlists
  • Privacy
  • Security
  • Software
  • This Site
  • vacation
  • Veterans
  • Windows 10
  • Windows 11
  • Windows 7
  • Windows 8
  • Windows Vista
  • Windows XP

Catagories

  • Android
  • Backup
  • Beer
  • Computer Hardware
  • Computer News
  • Cool Tools
  • Freeware
  • Freeware Machines
  • How-To's
  • Linux
  • News From The Web
  • Off Topic
  • openSUSE
  • Privacy
  • Security
  • Software
  • Tweak Guides
  • Veterans
  • Windows
  • Windows 10
  • Windows 11
  • Windows 7
  • Windows 8
  • Windows Vista
  • Windows XP

TweakHound - Optimize Your Computing Experience! TweakHound - Optimize Your Computing Experience!

Copyright 2002-2025 by Eric Vaughan All material contain here is the property of the materials owner. Windows, Windows XP, Windows Vista, Windows Seven, Windows 8, Windows 10, Windows 11, Microsoft, and all associated logos are trademarks/property of Microsoft. You may not use or copy any material from tweakhound.com without expressed written permission. Hotlinking to any material within this site is forbidden. Privacy Policy